Warning: do not use a blowtorch
Does your Mac freeze when booting up? Do apps become unresponsive when the spinning beachball or pinwheel icon appears on the screen? Here are nine potential ways to unfreeze your Mac computer when these situations happen.

1. Wait It Out
Your Mac may freeze if an app is running a resource-intensive process. For instance, some video-editing apps may cause your Mac to freeze when rendering or exporting videos. Depending on your Mac’s RAM configuration, you may be unable to use your device until the process is complete.
Some gaming apps, malware removal tools, and system-cleaning software may also freeze your Mac temporarily. While these apps perform heavy tasks, your cursor will change to a spinning beachball.
When this happens, we recommend waiting for 5-10 minutes before running other complex troubleshooting steps below.
2. Force Quit Freezing Apps
As mentioned above, macOS will freeze up at intervals if it’s low on memory. If an app doesn’t come back to life after waiting for minutes, force-quitting the unresponsive app is the next best thing to do.
Running too many resource-intensive apps or buggy software also can freeze macOS for a prolonged period. Force-close all active apps one after another and check which one unfreezes your Mac. We advise that you first force-close apps you’re no longer using to free up some memory.
Otherwise, force-quit all active applications if you can’t pinpoint the problem to a specific app. If you can, save all ongoing works in the application, so you don’t lose unsaved data.
Force Close Apps from the Apple Menu
- Press the Apple logo in the top-left corner of the menu bar and select Force Quit. Better yet, press and hold down Command + Option + Esc.
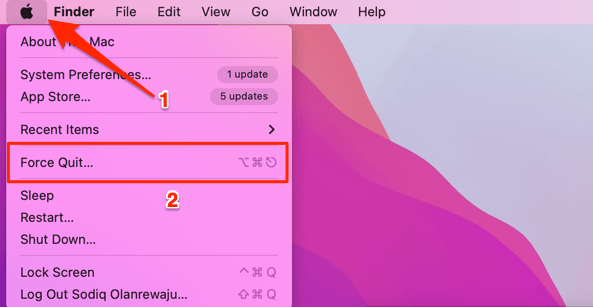
Press Command + Alt + Esc if your Mac keyboard doesn’t have the Option key.
- Select the app that’s freezing and select Force Quit.
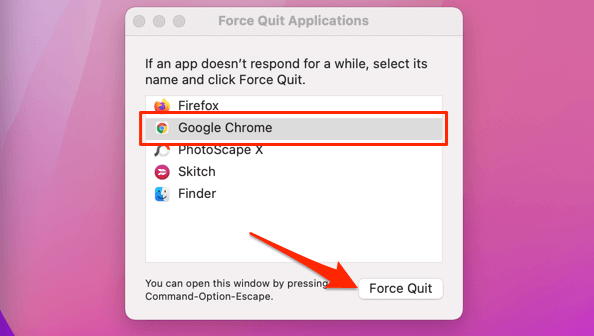
- Select Force Quit again on the confirmation prompt.
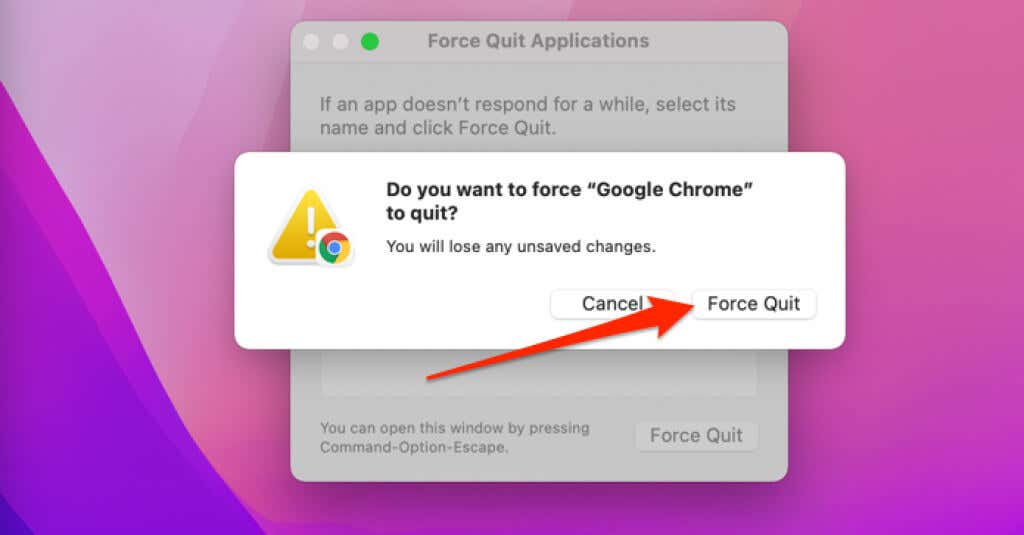
- To force-quit all active applications, press Command + A to select the apps and select Force Quit.

- Select Force Quit on the confirmation prompt to proceed.

Force Close Apps from the Dock
Right-click the app you want to force-close, hold the Option key, and select Force Quit.

Force Close Apps from the Activity Monitor
Activity Monitor provides a more detailed breakdown of foreground and background apps consuming your Mac’s system resources. Open the Activity Monitor and close usual or inactive apps consuming excessive memory.
- Go to Finder > Applications > Utilities and double-click Activity Monitor.

Alternatively, open Spotlight search (Command + Spacebar), type activity monitor in the search bar, and select Activity Monitor.

- Head to the Memory tab and identify any unneeded app with high memory usage. Select the app and tap the x icon on the toolbar.

- Select Force Quit.

Be careful not to close core background processes that are crucial to the proper functioning of your Mac. Force-quitting WindowServer, for instance, will close all applications and sign out of your Mac.
If you’re unsure about an app or what it does, tap the Info icon on the toolbar to view more details about the app, its processes, and resource usage.

3. Reboot Your Mac
If your Mac keeps freezing up even when you aren’t running any app, rebooting macOS may fix the problem.
Select the Apple logo on the Apple menu and select Restart on the Apple menu.
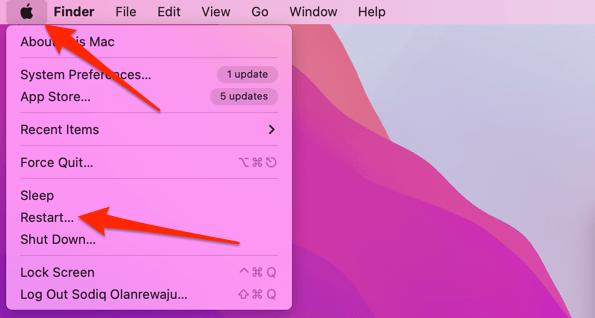
If you can’t restart your Mac from the Apple menu, perhaps because it’s completely frozen, forcefully shut down macOS using the Power button.
Disconnect or unplug all external devices, peripherals, and accessories (including your Mac’s charger). Press and hold the Power button for about 10 seconds until your Mac shuts down. Wait another minute or two and press the Power button to restart your Mac.
4. Boot Mac in Safe Mode
Running macOS in Safe Mode can help you diagnose problems caused by third-party applications, extensions, startup programs, and user-installed fonts. How you boot into Safe Mode will depend on the CPU configuration of your Mac.
Safe Boot Intel-Based Macs
- Press and hold the Power button until macOS shuts down.
- Wait for about a minute or two and press the Power button to restart your Mac. Press and hold the Shift key immediately, and your Mac’s screen lights up.
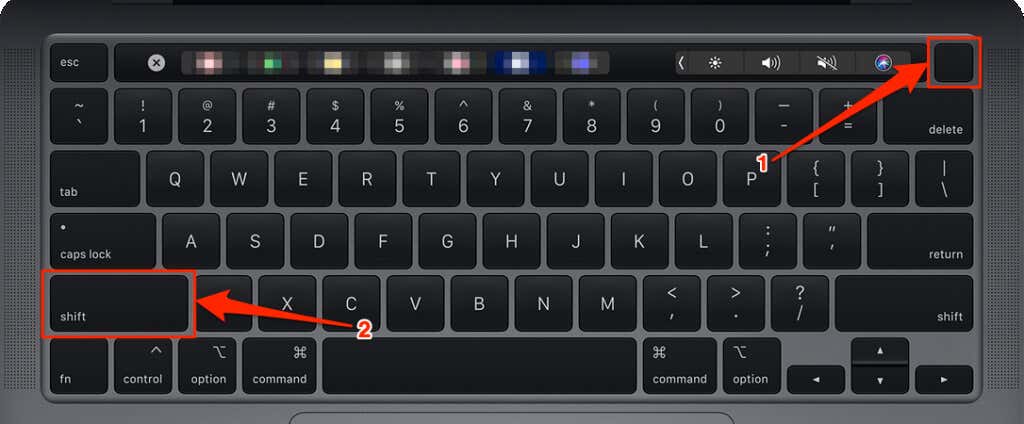
- Hold the Shift key until your Mac displays the login screen—this could take up to 30 seconds.
You should see a “Safe Boot” inscription in the top-right section of the menu bar. Otherwise, shut down your Mac and re-try the steps.
Safe Boot Apple Silicon-Based Macs
- Press and hold the Power button to force a shutdown of your Mac and wait for 1-2 minutes.
- Press and hold the Power button until the startup options page shows up on the screen.
- Select your startup disk (Macintosh HD or whatever disk your macOS is installed). Press and hold the Shift key immediately.
- Select Continue in Safe Mode and wait for your Mac to load the login screen.
- Enter your Mac’s password to proceed.
5. Delete Recently-Installed Apps or Extensions
If your Mac performs smoothly in Safe Mode, a recently installed application, extension, or font is likely the reason why it was freezing earlier.

Restart your Mac normally to boot out of Safe Mode, locate the latest apps installed before your Mac started freezing, and uninstall them. Refer to our tutorial on uninstalling apps on Mac for more details.
6. Disable Login Items
Does your Mac hang for seconds or minutes after logging in to your Mac? Chances are, the freezing issue is caused by excessive Login Items. Login Items are apps or extensions that run automatically when you first sign in to your Mac.
Temporarily Disable Login Items in macOS
If your Mac won’t load into the desktop page when you sign in, force shutdown your Mac and temporarily disable Login Items before signing in.
On the login screen, enter your device’s password, and hold down the Shift key as you select the Login button or press Return.
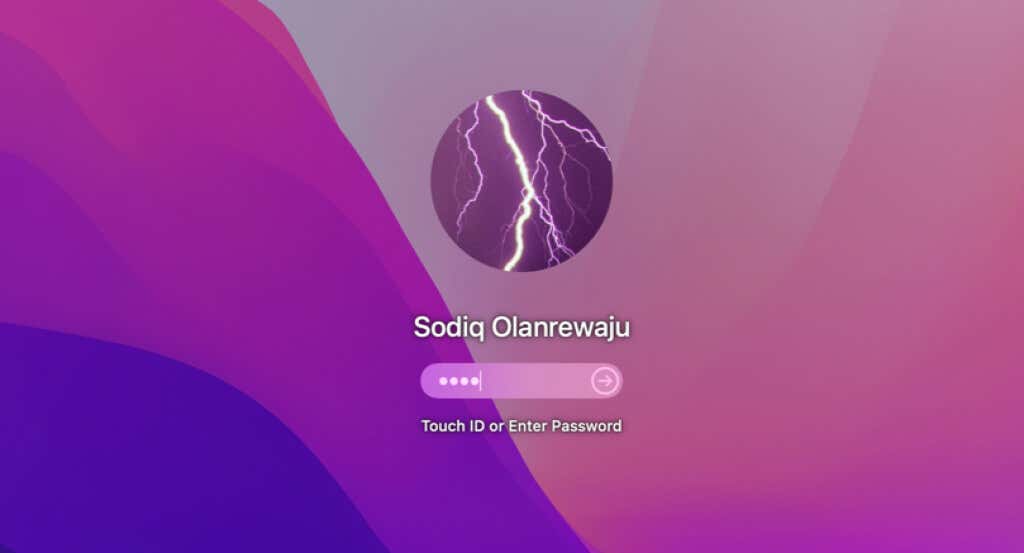
That will temporarily disable all login applications as you log in to your Mac.
Permanently Disable Login Items in macOS
Head to your Mac’s settings and disable apps that don’t necessarily need to start alongside macOS. You may need to Safe Boot your Mac if macOS freezes on startup.
- Open System Preferences and select Users & Groups.

- Select your profile in the sidebar, head to the Login Items tab, and select the lock icon in the bottom-left corner.

- Enter your Mac’s password to access the Users & Groups preferences menu. You can also authenticate access to the page with your fingerprint if you use a MacBook Pro with Touch ID.
- Select the item you want to remove from the Login Items box and select the minus icon.

7. Check for Malware & Viruses
Your Mac may malfunction if infected with viruses, trojans, and other forms of malware. If there’s antivirus software on your Mac, run a complete system scan to eliminate hidden and stubborn malware.
8. Install macOS Updates
Updating your Mac’s operating system can remove malware and fix bugs responsible for infrequent system freezes and other performance issues.
Open System Preferences, select Software Update, and update macOS to the latest version.
9. Check for Disk Errors
Hard disk corruption and errors can slow down your Mac and cause it to freeze or crash regularly. If your Mac can boot into macOS, follow the steps below to diagnose and repair hard drive errors using Disk Utility.
- Go to Finder > Applications > Utilities and open Disk Utility.

- Select the Macintosh HD – Data disk at the bottom of the Internal drives in the sidebar. Afterward, select First Aid on the toolbar.

If you can’t find the “Macintosh HD – Data” disk in the sidebar, select the View at the top of the Disk Utility window and select Show All Devices.

- Select Run.

- Select Continue to proceed. You may be unable to use your Mac while Disk Utility runs the First Aid repair on the disk.

- Select Done when the First Aid operation is successful.

If your MacBook or iMac doesn’t boot into macOS, run the First Aid repair from macOS Recovery instead.
Thaw Your Frozen Mac
If the problem persists, free up your Mac’s hard drive space and reset its Non-Volatile RAM (NVRAM) and System Management Controller (SMC). Refer to our tutorial on resetting a Mac’s NVRAM & SMC for instruction. Contact Apple Support or visit a nearby Apple Store to check your Mac for hardware failures or damages.


