Take a snapshot and restore it to a new drive
When you decide to back up your Mac, it’s important to choose the right way to do it. While using Time Machine is a great option, sometimes it helps to consider all your options.
For example, if you’re looking to replace your MacBook’s hard drive, consider creating a disk image of your hard drive and storing it on an external drive. You can do it by using Disk Utility.

Creating a backup of your Mac will allow you to make an exact copy of your current hard drive and restore all of the information when you get a new drive installed. Having a backup copy of your startup disk also removes the risk of losing your data while performing system updates.
Prepare to Backup Your Mac
Before you begin backing up your Mac, there are a few things you need to keep in mind.
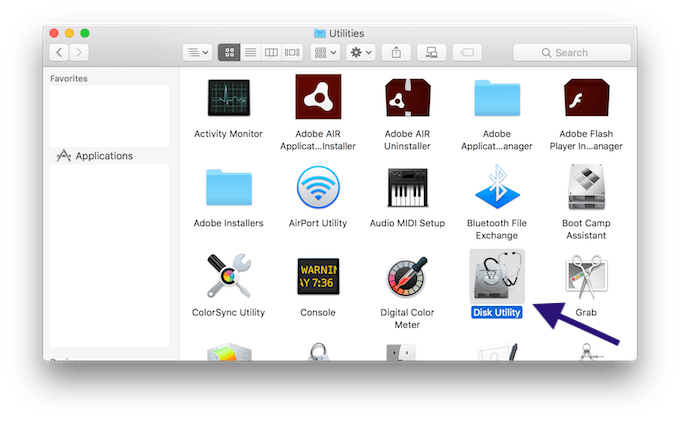
- Disk Utility is free and included with macOS. You can find it in Applications > Utilities.
- Before you start the Mac backup, make sure you have an internal or external hard drive ready. It needs to be large enough to store the data you have on your current startup disk and that it doesn’t have anything you want to keep on it. The backup process will erase the receiving drive.
- The destination drive also needs to be properly formatted. Especially if you’re using an external hard drive or an external SSD to back up your data, as most of them don’t come pre-formatted for Macs.
- Check the destination drive for errors before you begin the process.
- Finally, the whole process will take anything between half an hour and several hours, depending on the data you’re backing up. So make sure your computer is plugged in and you won’t need to use it in the next couple of hours.
Verify the Destination Drive Using Disk Utility
If your destination drive has any errors, it might cause issues with your backup, and you won’t have a reliable copy of your startup drive.
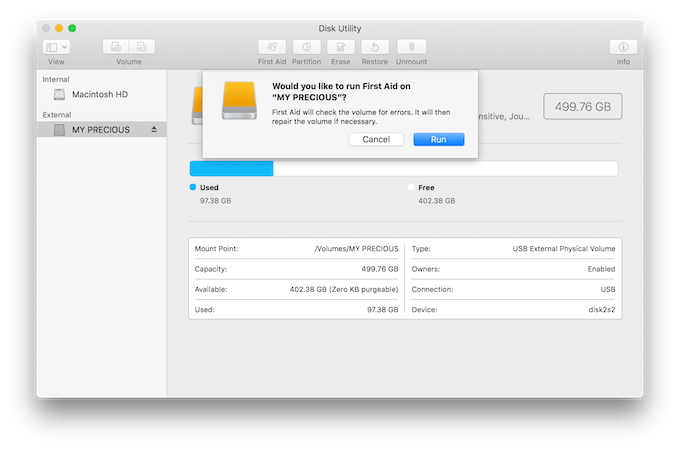
We recommend using Disk Utility to verify the destination drive before you start the backup process. To do that, follow these steps:
- Open Disk Utility.
- From the device list, select the destination drive.
- Click First Aid at the top of the app. Then choose Run.
This will start the verification process which shouldn’t take longer than a few minutes.
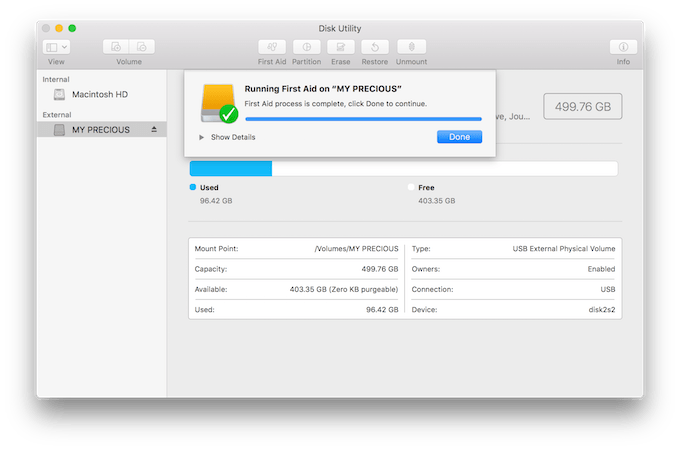
If Disk Utility shows verification errors, you’ll need to repair the disk before moving on. To do that, click the First Aid button in Disk Utility again to repair the disk. If you get a confirmation message in the end, you’re good to go.
On the contrary, if there are still errors listed after you’ve repaired the disk, you’ll need to repeat the whole process until the disk is fully repaired and you get the Disk Utility confirmation message.
Start The Mac Backup Process
Now that your destination drive is ready, you may begin the cloning process and create a copy of your startup disk. To do that, follow these steps:
- In Disk Utility, select your startup disk.
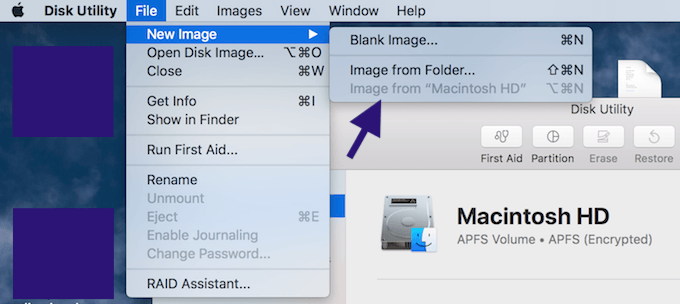
- From the Disk Utility menu, choose File > New Image > Image from “name of your drive”.
What to Do if The Option to Create an Image is Greyed Out
Sometimes the option to create an image from the current disk will be greyed out. That happens because some macOS versions have a rather complex file system arrangements. Disk Utility will sometimes only show you volumes and not all available devices.
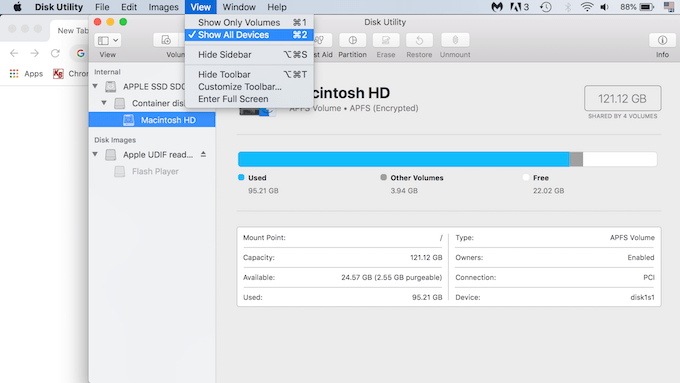
In order to fix that, open the View menu in Disk Utility and choose Show All Devices. You will then see a different file structure. To create an image of your internal disk, you’ll need to choose it under “Internal” and then repeat the process FIle > New Image > Image from “name of your disk”.
- Before starting the backup, you can change its name. If you’re only using that disk for backup purposes, we recommend choosing something like Mac Backup to help you remember it in the future.
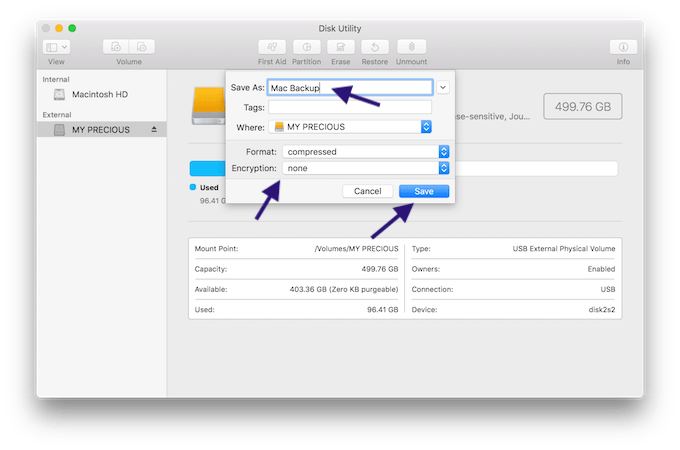
- Select your destination drive.
- For general use, choose the default options: “compressed” under Format and “none” under Encryption.
- Click Save. This will start the backup.
Disk Utility will require some time to create the backup of your Mac depending on the amount of data you have on your startup disk. Once it’s finished, Disk Utility will notify you. Then you’ll have a complete copy of your hard drive which you can use to restore your data later on.
Use Boot Manager To Check Your Copy
One extra precaution that you can take is checking your backup to see if it works as your startup disk. After your Mac backup is complete, you’ll need to restart your computer and see if it can boot from the backup copy. You can do it using the Mac’s Boot Manager.
- Shut down all applications.
- Click on the Apple menu and choose Restart.
- When your screen turns black, hold down the Option key until your screen turns gray and you see icons of bootable hard drives.
- Choose the backup copy you just created.
Your Mac will now boot from the backup you just made. To return to your startup disk, you’ll need to restart your computer once again.
If you don’t want to lose your data, taking a backup of your Mac should become a habit for you. If you can’t remember when was the last time you’ve made a copy of your files, it’s safe to say it’s time to do it again.
There are many different ways to backup your iOS and macOS devices. You can choose the one that suits your needs best, or even better – use different methods for different types of data. Aside from Disk Utility, try using iCloud for backing up your photos, and Time Machine for creating copies of larger files.


