Introduced in 2010 as a way to locate your lost or stolen Apple devices, Find My iPhone is one of the most essential security measures available to Apple users to keep their devices safe. It gives you the power to track, wipe, or remotely lock all of your Apple kit, including any iPhones, iPads, and Macs attached to your Apple ID.
There are occasions where you might want to turn off Find My iPhone, however. You’ll need to turn it off if you’re selling your iPhone, or if you’re worried about being tracked by somebody with your Apple ID information. If you want to know how to turn off Find My iPhone, you’ll need to follow these steps.

Disabling Find My iPhone On iPhone Or iPad
As we’ve mentioned, disabling the Find My iPhone feature is important if you want to sell your device, switch to another Apple ID, or if your account has been compromised. It’s possible to do this on any iPhone or iPad device you own, as long as the devices share the same Apple ID.
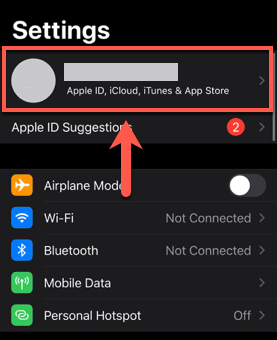
- To turn off Find My iPhone on an iPad or iPhone, open the Settings menu for your device. In the Settings menu, tap your name at the top of the menu. For older iOS devices, you’ll need to tap iCloud instead.
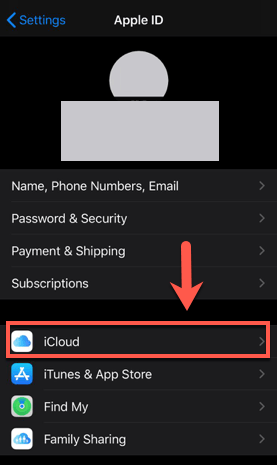
- In the Account Settings menu, tap iCloud. Older iOS devices can skip this step.
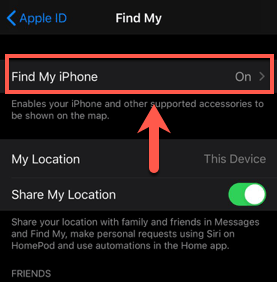
- In the iCloud menu, tap the Find My iPhone option (named Find My iPad/iPod on other devices) to enter the menu to begin disabling it. For older iOS devices, you can simply tap the slider next to the Find My iPhone option in the iCloud menu to disable the feature.
- Tap the slider next to the Find My iPhone option to disable it in the Find My iPhone menu. You’ll need to confirm your Apple ID username and password to do this. Older iOS devices can skip this step.
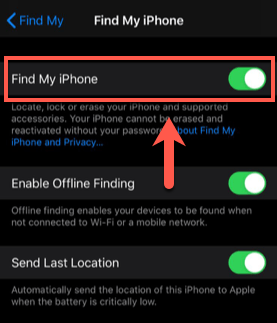
This will turn off Find My iPhone while leaving your device signed in to your Apple ID. If you want to enable Find My iPhone at a later date, tap the slider next to the Find My iPhone option to re-enable it.
Disabling Find My iPhone on Mac
If you have a Mac, you’ll be able to turn off the Find My feature for any devices signed in using the same Apple ID. That includes your Mac, as well as iPhones, iPads, and more.
You can disable the Find My feature for Mac while leaving your Apple ID signed in. For other devices, you can use your Mac to remove your Apple ID from the device. This will remove the Find My feature, but it will sign you out of your Apple ID in the process.
- To do this, open the System Preferences app. You can do this by clicking the icon on the Dock, or by pressing the Apple menu > System Preferences.
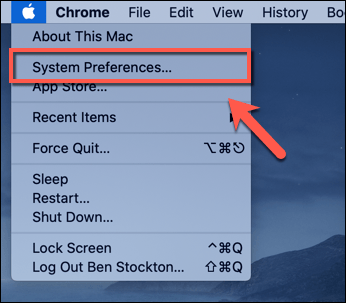
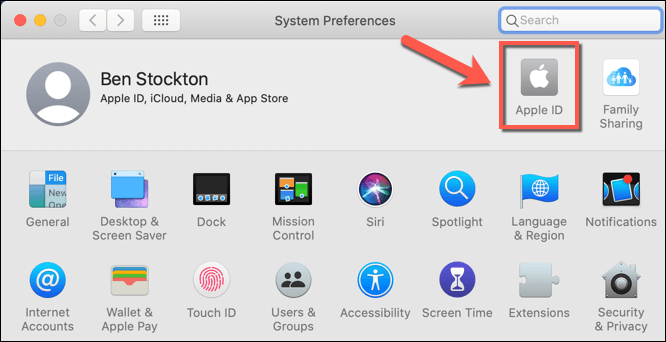
- In the System Preferences menu, click the Apple ID icon.
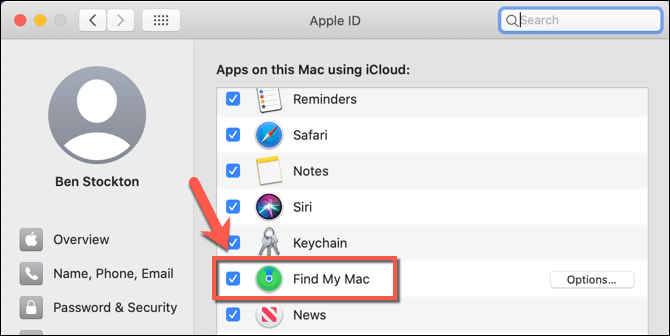
- If you want to disable the Find My feature for your Mac, press iCloud, then tap to uncheck the Find My Mac checkbox. You’ll need to confirm this by providing the password for your Apple ID.
- For other devices (such as your iPhone), you’ll need to select your Apple device in the list on the left-hand side. Clicking this will bring up the available options for that device. To remove it from your account (thus disabling Find My tracking—as well as removing your settings and information), tap the Remove from Account button at the bottom of the screen.
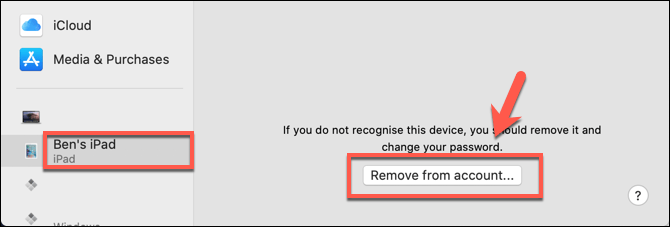
If you disable the Find My feature for your Mac, you’ll be able to return to this menu in the future to enable it. For other devices, removing your Apple ID in this way will disable the Find My feature, but also wipe your device in the process, so be sure to backup your iPhone or iPad before you proceed.
How To Turn Off Find My iPhone Using iCloud
It’s possible to turn off Find My iPhone on other devices, such as Android or Windows PCs, using the iCloud website. Unfortunately, you’ll need to wipe the device to be able to do this remotely—the iCloud website doesn’t allow you to simply switch off the system as a security precaution, as it could leave your device and data compromised.
This makes this option a last-ditch option that may only be useful in certain situations. You may wish to do this if you’ve sold your device, but you’ve forgotten to remove it from your account first.
- To do this, head to the iCloud website using your web browser. You’ll need to tap the Find My iPhone icon on the main screen to proceed.
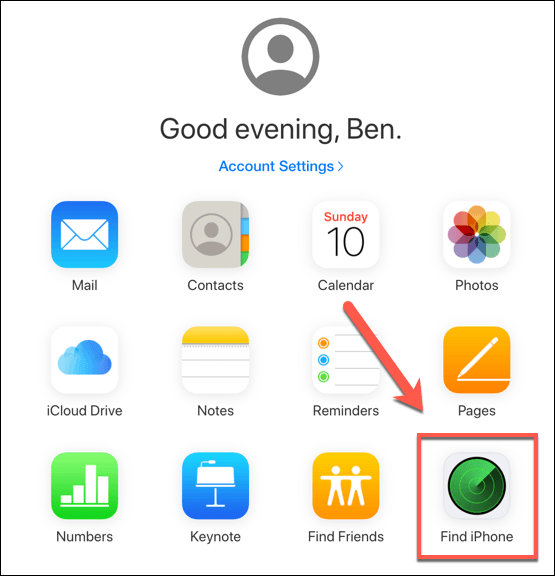
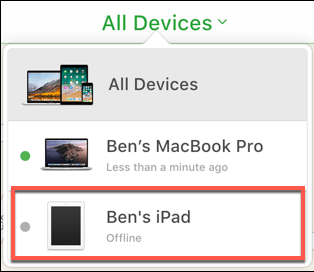
- At the top of the Find My iPhone page, tap All Devices, then select the device you wish to remove.
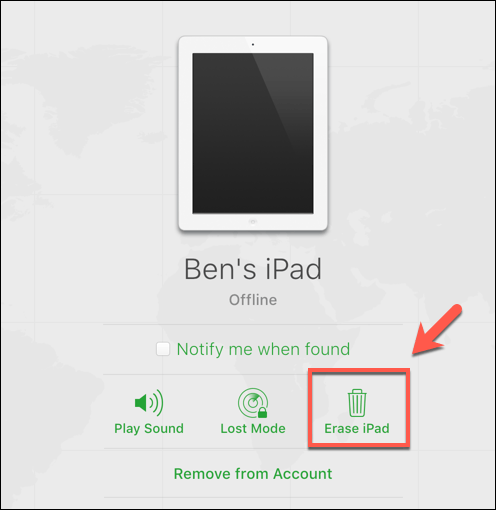
- Press the Erase button to wipe your settings and files from the device first. This should remove all of your data, but it will leave the device attached to your Apple ID. You’ll need to tap Erase at the next stage to confirm.
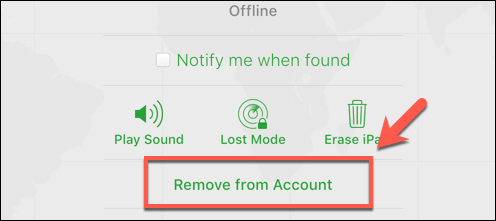
- Once the device is erased, press Remove from Account button to fully remove the device from your account. This will disable the Find My feature and remove any link the device has to your account. Tap Remove again to confirm.
Turning Off Find My iPhone Without Credentials
If you don’t have the Apple ID login details for a device that has the Find My feature activated, you can’t disable it. This is part of the overall security measures that Apple has put into place to stop stolen Apple devices from being wiped and repurposed without the owner’s consent.
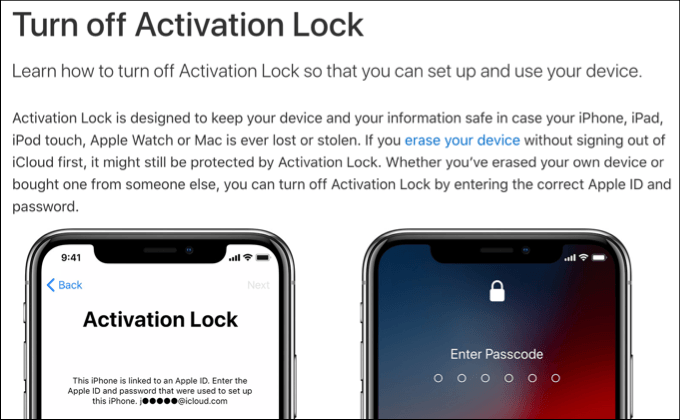
If an Apple device is wiped, but it hasn’t been removed from an Apple account first, the activation lock will remain in place. There’s no workaround for this—you’ll either need to replace the device or look to restore access to your Apple ID by resetting the password or by contacting Apple directly.
Once you have access to the account, you can then disable the Find My feature or remove your Apple ID from the device entirely.
Securing Your Apple Devices
Knowing how to turn off Find My iPhone is essential if you’re looking to sell your iPhone or if you’re switching Apple IDs. Using it provides you with another layer of security against theft, but if you’re worried about losing access, don’t forget to turn on two-factor authentication for iCloud to keep your Apple ID secure.
If you’ve got a Mac, you can also enable Activation Lock as another layer of theft protection to stop anybody else from using your Mac, even if they’re able to wipe it first. Let us know your own Apple security tips in the comments below.