To significantly upgrade your listening experience
Your AirPods Pro aren’t just wireless earbuds—they’re intuitive audio companions that let you stay in control through simple presses and gestures. With built-in sensors, you can switch between Noise Control modes, adjust the volume, take phone calls, and more without ever reaching for your iPhone.
In this tutorial, we’ll walk you through everything you need to know about using the controls and gestures of your AirPods Pro, so you can fully enjoy their hands-free convenience and superior sound quality.
How to Use the Force Sensors on Your AirPods Pro
The AirPods Pro lacks physical buttons but include force sensors on both the left and right earbuds. These sensors can be activated by squeezing the indented portion neither AirPod stem with your thumb and index finger. You can use single, double, and triple-press gestures to interact with playback controls and activate features like Active Noise Cancellation and Siri.
On the second-generation AirPods Pro, the force sensors are also touch-sensitive. You can swipe them to increase and decrease the volume during audio playback.
Cycle Between Noise Controls Modes on Your AirPods Pro
The AirPods Pro offers three noise control modes: ANC (Active Noise Cancellation), Transparency, and Off. ANC cancels out surrounding noise, while Transparency amplifies ambient sounds. Off lets you use the AirPods as regular earbuds.
Briefly press and hold the force sensor on either AirPod once to switch from ANC to Transparency and vice-versa. This is the default behavior, and you can change what Noise Control modes your AirPods Pro transition between when you do that.
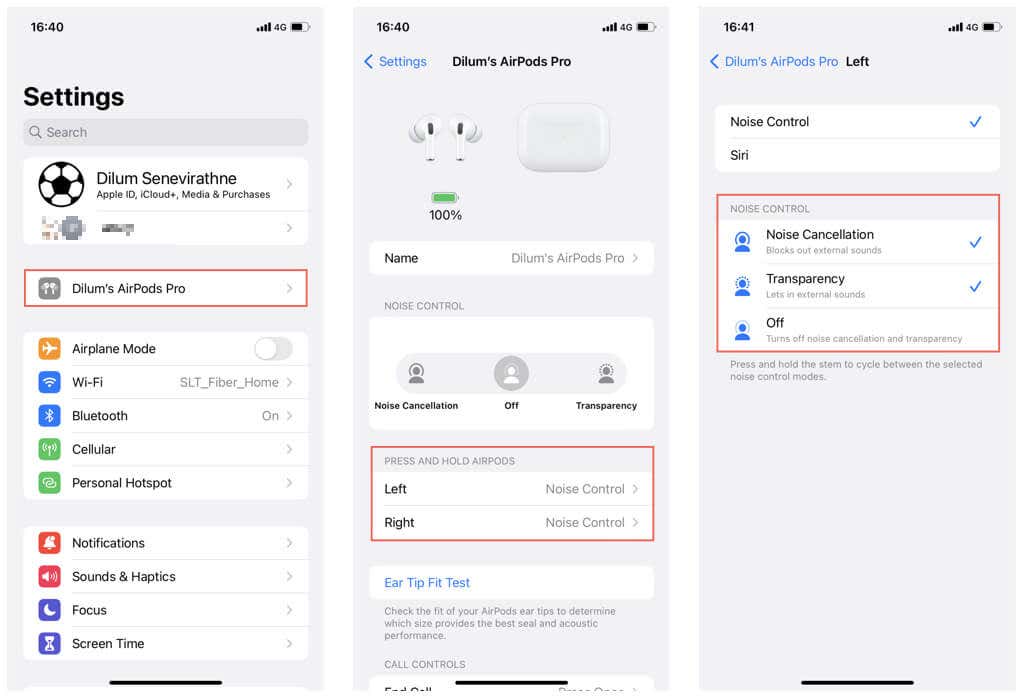
To customize Noise Control, open the Settings app, tap your AirPods Pro, and tap Left or Right under the Press and Hold AirPods section. Pick the Noise Control modes you want to cycle through on the following screen. You can bind different Noise Control modes for the left and right AirPods.
Control Audio Playback on Your AirPods Pro
Noise Control aside, your AirPods Pro’s force and touch sensors double up as playback controls while playing music, videos, and podcasts.
Play/Pause Audio
Press the force sensor on the left or right AirPod once to pause the audio. Press again to resume playback.
Skip to the Next Track
Double-press the force sensor to skip to the next song on a playlist. The same gesture on a podcast, audiobook, or video skips the track forward by 30 seconds.
Skip to the Previous Track
Triple-press the force sensor to play the previous song on a playlist. The same gesture on a podcast, audiobook, or video rewinds the track by 15 seconds.
Increase or Decrease Volume (AirPods Pro 2 Only)
Swipe the touch-sensitive force sensor on the left or right AirPod up to increase the volume and down to decrease the volume.
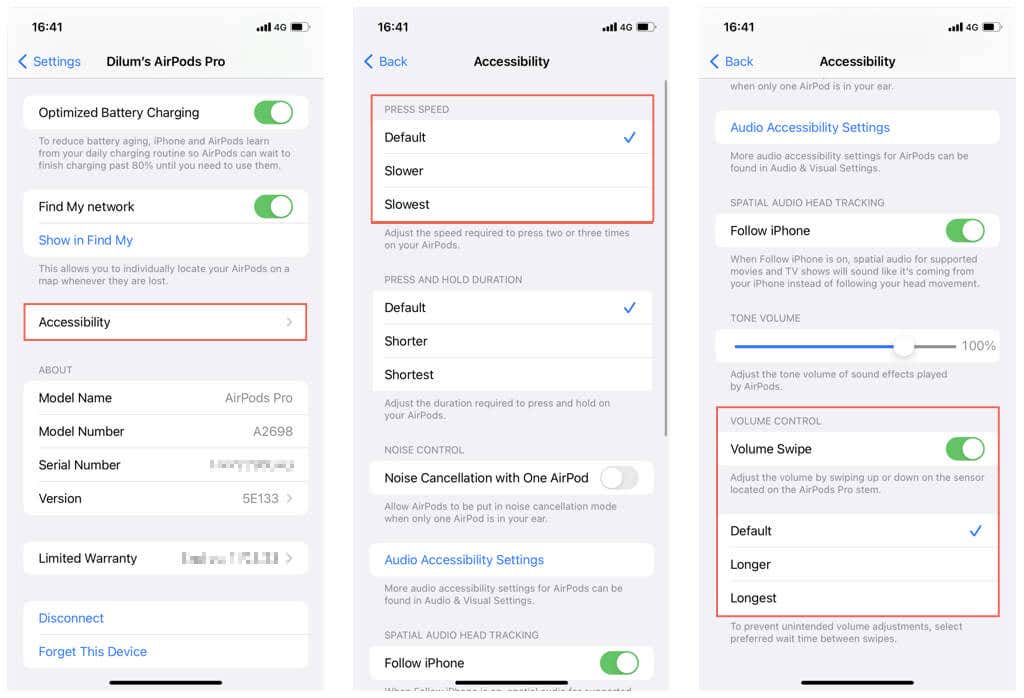
If you have trouble registering double-press and triple-press gestures, you can slow down how quickly you need to press the sensor. To increase the delay between presses, go to your AirPods Pro settings, scroll down, and tap Accessibility. Then, under Press Speed, switch to the Slower or Slowest setting.
Additionally, scroll down to Volume Control and select Longer or Longest if you prefer longer swipes to adjust the volume on the AirPods Pro 2.
Answer Phone Calls With Your AirPods Pro
The AirPods Pro lets you conveniently pick up and end phone calls. Press the force sensor on the left or right AirPod once to answer an incoming call, and press it again to end the call.
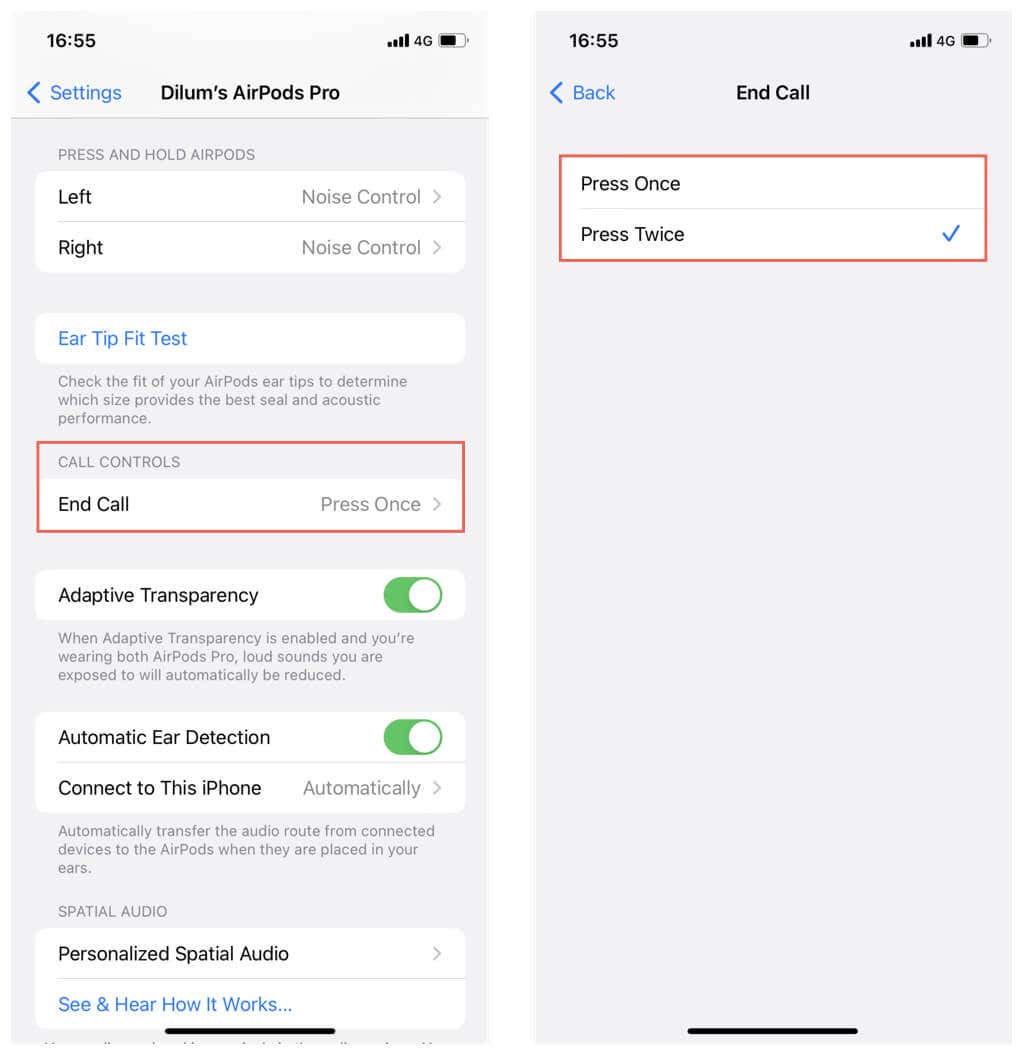
To avoid ending calls by accident, bind the action as a double-press gesture—go to your AirPods settings, tap End Call, and activate the Press Twice option.
To decline a phone call without answering, squeeze the force sensor twice.
Activate Siri via Your AirPods Pro
Assuming you’ve set up and configured Siri on your iPhone, your AirPods Pro microphone will pick the “Hey Siri” command and activate Apple’s voice assistant whenever you speak it aloud.
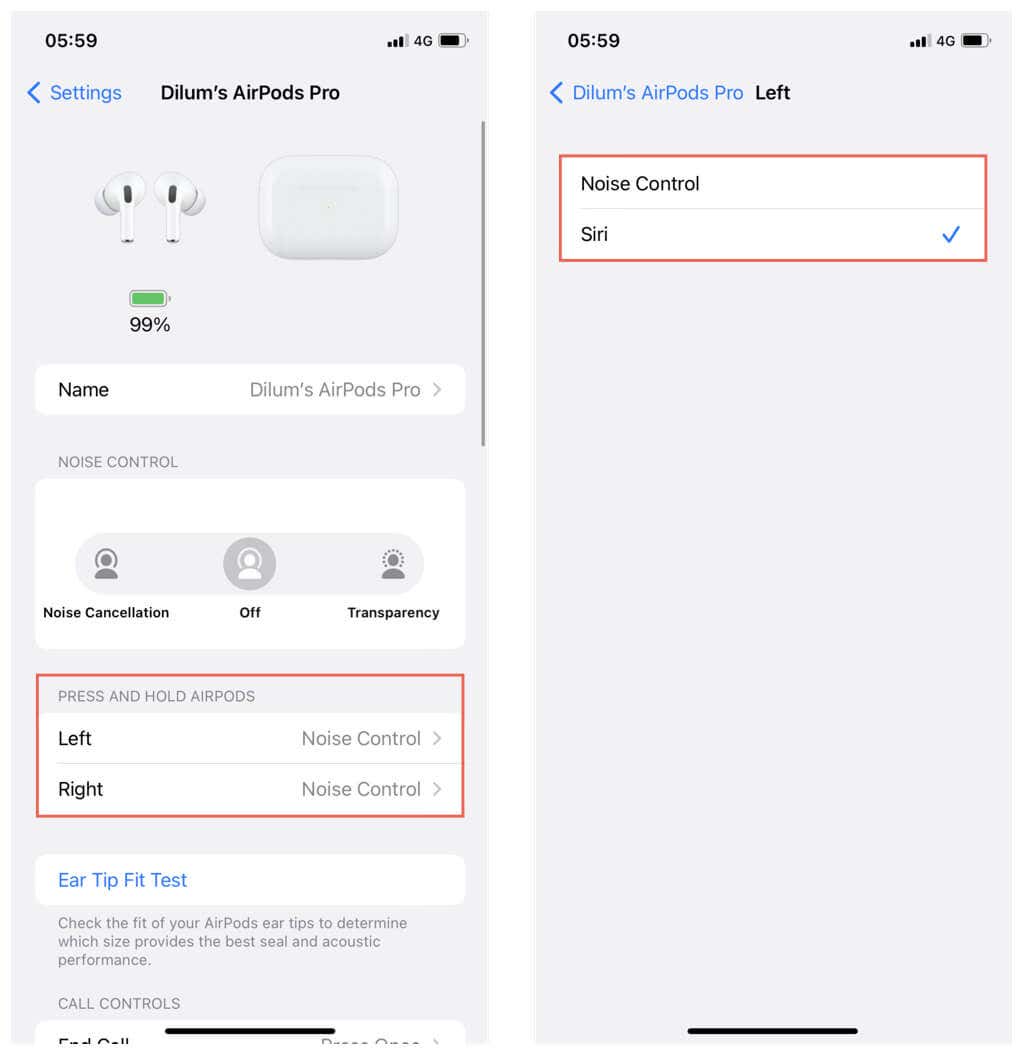
Alternatively, you can use the force sensor to invoke Siri. However, before doing that, you must replace the Noise Control gesture with Siri on the left or right AirPod—tap Left or Right under the Press and Hold AirPods section and select Siri.
To activate Siri, press and hold the stem of the AirPod. Besides the typical stuff you can ask Siri, you can also use it to control audio playback with simple voice commands—e.g., “pause,” “skip song,” “increase volume,” etc.
Ramp Up Your AirPods Pro Experience
Knowing how to use the controls and gestures on your AirPods Pro can significantly enhance your listening experience and make Apple’s wireless earbuds more convenient to use. By practicing and familiarizing yourself with these features, you can easily switch between your favorite songs, control the volume, answer calls, and more. Remember to customize the force sensors to make using the gestures even easier.
To troubleshoot issues with force and touch controls, reset the AirPods Pro to factory defaults. Additionally, update the AirPods firmware to improve performance and unlock new features.


