Apple advises against sharing Apple ID with your kids. Doing so may expose them to inappropriate content, apps, or services. When you set up a separate Apple ID for kids, you can use parental controls and Screen Time restrictions to manage how your kids use their Apple devices remotely.
This tutorial covers everything about creating Apple ID for kids on supported Apple devices.
Apple ID Age Requirements/Restrictions
Children under certain ages can’t create an Apple ID on their own. The Apple ID account creation age varies according to the following countries and regions:
| Minimum Age for Account Creation | Country/Region |
| 16 | Ireland, Brazil, Luxembourg, Philippines, Poland, Slovakia, Croatia, Germany, Romania, Hungary, Kosovo, Liechtenstein, Malaysia, Netherlands, and Singapore. |
| 15 | France, Greece, Czech Republic, Slovenia, and Peru. |
| 14 | Lithuania, Austria, Cyprus, South Korea, Italy, mainland China, Bulgaria, Spain, and Israel. |
| 13 | All other regions and countries. |
Create a kid’s Apple ID for your child if they don’t meet the age requirements to make one for themselves. To do so, you must first set up family sharing to create an Apple ID account for your kid(s).
Setting up your kid’s Apple ID as the family organizer provides parental control options for monitoring and managing your child’s app downloads, purchases, and location. Essentially, you get to manage how your child uses their Apple device(s).
How to Set Up Apple ID for Your Kid (iPhone and iPad)
Open Settings on your iPhone/iPad and follow the steps below to set up an Apple ID for your kid.
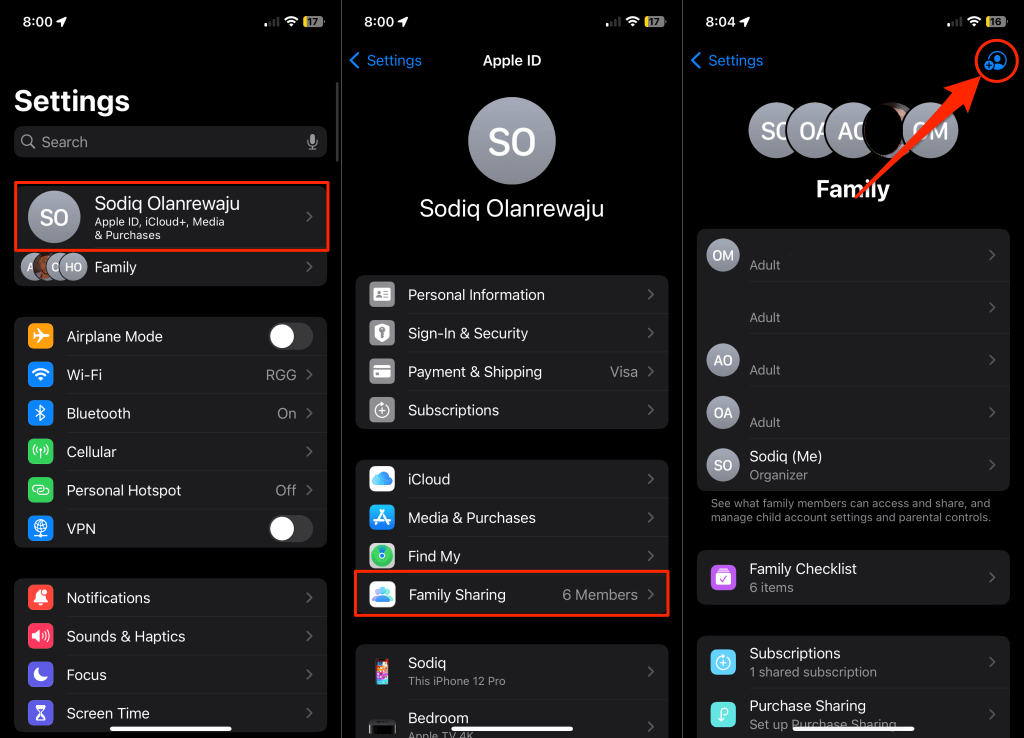
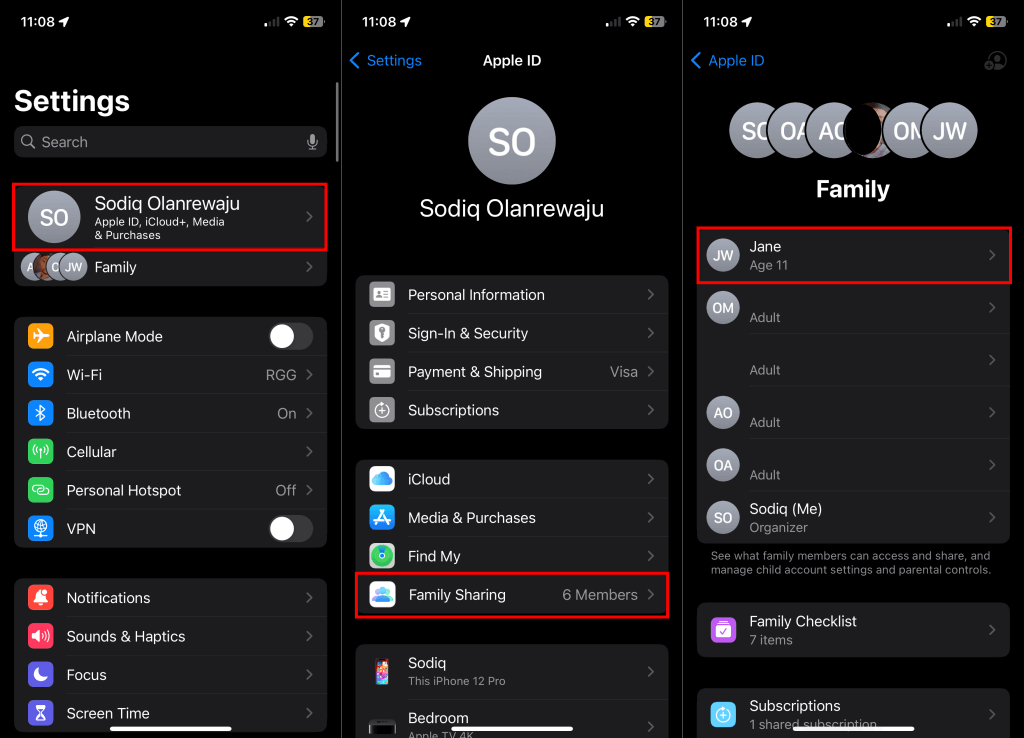
- Tap your name at the top of the page and select Family Sharing.
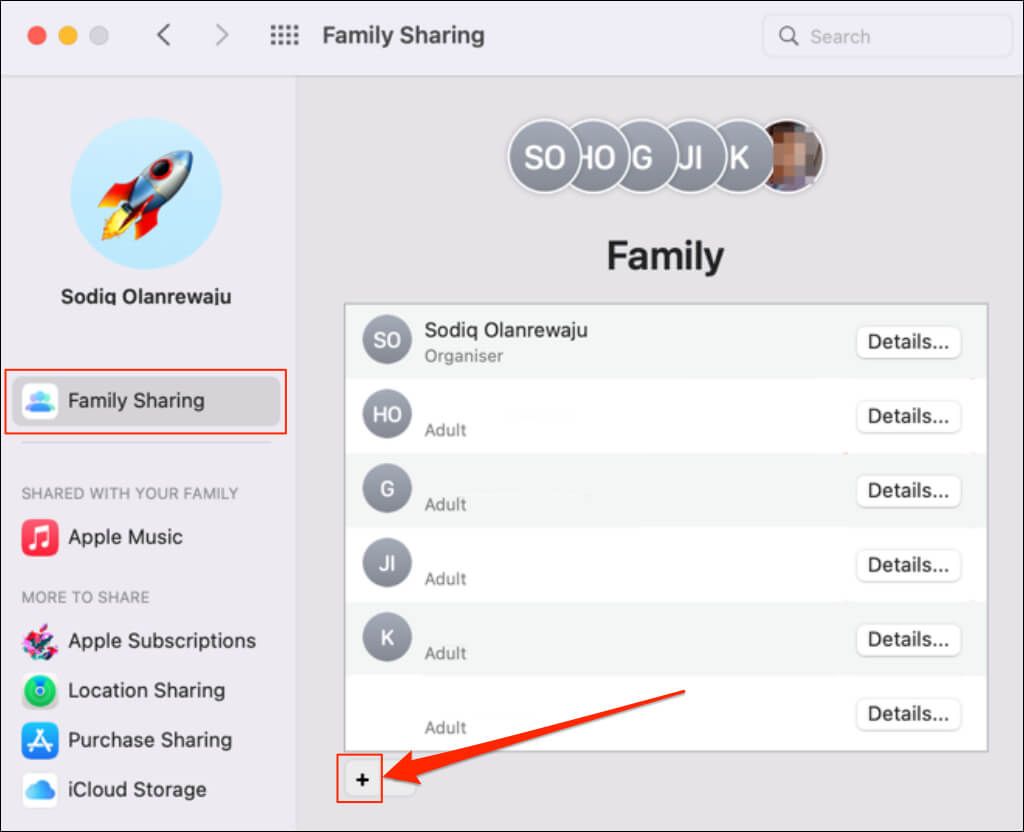
- Tap the Add Member icon in the top-right corner.
Select Add Member below the family members list if your device runs iOS 15, iPad OS 15, or earlier versions.
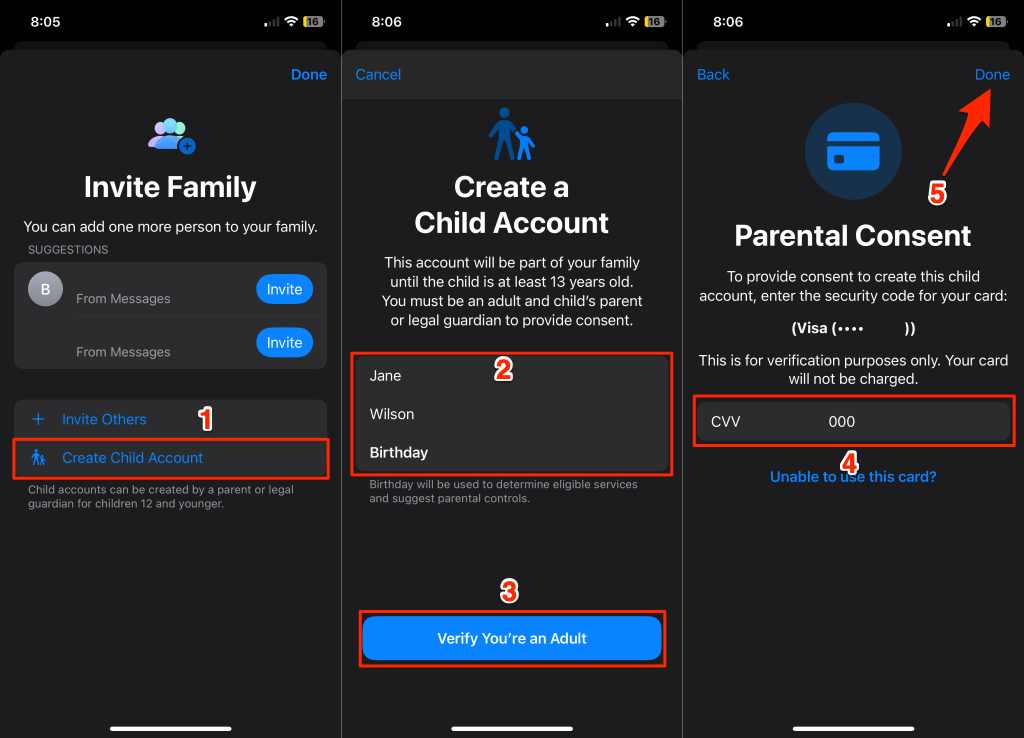
- Tap Create Child Account on the “Invite Family” screen.
- Enter your child’s first name, last name, birthday, and tap Verify You’re an Adult.
You can’t edit or change your kid’s birth date after creating their Apple ID account. Hence, double-check the name and birthday and ensure you provided the correct information.
- Enter the security code for your Apple ID payment method to provide consent to create the child account. Tap Done in the top-right corner to proceed.
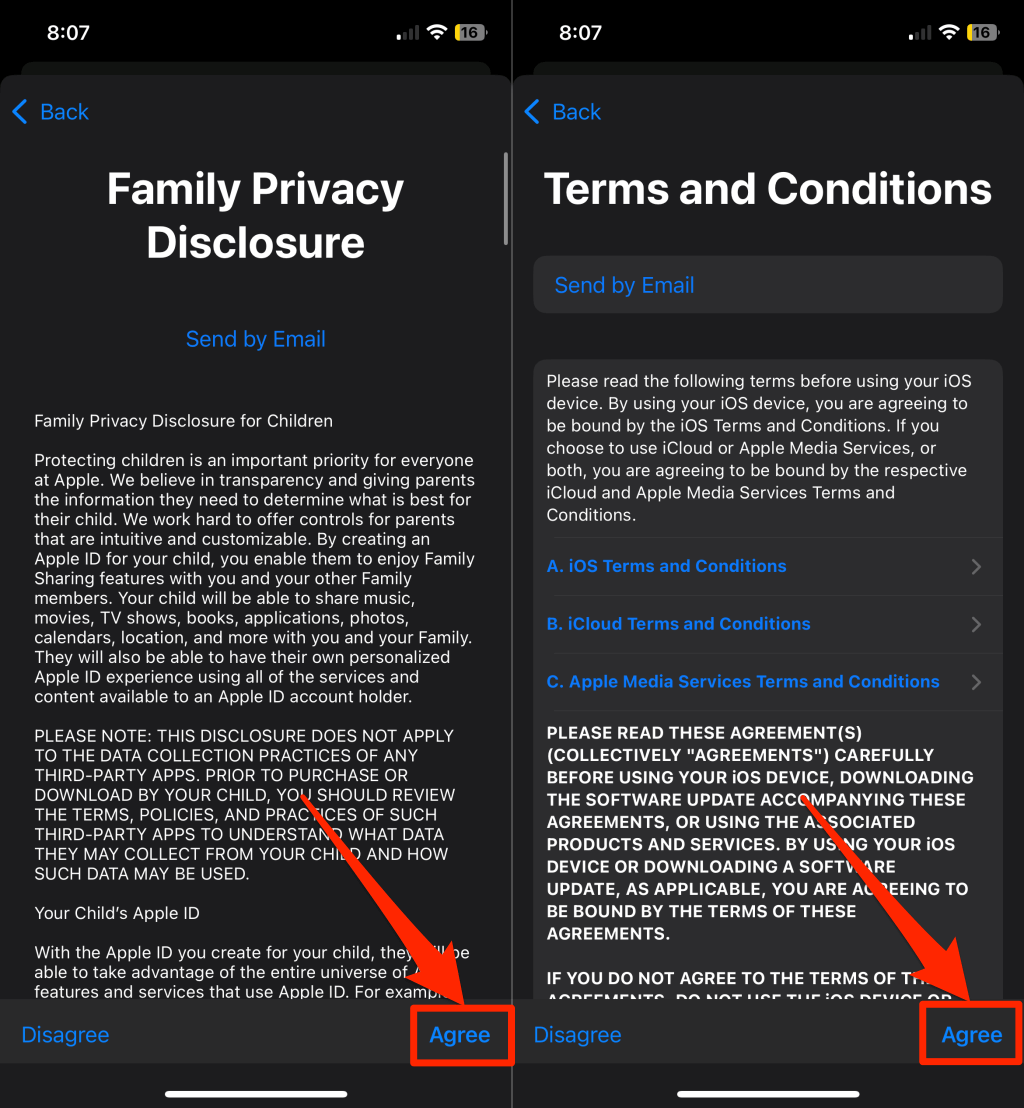
- Read the “Family Privacy Disclosure” and “Terms and Conditions” agreements and tap Agree to continue.
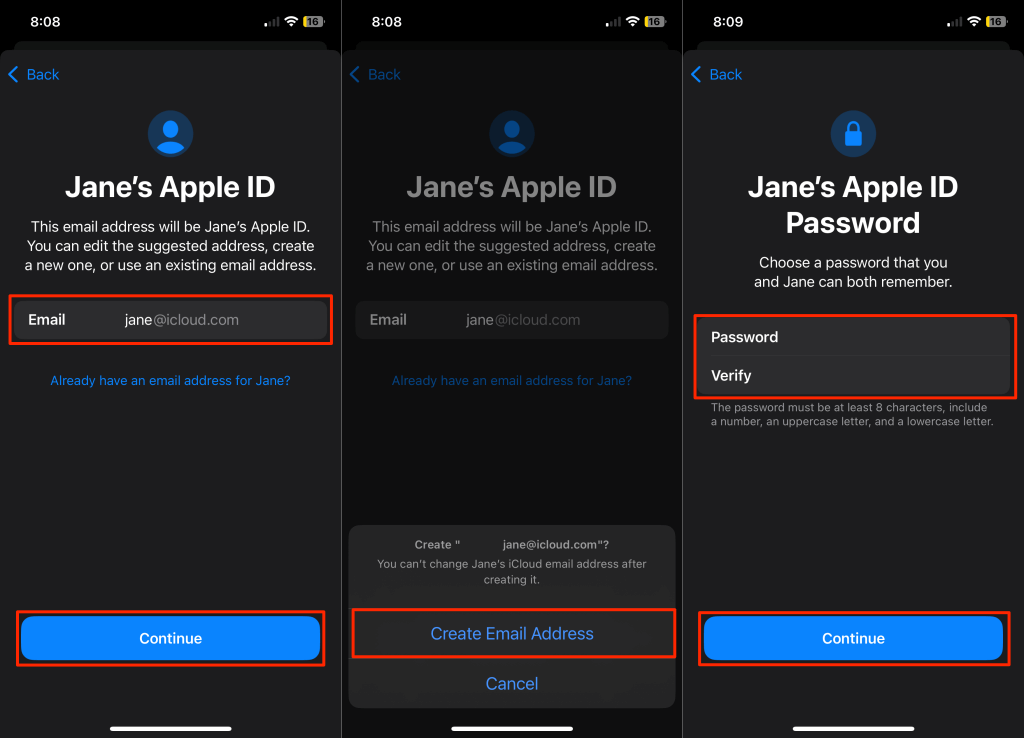
- Apple will suggest an available Apple ID email address for your child. Edit the email address or enter a new one, tap Continue, and select Create Email Address on the confirmation pop-up.
- Create a password for the account and tap Continue.
Apple ID passwords must have at least eight characters. It must also include an uppercase letter, a number, and a lowercase letter.
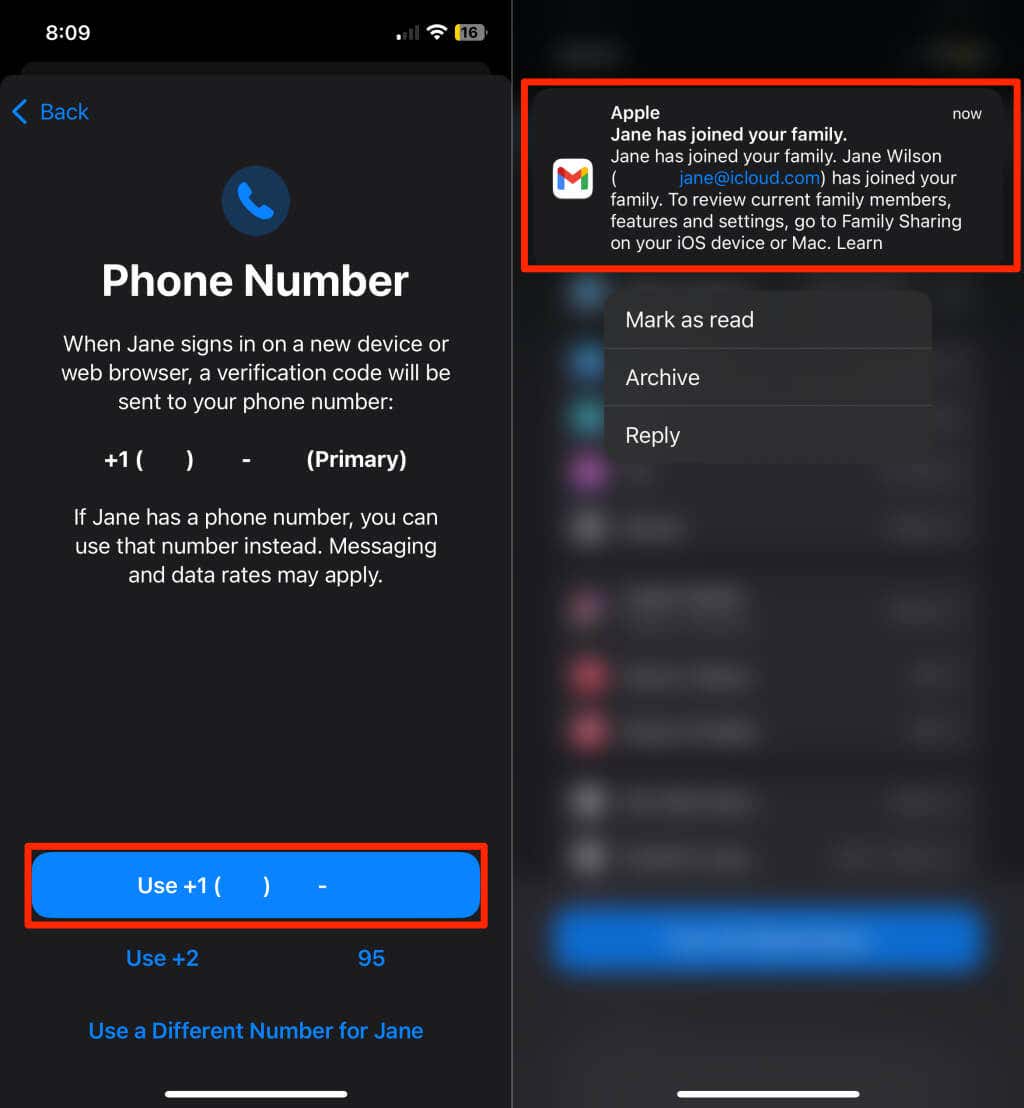
- Provide a phone number for sign-in verification—you can use your phone number or your kid’s. Apple will send a verification code to the number each time your kid signs in on any device. You should get a notification email that your kid’s Apple ID is now part of the family group.
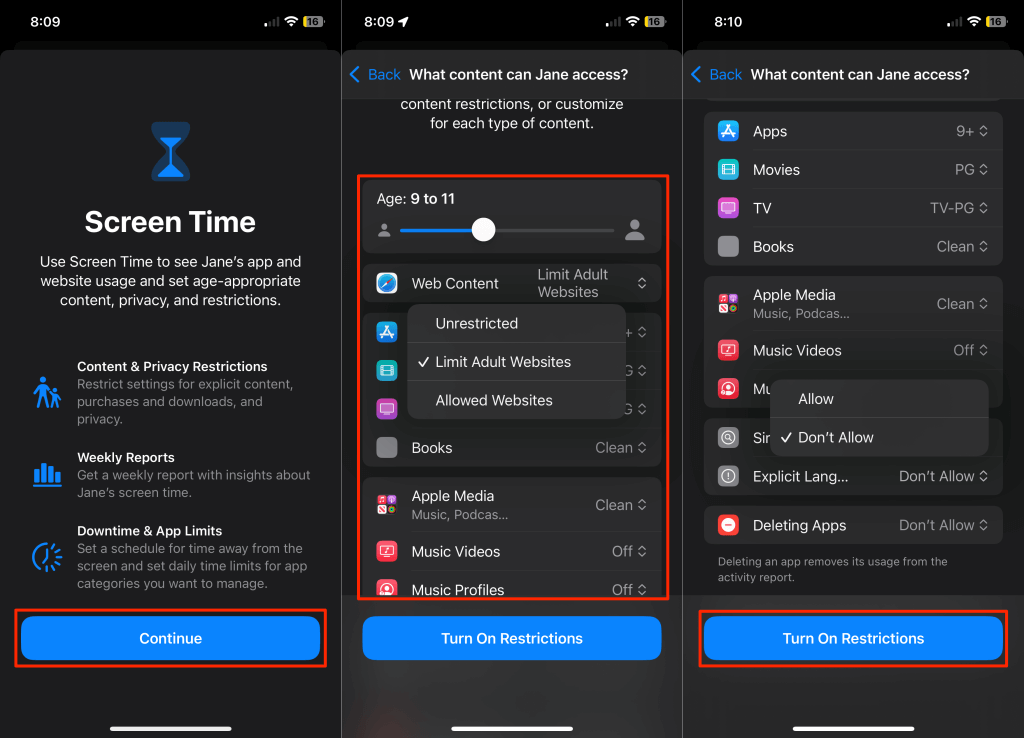
- The next step is to set up and customize Screen Time restrictions for your kid’s account and device. Tap Continue and choose the type of content or apps your kid can access with their account.
You can limit adult websites in Safari, block explicit languages, and configure applications to display only clean content. You can also prevent them from installing apps, deleting apps, playing music videos, playing multiplayer games, etc.
- Tap the Turn On Restrictions button to continue.
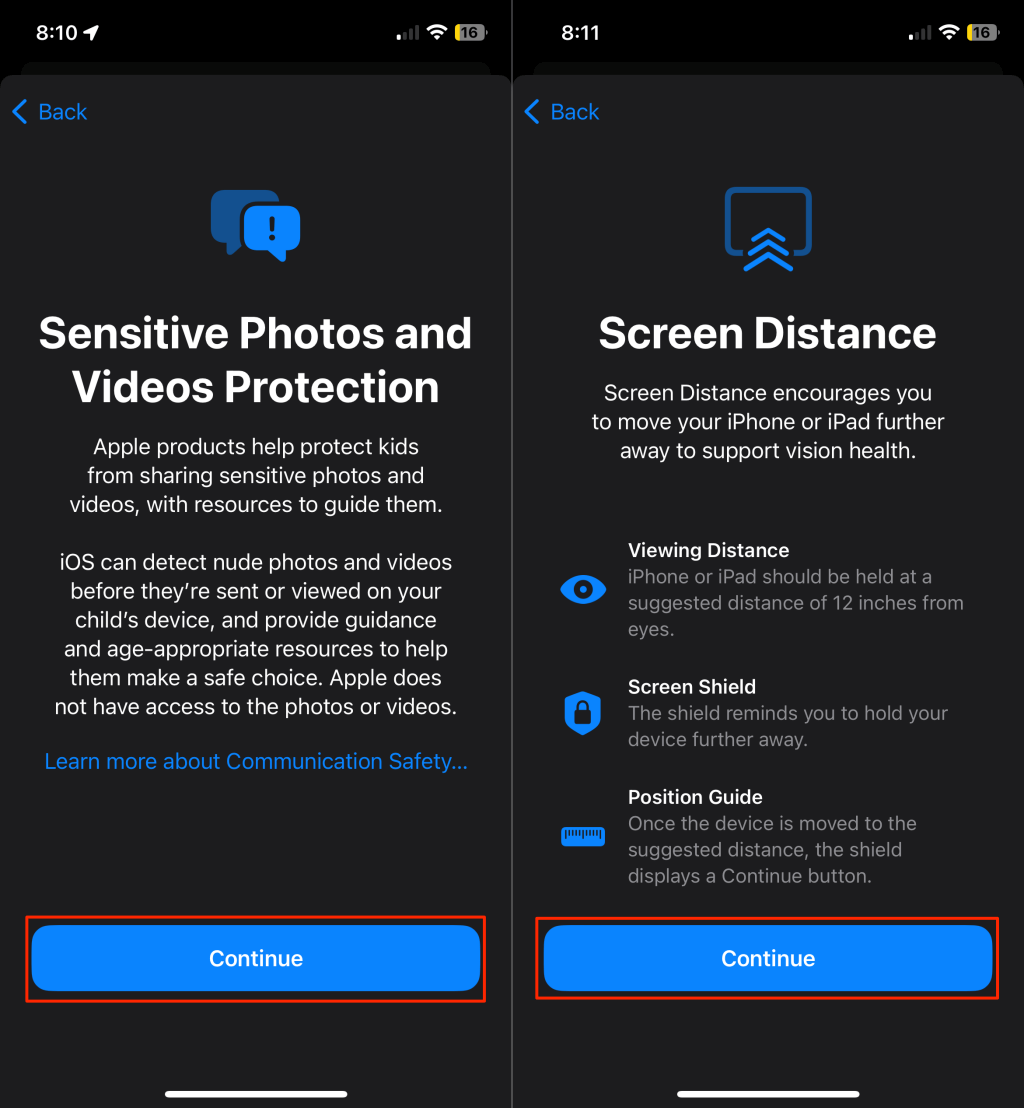
- Next, tap Continue to set up “Sensitive Photos and Videos Protection” and “Screen Distance.”
“Screen Distance” helps protect your kid’s vision by encouraging them to move their device away from their eyes when held closer than 12 inches. “Sensitive Photos and Videos Protection” prevents your kid(s) from viewing or sharing sensitive media files on their device.
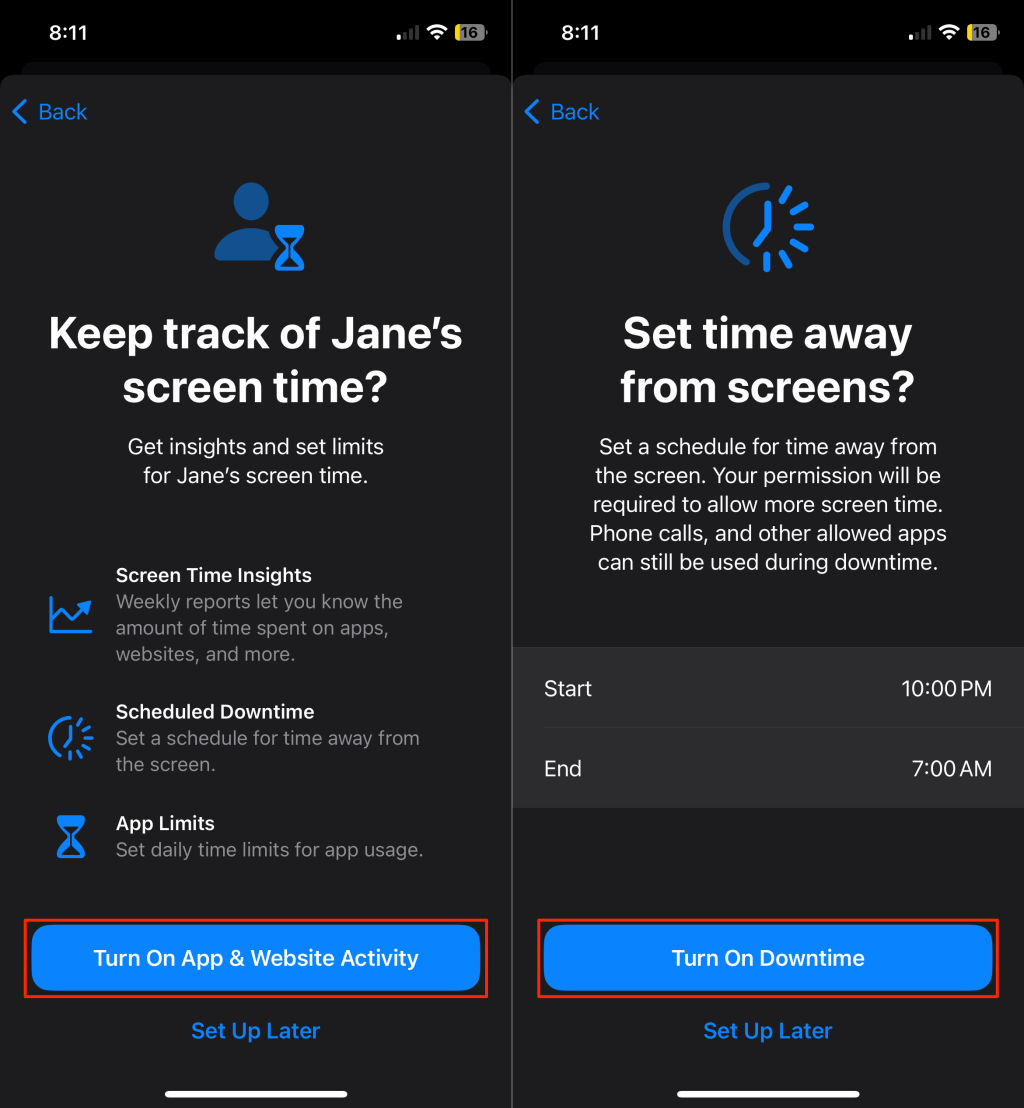
- Tap Turn On App & Website Activity on the next screen.
That allows Apple to monitor and report your kid’s screen time per application, website, etc. Turning on activity monitoring also lets you schedule screen downtime, app usage limit, and set parental control passcode.
- Set the downtime schedule on the next screen and tap Turn On Downtime. Downtime refers to periods when your kid isn’t allowed to use their device (perhaps by bedtime) and when they can.
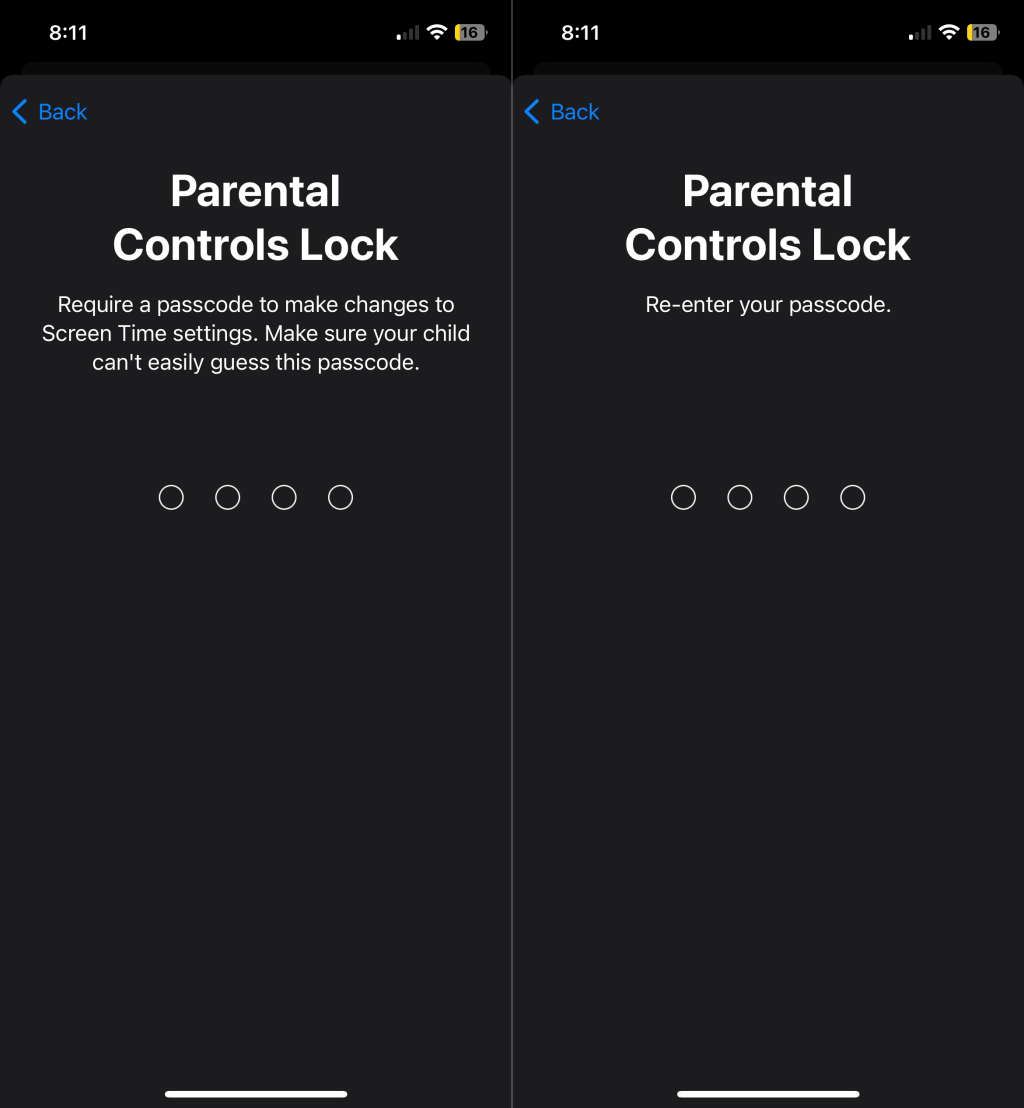
- Enter a four-digit passcode as the “Parental Controls Lock.” Re-enter the passcode to proceed.
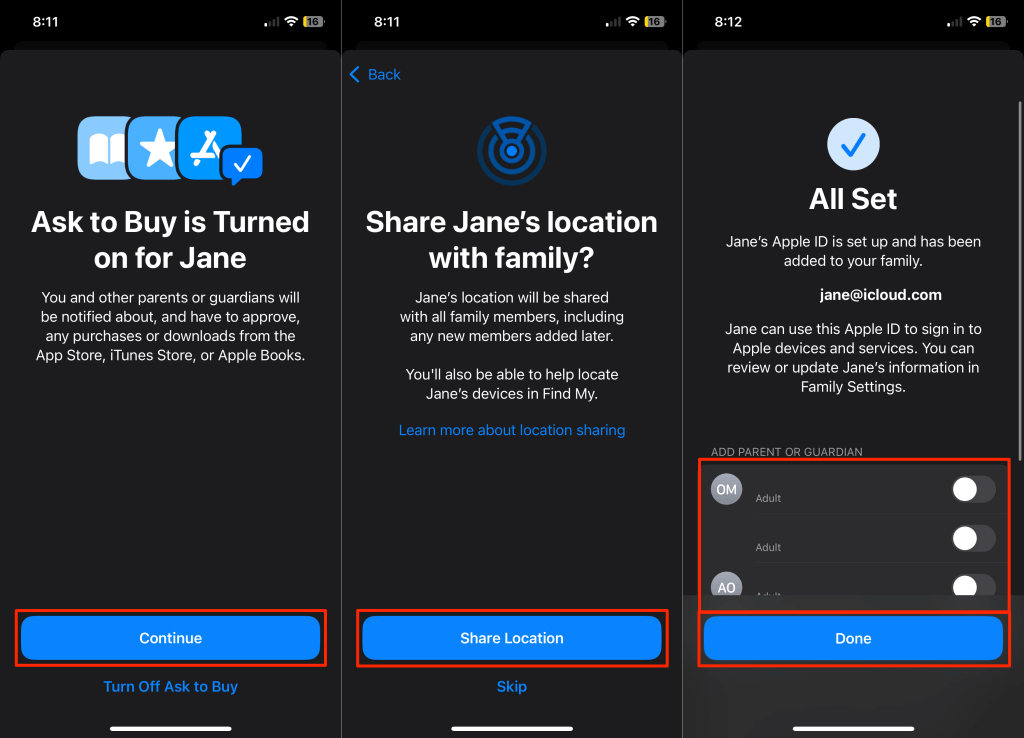
- Apple automatically turns on “Ask to Buy” for your kid’s Apple ID account.
The feature sends you an approval request whenever your kid attempts to download or purchase any item from the App Store. We recommend leaving this feature enabled—tap Continue on the setup screen.
- Tap Share Location to have Apple share your kid’s location with all family members.
You can make other family members co-parents or co-guardians to your kid’s account if you wish. A co-parent or co-guardian can approve your kid’s app store download/purchase requests and adjust parent control or Screen Time settings.
- Choose the family member(s) you want to add as co-parents or co-guardians and tap Done.
That’s about it. Your kid’s Apple ID account is now set up and can be used on any Apple device.
How to Set Up Apple ID for Your Kid (Mac)
You can also create an Apple ID account for your kid from your Mac computer. The process is as straightforward as setting up the account from an iPhone or iPad.
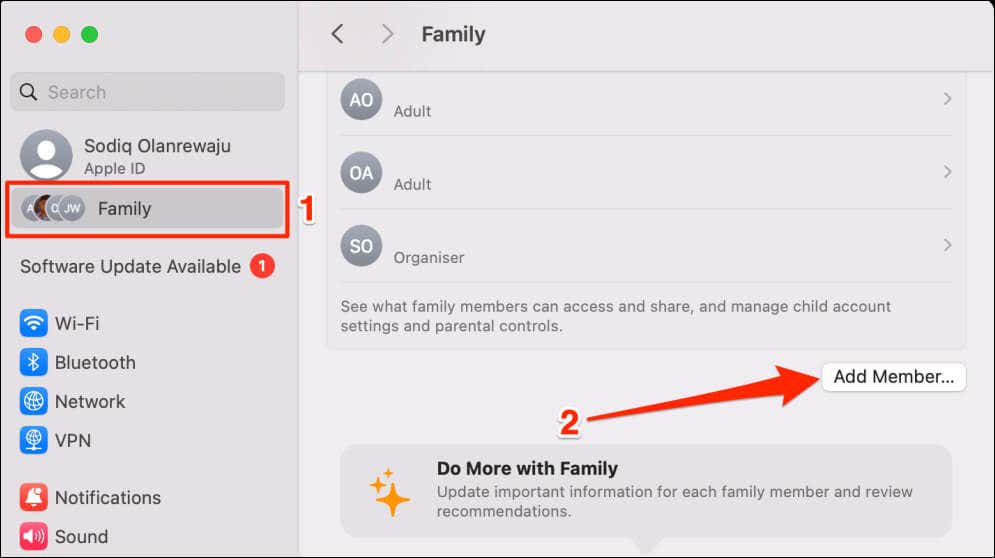
- Open System Settings, select Family in the sidebar, and select the Add Member button.
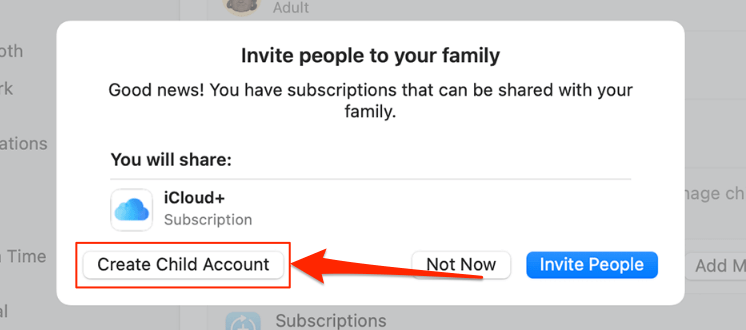
- Select Create Child Account to proceed.
If your Mac runs macOS Monterey (or earlier), go to System Preferences > Family Sharing, select the Add button, and choose Create Child Account.
- Follow the on-screen instructions and provide your child’s personal information—first name, last name, and birthday. Remember to enter accurate information before you can’t change it later. You’ll also need to verify that you’re an adult by confirming your payment method.
Manage Your Kid’s Apple ID
You can modify your kid’s Apple ID settings (Screen Time restrictions, purchase approval, subscription access, etc.) anytime.
Manage Your Kid’s Apple ID on iPhone/iPad
- Open the Settings app on your iPhone/iPad and tap your Apple ID name.
- Select Family Sharing and tap your kid’s name.
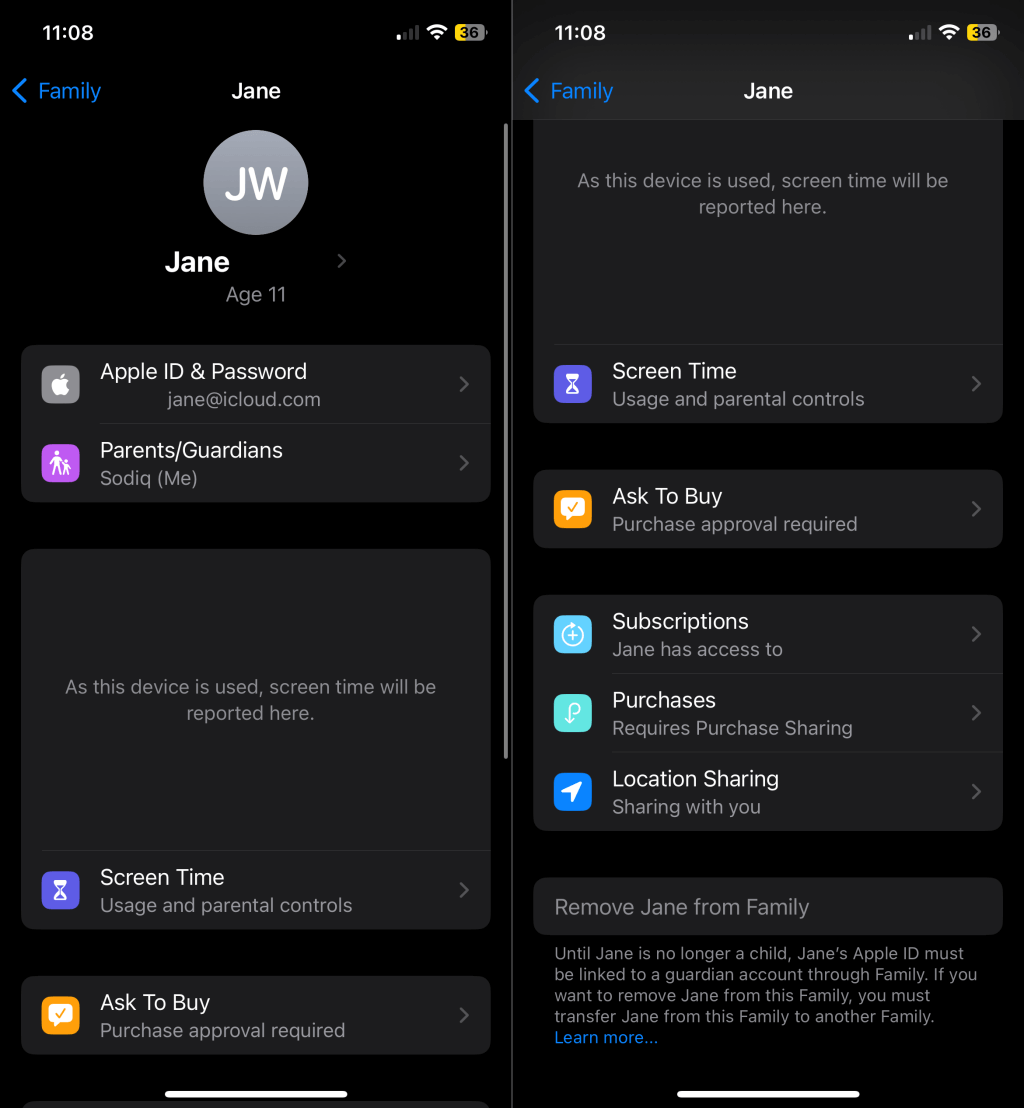
- Choose the settings or restrictions you want to edit to proceed.
Manage Your Kid’s Apple ID on Mac
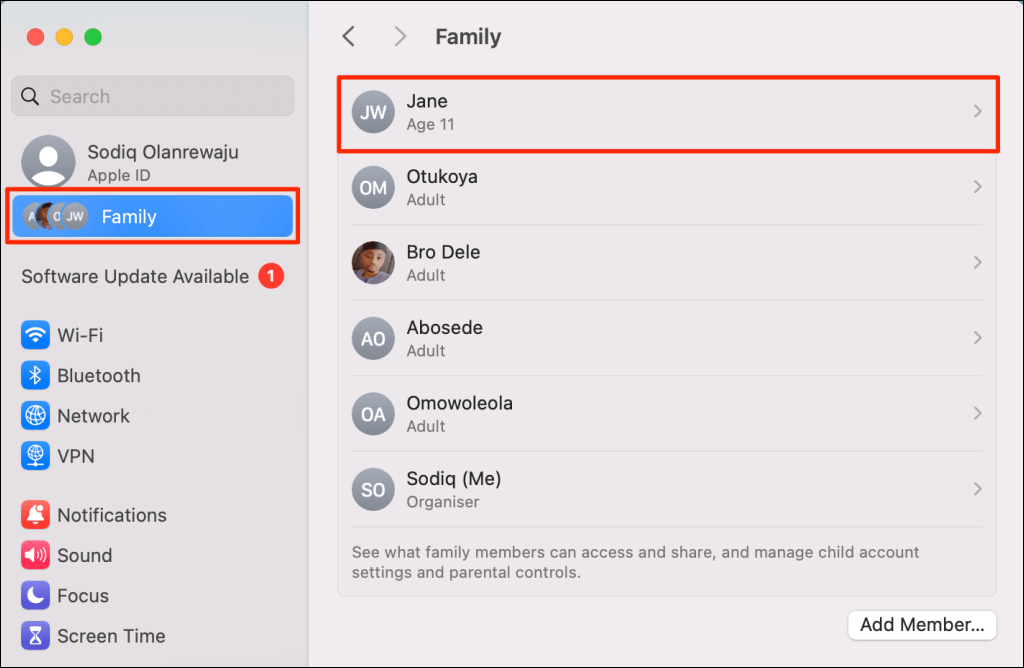
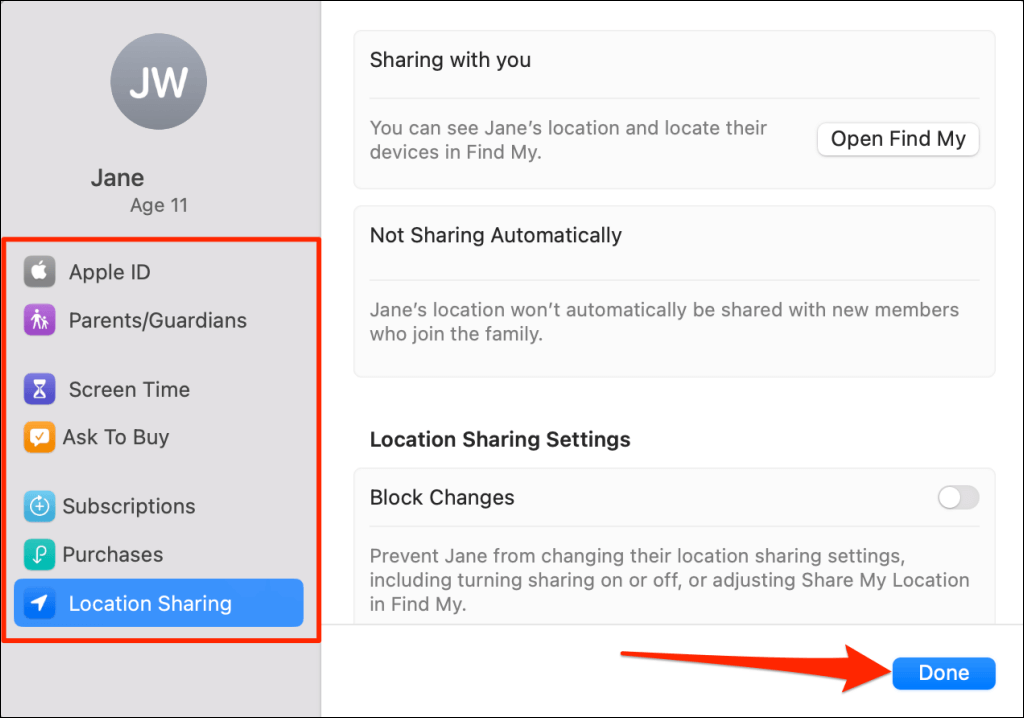
- Open System Settings, select Family in the sidebar, and choose your kid’s name.
- Choose the settings you want to manage in the sidebar. Select the Done button to save changes made to the account.
Note: Apple ID for kids must always be linked to a family group or managed by a guardian. Hence, you can’t remove your child from your family group until they reach your country’s minimum account creation age.
Move your kid to another family group if you can’t wait until they reach the minimum account creation age. See our tutorial on removing Apple family members to learn how to transfer your kid to a different family. Deleting their Apple ID account is another available alternative.
Parental Control Is Important
As a parent in this digital age, being in the driving seat of technologies accessible to your kids is essential. With a dedicated kid-focused Apple ID, you can protect your kids from the dangers of explicit, unsafe, and inappropriate content. You can also view and manage the time spent online/offline, websites they visit, app downloads/installations, location, etc.

