Do you keep seeing a “Your account has been disabled in the App Store and iTunes” error on your iPhone, iPad, iPod, or Mac? That happens when you’ve got a severe problem with your Apple ID. For example, your account may have been the subject of a security breach. Or, it could be due to unresolved billing issues or disputed charges on past purchases.
You can’t make new purchases in the App Store or the iTunes Store until you resolve the issue. It’s also possible that you won’t be able to use Apple services such as FaceTime and iMessage in the meantime.
But while Apple recommends contacting Apple Support to fix a disabled Apple ID, you just might have a chance of sorting things out yourself by working through the suggestions below.
Change Your Apple ID’s Password
Security reasons—such as repeated login attempts with the wrong password—can result in the “iTunes/App Store account disabled” error. Therefore, try changing your Apple ID account password immediately.
Change Apple ID Password on iPhone & iPad
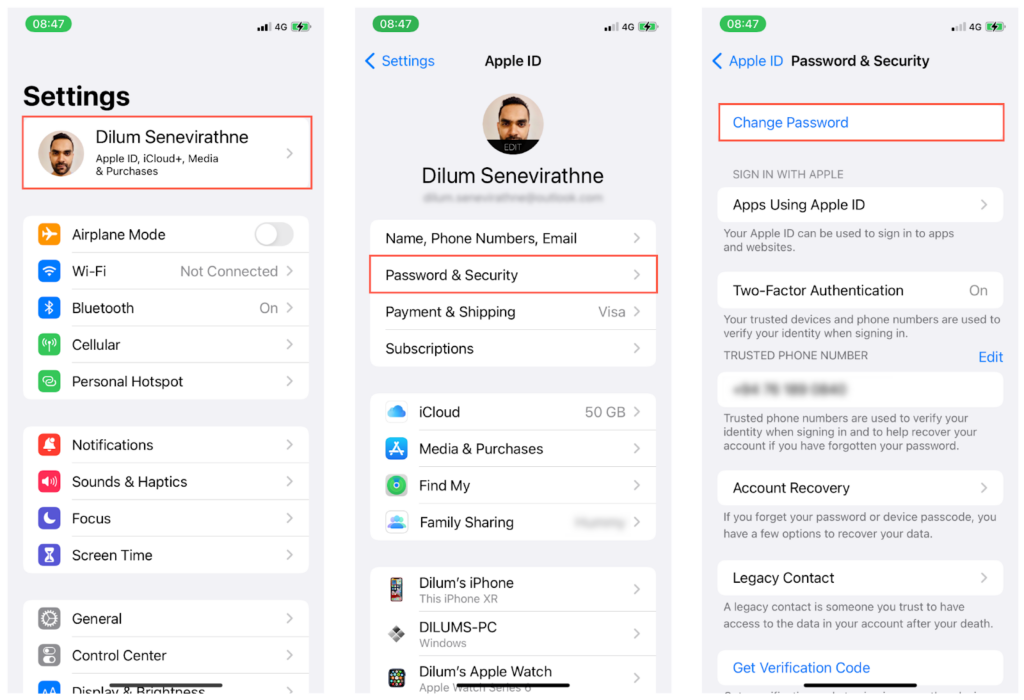
1. Open the Settings app and tap on your Apple ID.
2. Tap Password & Security.
3. Tap Change Password.
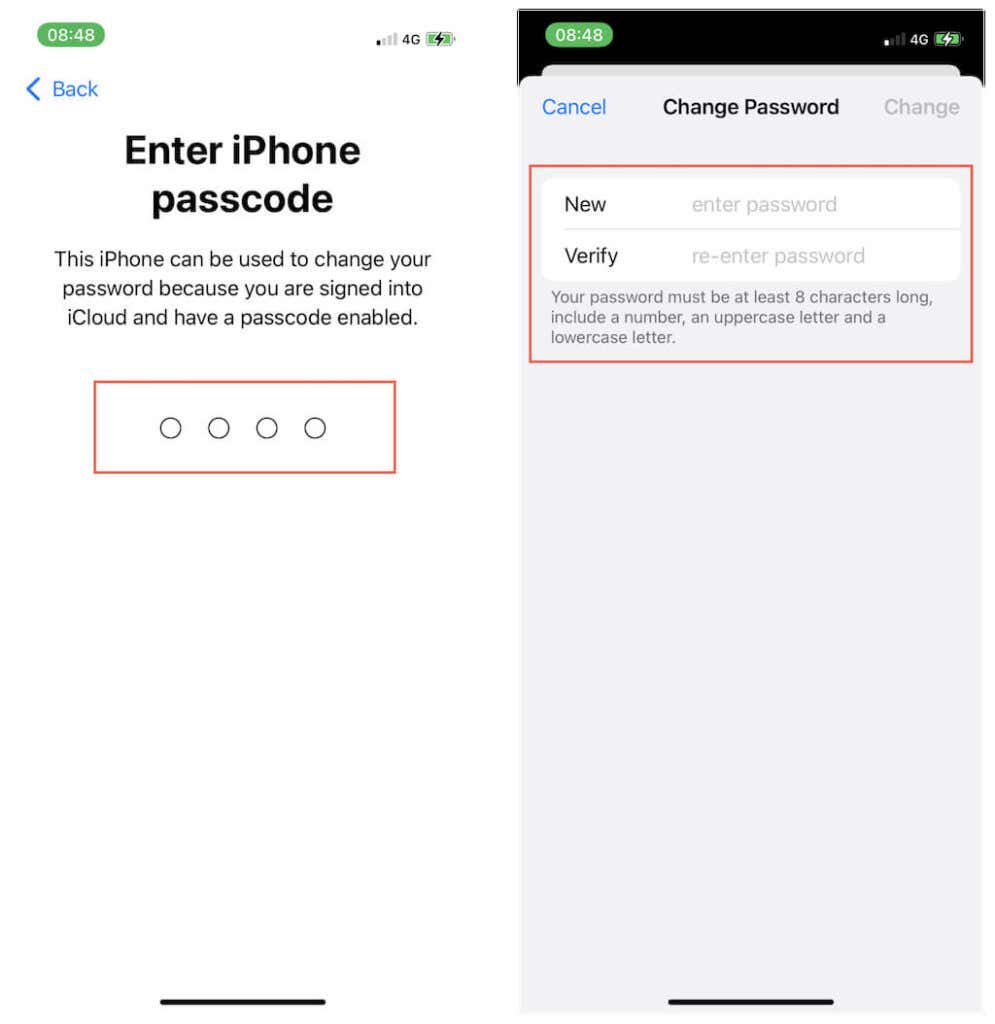
4. Enter your iPhone’s device passcode.
5. Fill in the new password into the New and Verify fields and tap Change.
Change Apple ID Password on Mac
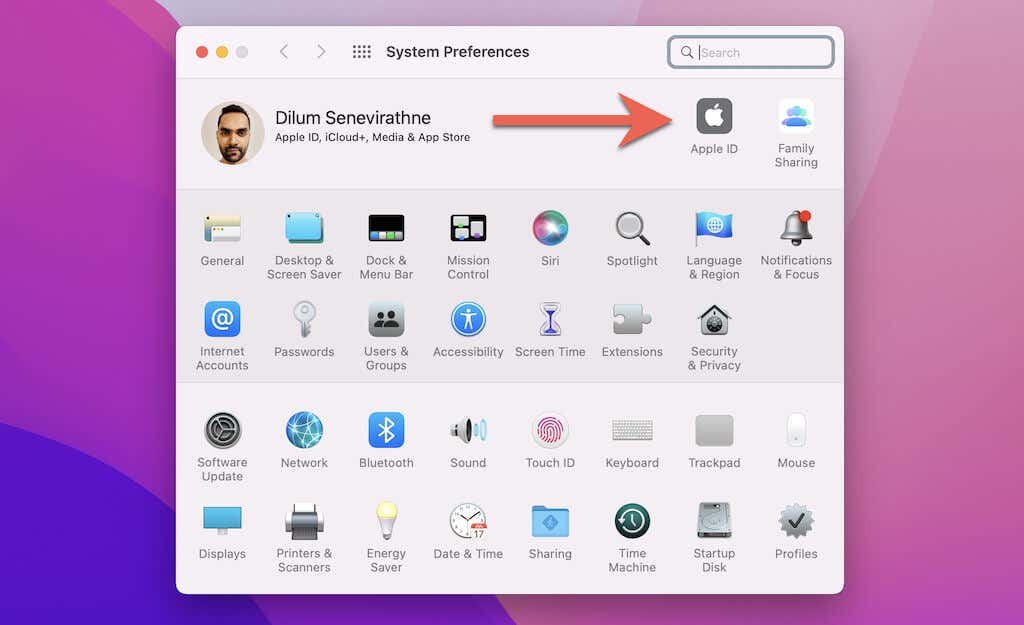
1. Open System Preferences.

2. Select Apple ID.
3. Select Password & Security on the sidebar.
4. Select Change Password.
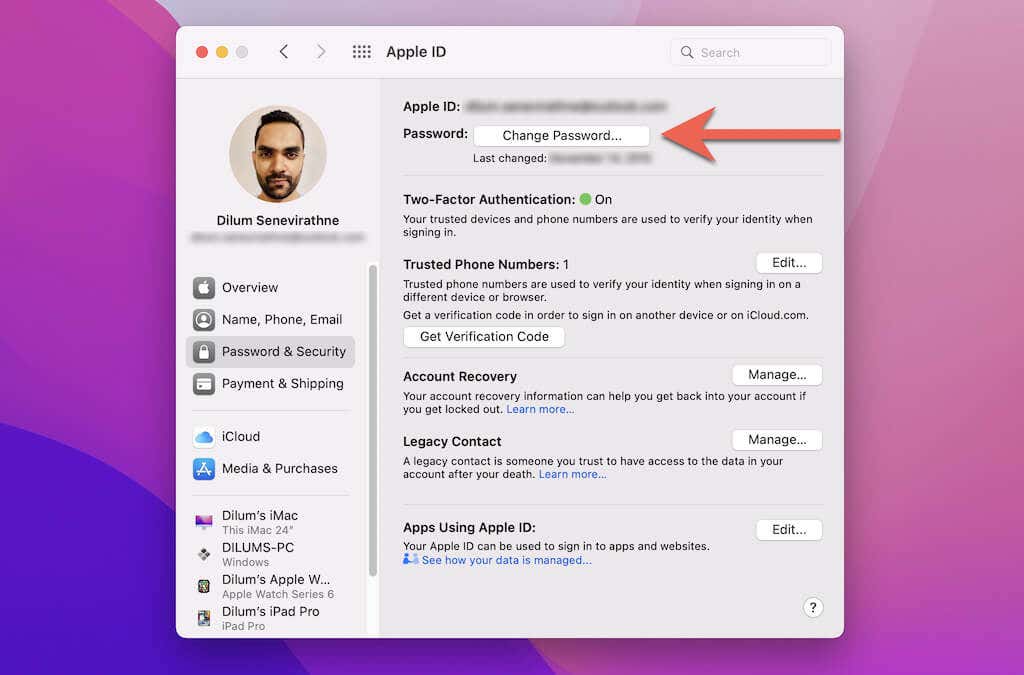
5. Enter your Mac user account password and select Allow.
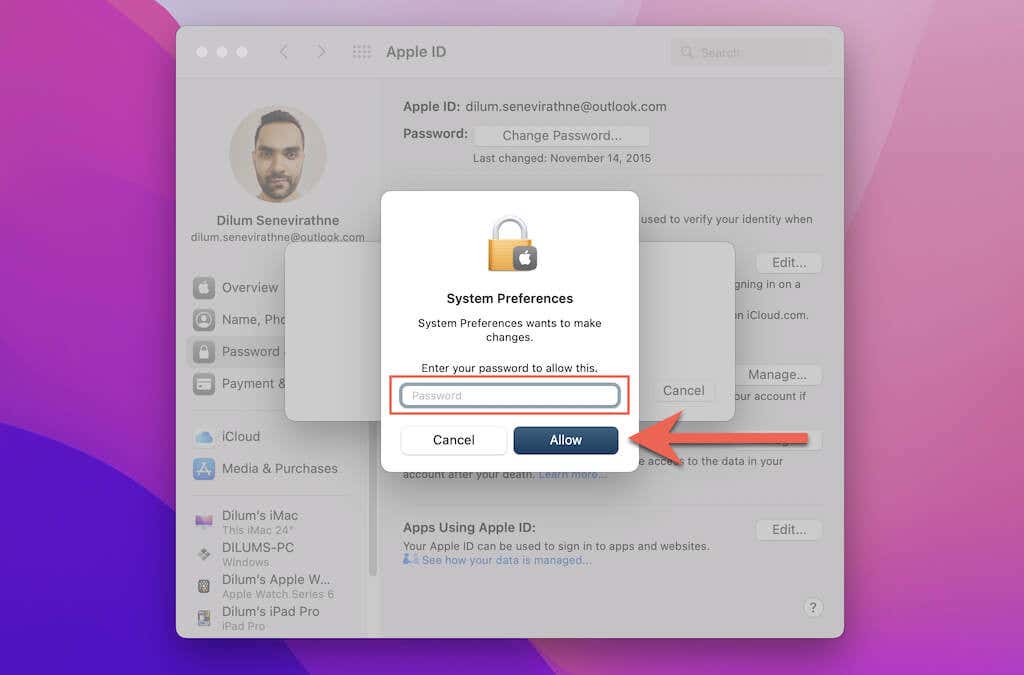
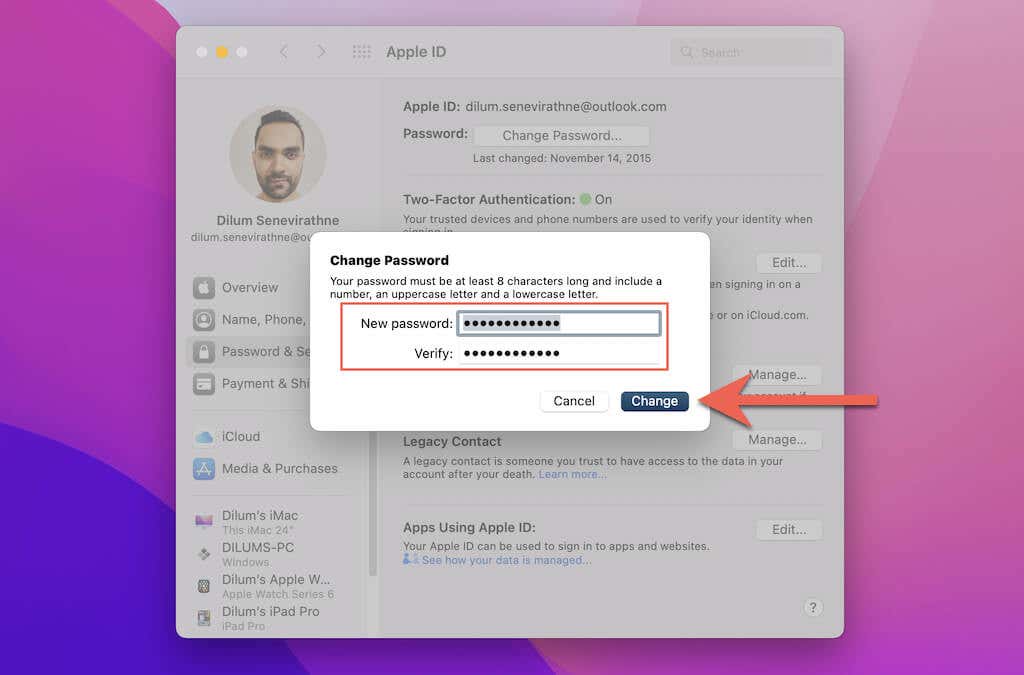
6. Fill in the new passcode into the New Password and Verify Password fields and select Change.
Reset Apple ID Password Online
If you have trouble changing your Apple ID password via the Settings or the System Preferences app, try using Apple’s online password reset portal instead.
1. Visit https://iforgot.apple.com using Safari or Chrome on any of your Apple devices.
2. Enter the email address associated with your Apple ID and select Continue.
3. Enter your Apple ID’s phone number and select Continue.
4. You’ll receive a notification on your iPhone, iPad, or Mac—select Show or Allow when that happens.
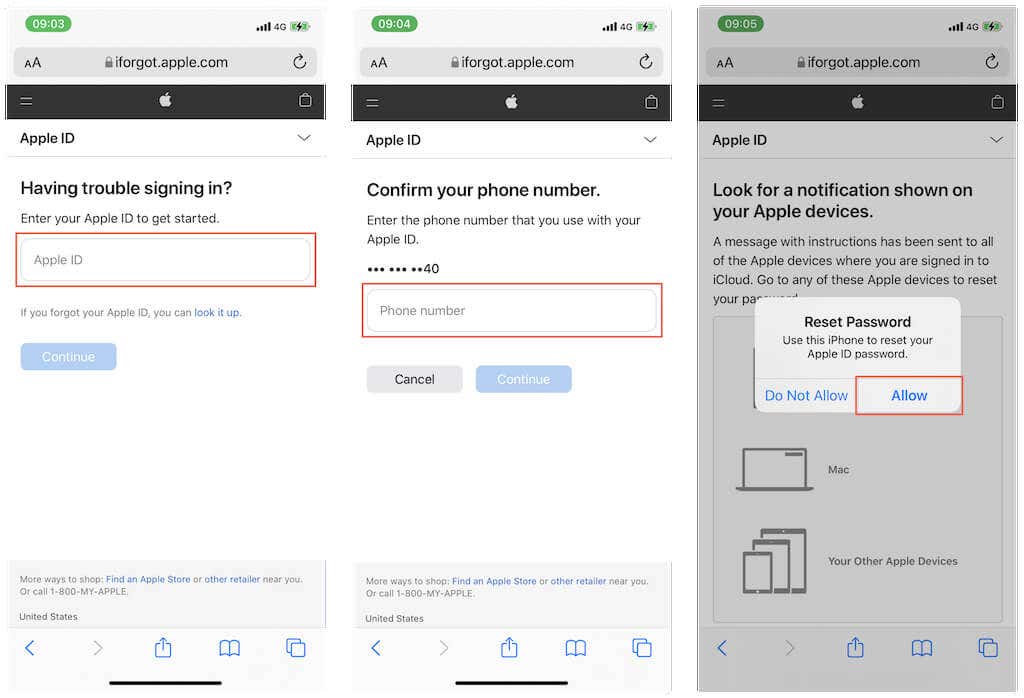
5. Enter the device passcode and follow each on-screen instruction to complete the password reset process.
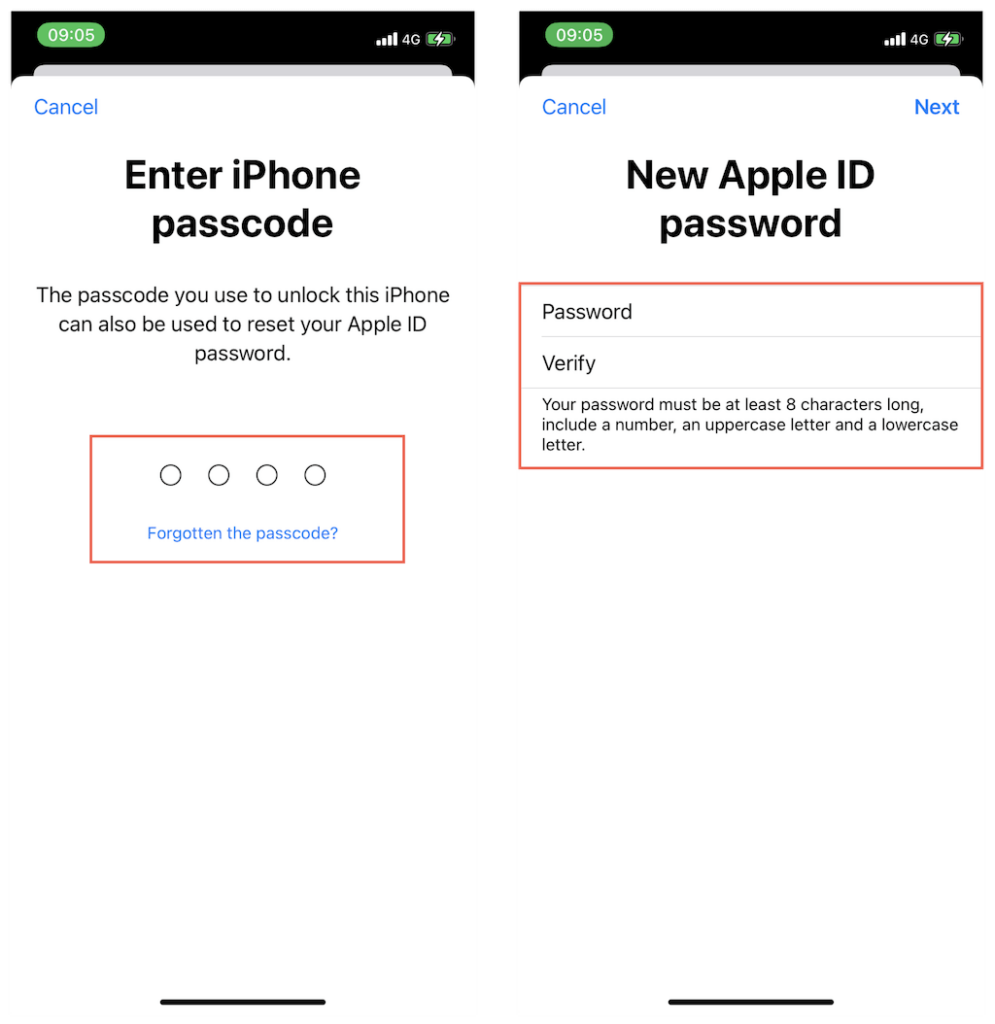
6. You may need to verify your action by inserting the two-factor authentication code you receive on another trusted device or by using your Apple ID’s recovery key. Don’t forget to sign in to all of your Apple devices with the correct password afterward.
Update or Add Payment Method
Problems with billing or disputed app purchases can also result in “iTunes/App Store account disabled” errors. Try updating your current payment method (e.g., credit card) or adding a new payment form and check if that helps.
Update/Add Payment Method on iPhone & iPad
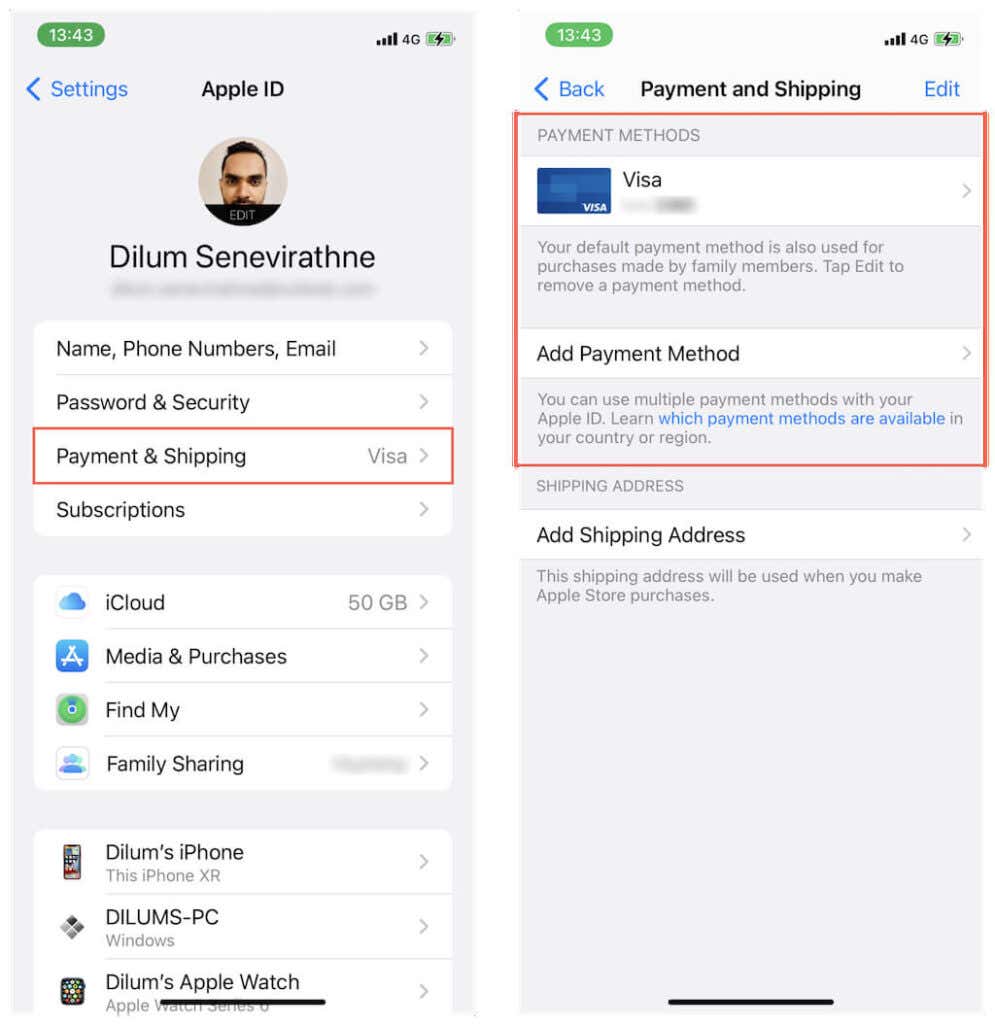
1. Open the Settings app and tap Apple ID.
2. Tap Payment & Shipping.
3. Update your current payment details or tap Add Payment Method to add a new form of payment.
Update/Add Payment Method on Mac
1. Open the App Store.
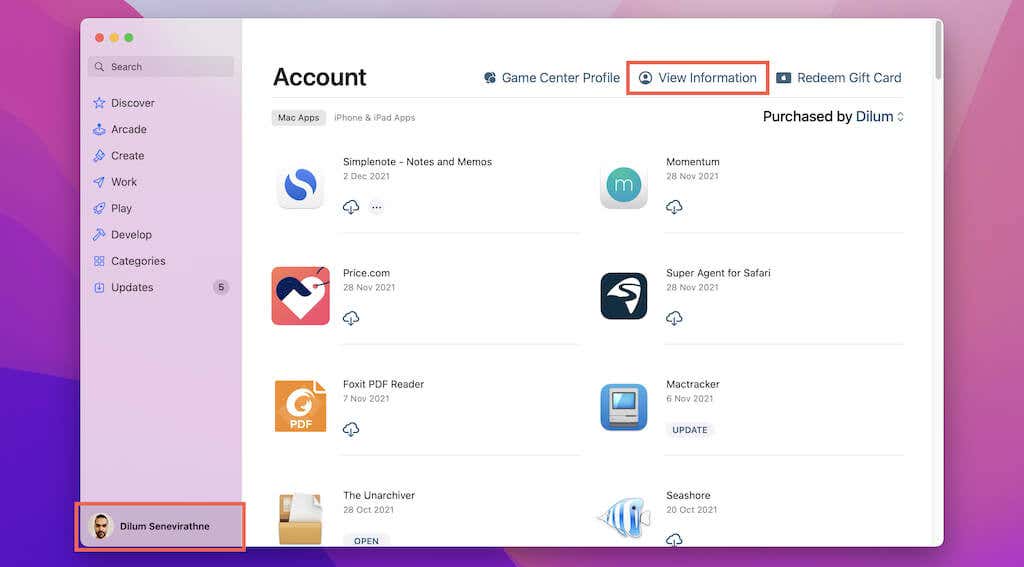
2. Select your profile portrait at the bottom left of the App Store window.
3. Select View Information.
4. Select Manage Payments.
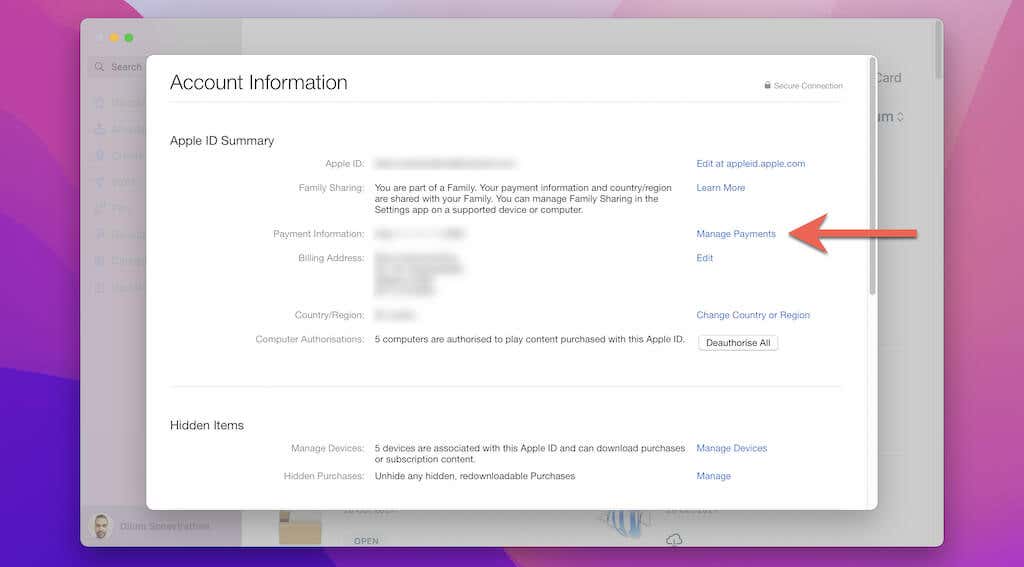
5. Update your current payment details or select Add Payment to add a new form of payment.
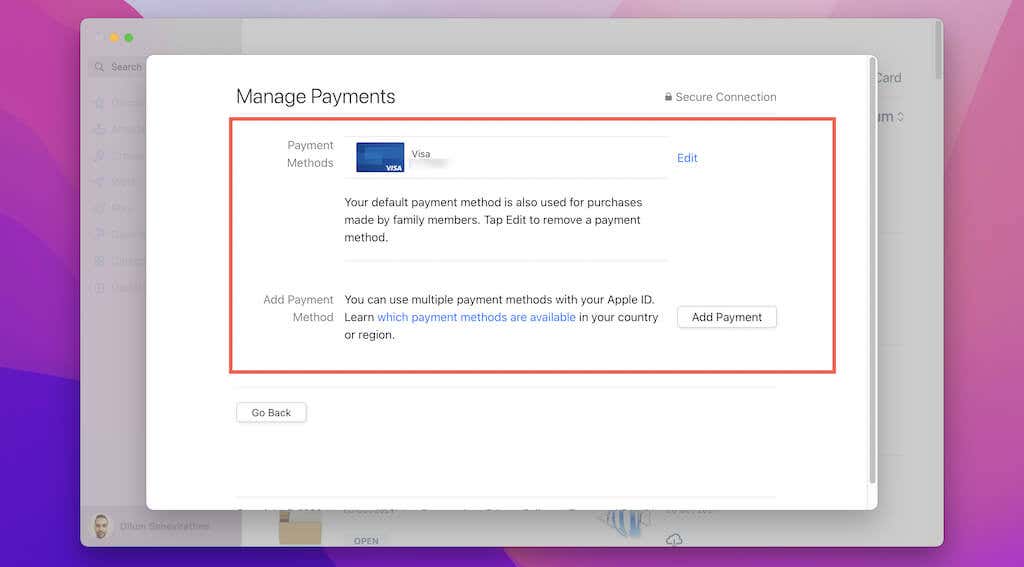
Alternatively, you can try changing your Apple ID password or adding a new payment method via the Apple Account Management portal at appleid.apple.com.
Set the Correct Date & Time
Having the date and time on your iPhone, iPad, or Mac set up incorrectly is another possible reason for App Store/iTunes account-related issues. Check and rectify that.
Set the Correct Date & Time on iPhone & iPad
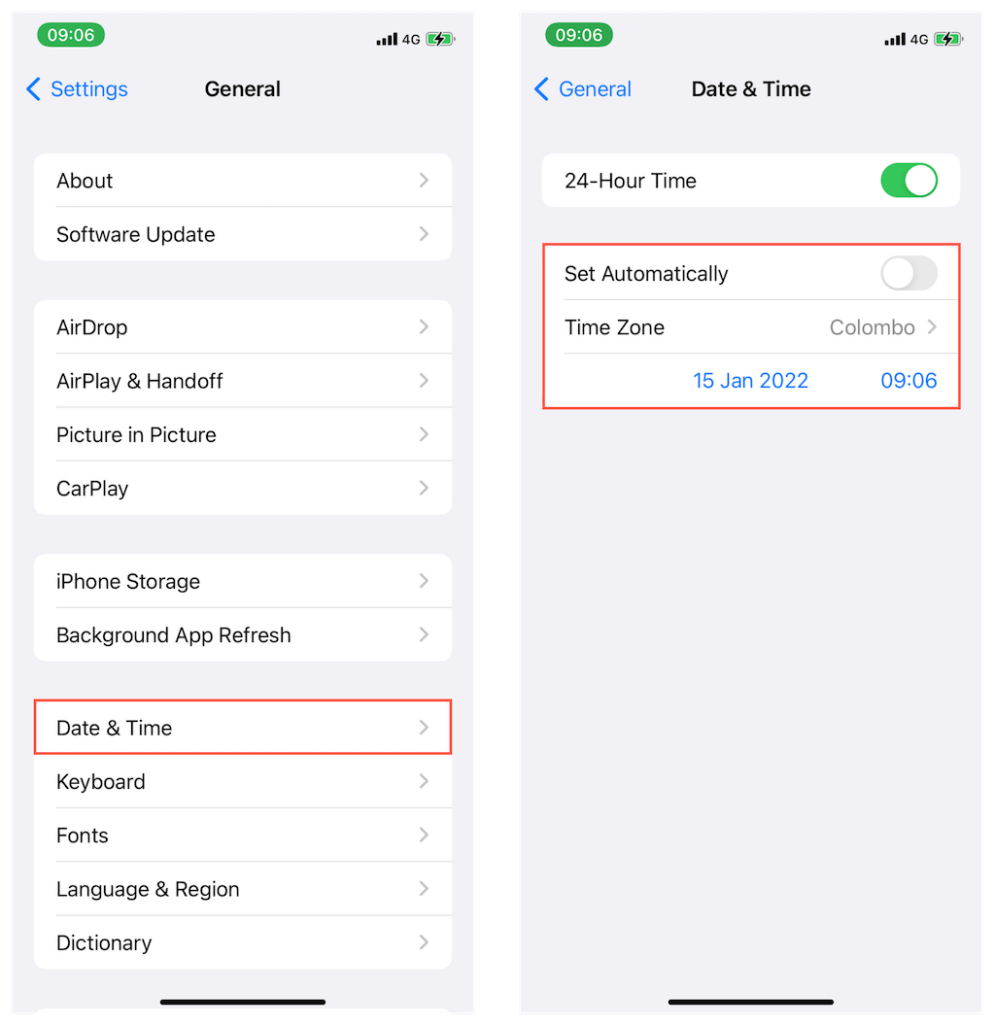
1. Open the Settings app on your iPhone and tap General.
2. Tap Date & Time.
3. Turn on the switch next to Set Automatically. If it already is but the Time Zone shows up incorrectly, disable Set Automatically and manually configure the date and time.
Set the Correct Date & Time on Mac
1. Open the System Preferences app.
2. Select Date & Time.
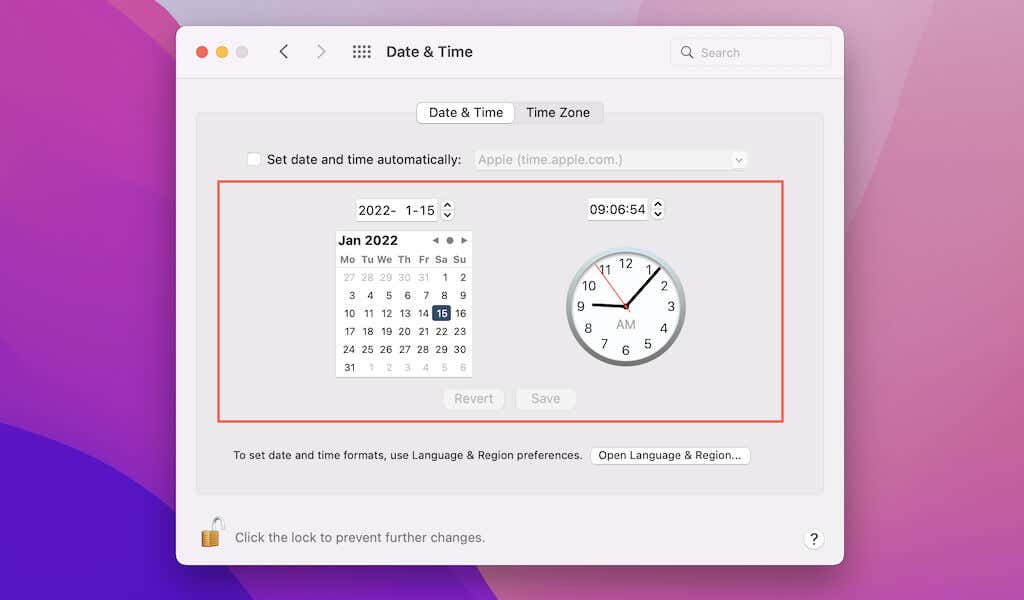
3. Select the Lock icon and enter your Mac’s user account password.
4. Under the Date & Time tab, check the box next to Set date and time automatically. If the date and time show up incorrectly, uncheck it and make manual adjustments.
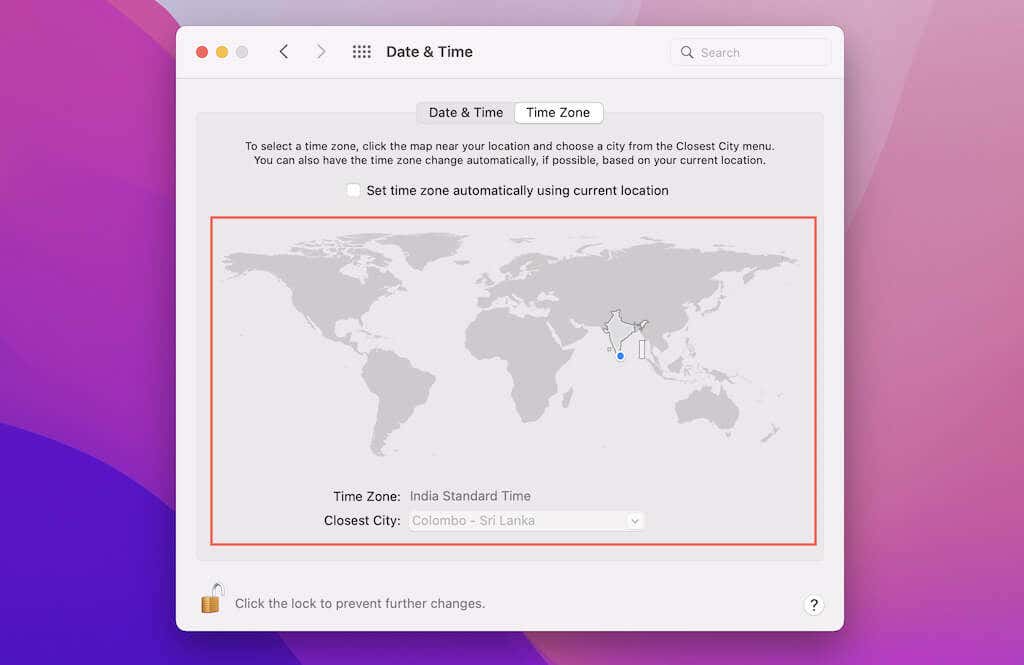
5. Switch to the Time Zone tab. Then, uncheck Set time zone automatically using current location and manually set your time zone if needed.
If your Mac continues to display the date and time incorrectly, we recommend resetting the NVRAM and SMC.
Update Your System Software
Updating the system software on your iPhone, iPad, or Mac often resolves various conflicts related to your Apple ID.
Update System Software on iPhone & iPad
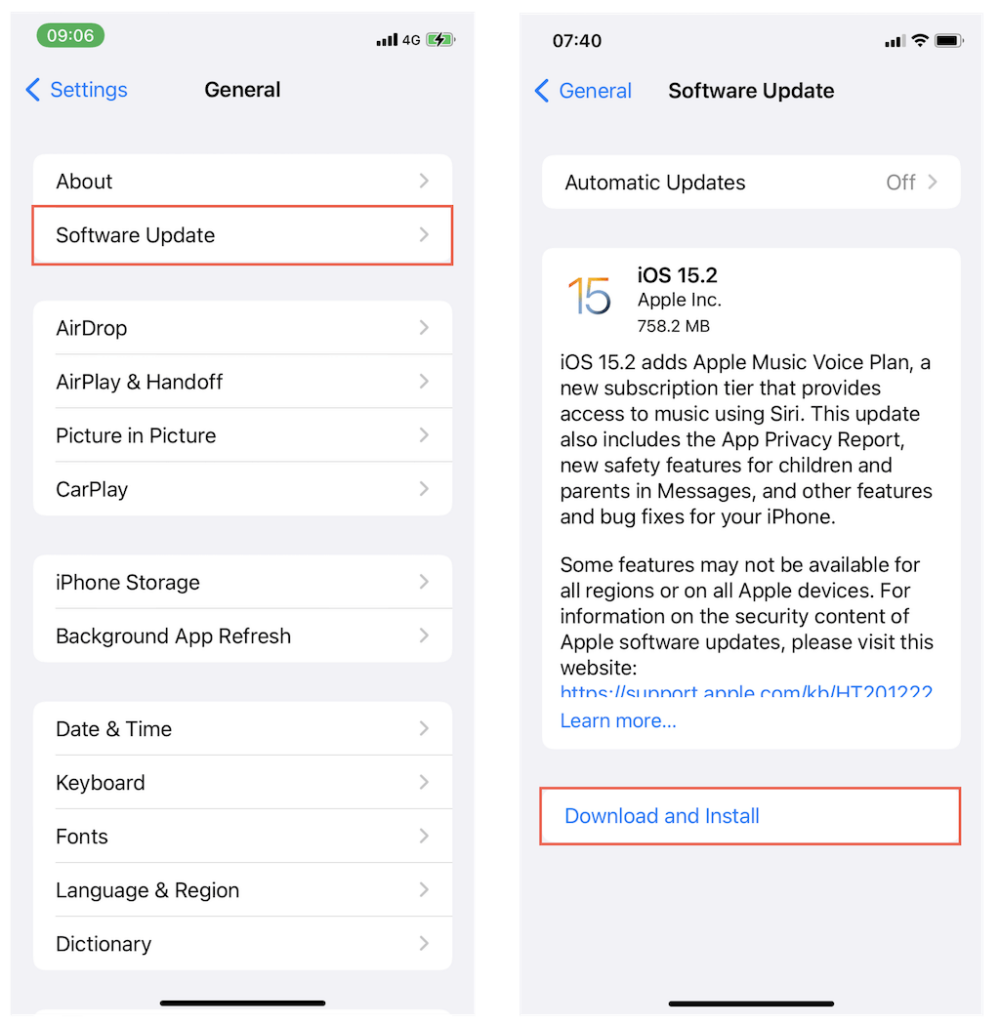
1. Open the Settings app.
2. Tap General > Software Update.
3. Tap Download and Install to apply any outstanding iOS device updates.
Update System Software on Mac
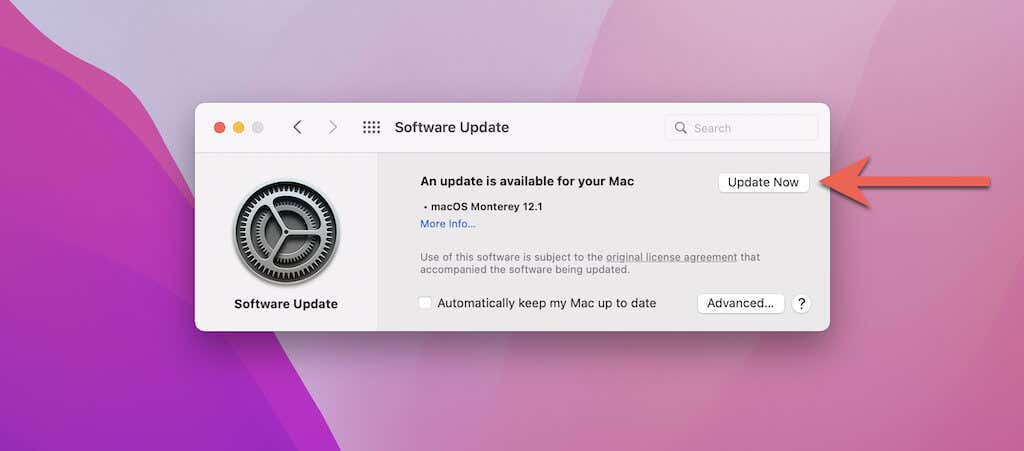
1. Open the System Preferences app.
2. Select Software Update.
3. Select Update Now apply any pending macOS updates.
Have trouble applying system software updates? Learn how to fix stuck updates on iPhone and Mac.
Sign Out/Sign Back Into Apple Store
If the “Disabled iTunes/App Store Account” error persists, try signing out and back into the App Store on your iPhone, iPad, or Mac.
Sign Out/Sign Back Into App Store on iPhone & iPad
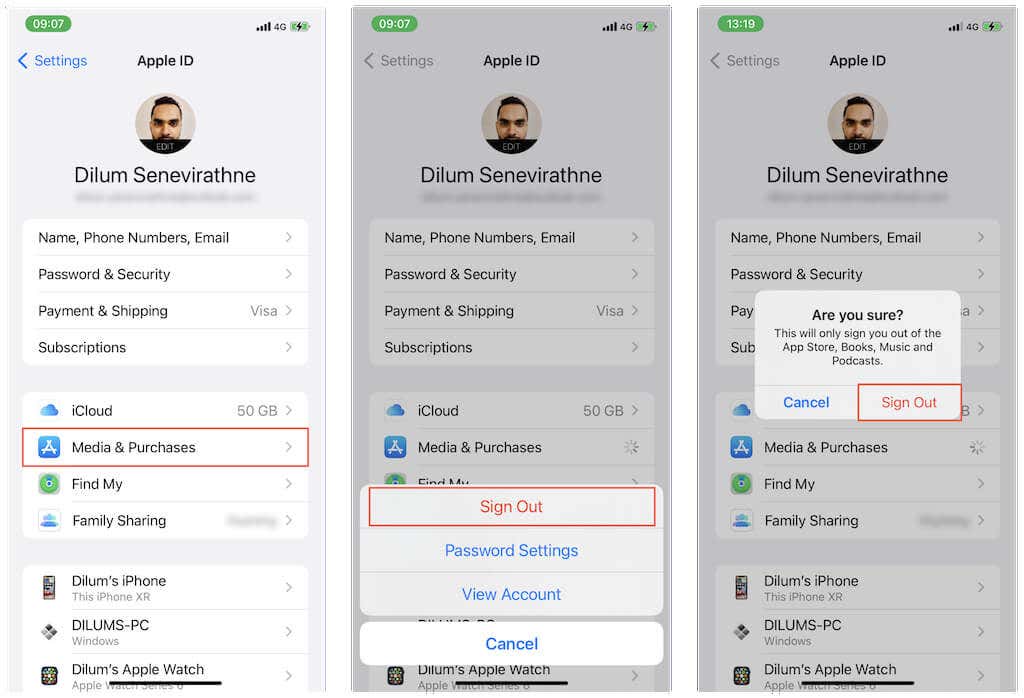
1. Open the Settings app and tap your Apple ID.
2. Tap Media & Purchases.
3. Sign Sign Out.
4. Restart your iPhone or iPad.
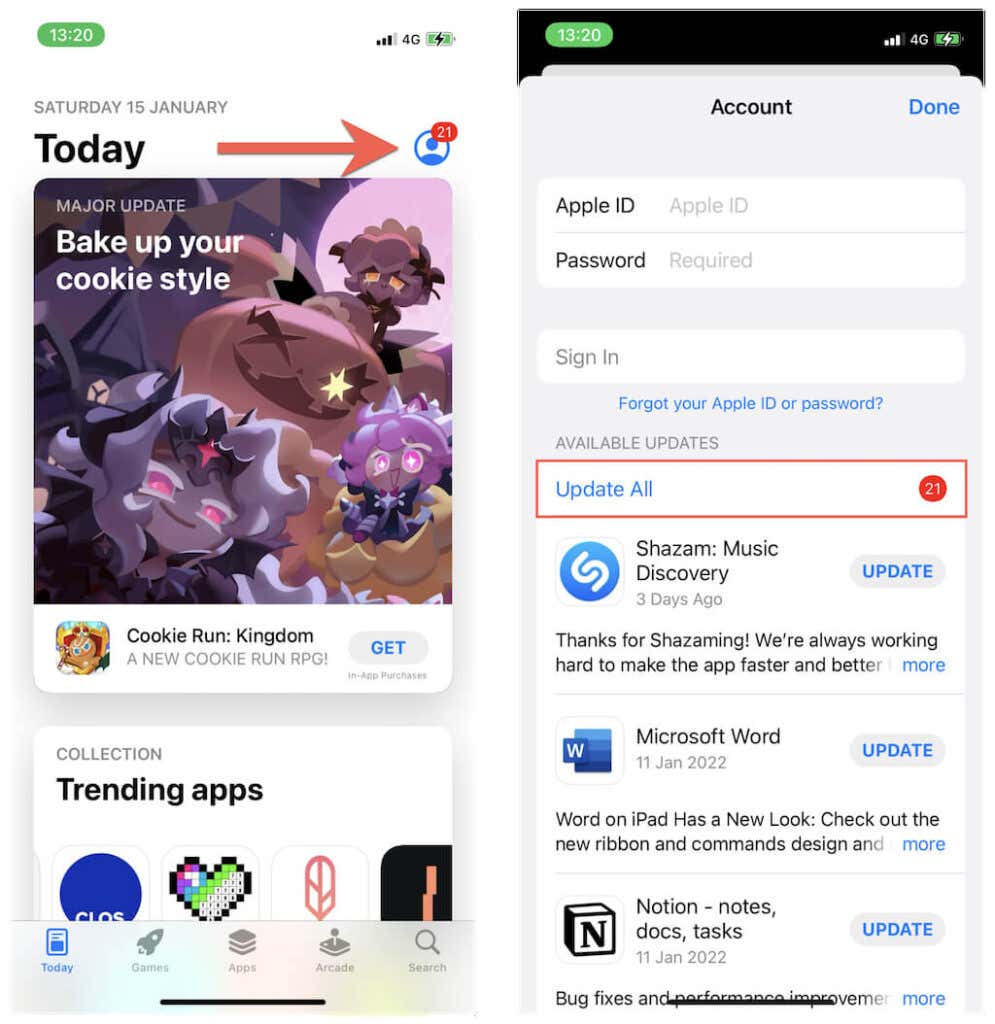
5. Open the App Store. Then, tap the profile icon and sign in with your Apple ID.
Sign Out/Sign Back Into App Store on Mac
1. Open the App Store.
2. Select Store > Sign Out on the menu bar.
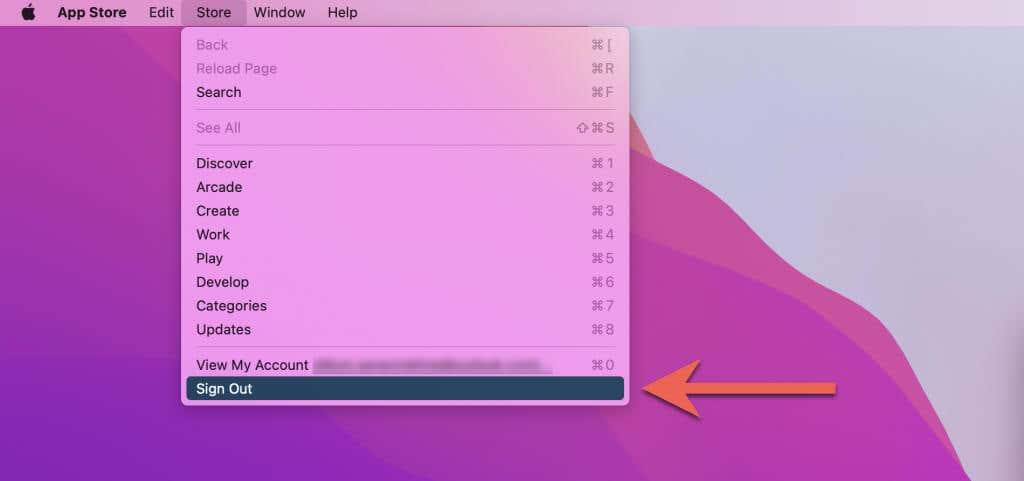
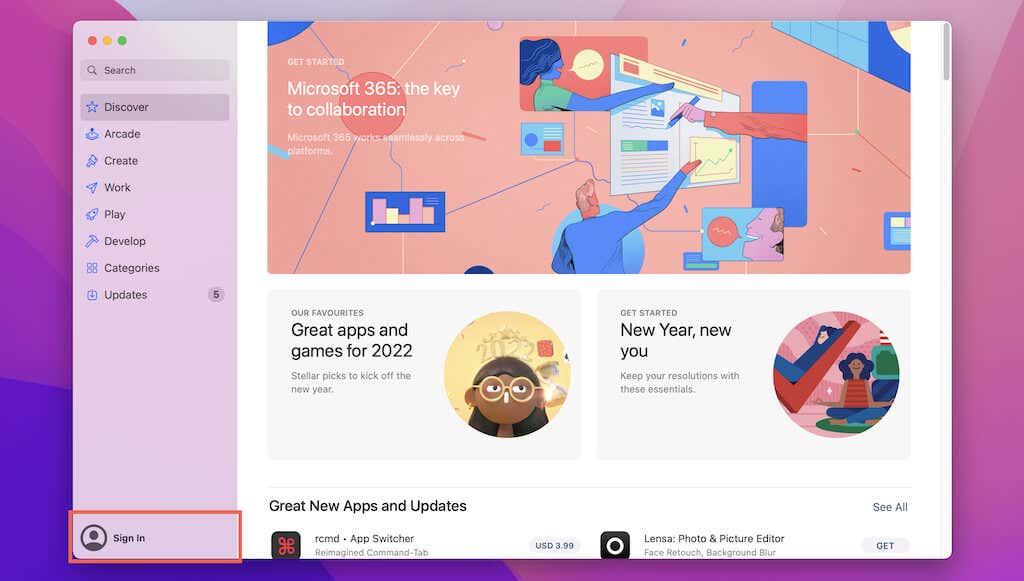
3. Restart your Mac. Then, re-open the App Store and select the Sign In option to sign back in.
Sign Out of iPhone, iPad, & Mac
The following fix involves signing out of iCloud on your iPhone, iPad, or Mac, and then back in.
Sign Out/Sign Back Into iPhone & iPad
1. Open the Settings app and tap your Apple ID.
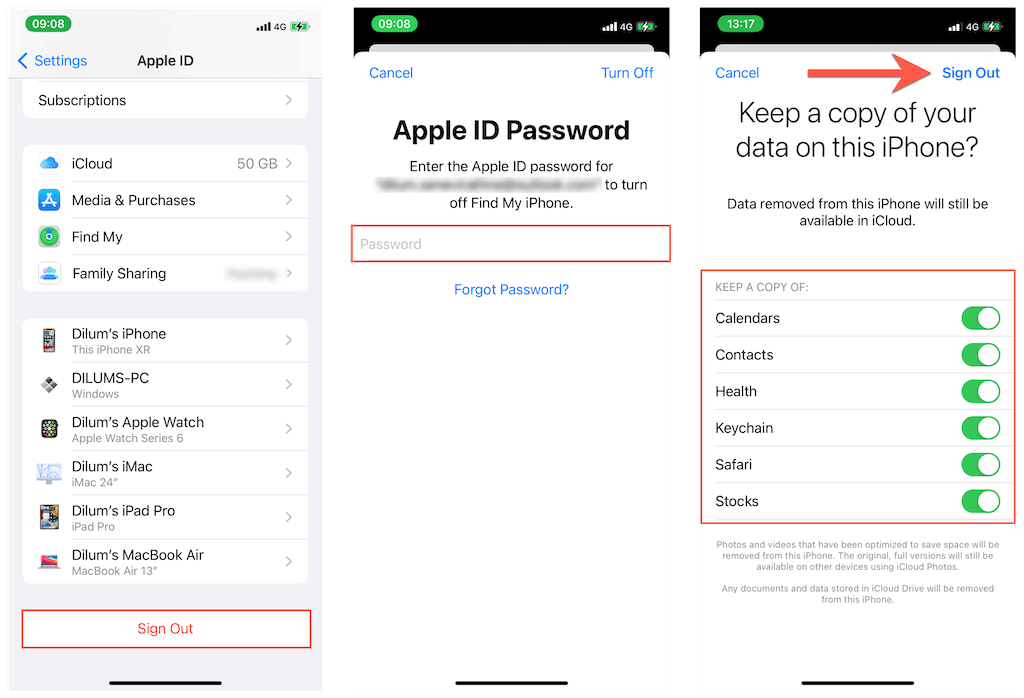
2. Scroll down and tap Sign Out.
3. Enter your Apple ID password to disable Find My iPhone/iPad. Then, review the forms of data you want to keep on your iPhone or iPad (e.g., Contacts, Health, Keychain) and tap Sign Out.
4. Restart your iPhone.
5. Reopen the Settings app and tap Sign In to back into the iPhone.
Sign Out/Sign Back Into Mac
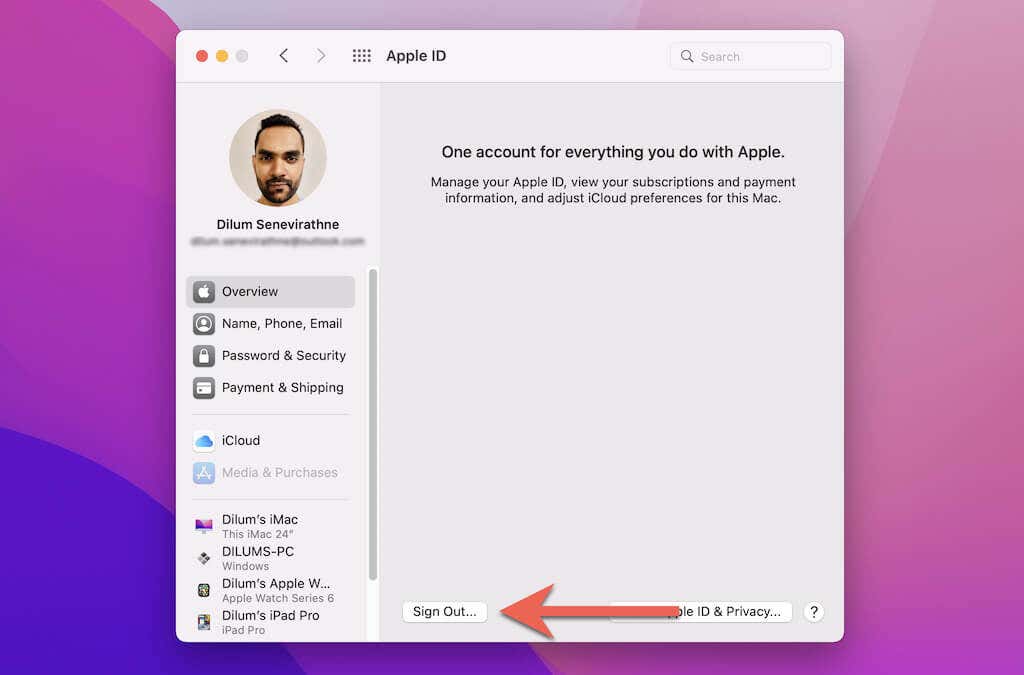
1. Open System Preferences and select Apple ID.
2. Switch to the Overview tab.
3. Select Sign Out.
4. Review the forms of data you want to keep on your Mac.
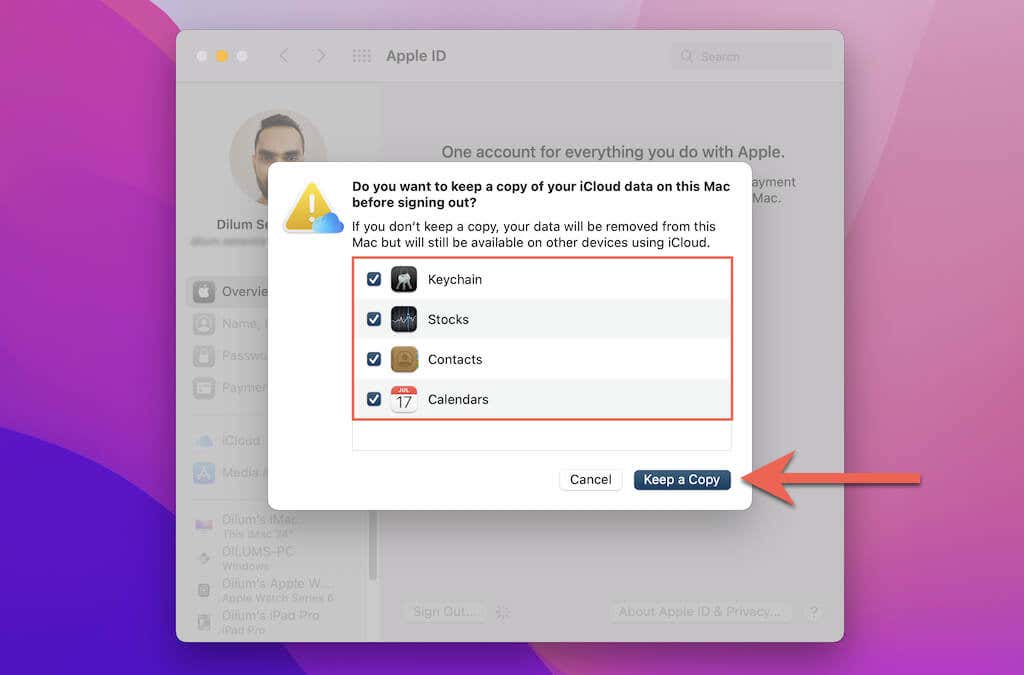
4. Disable Find My Mac and select Continue to sign out of iCloud.
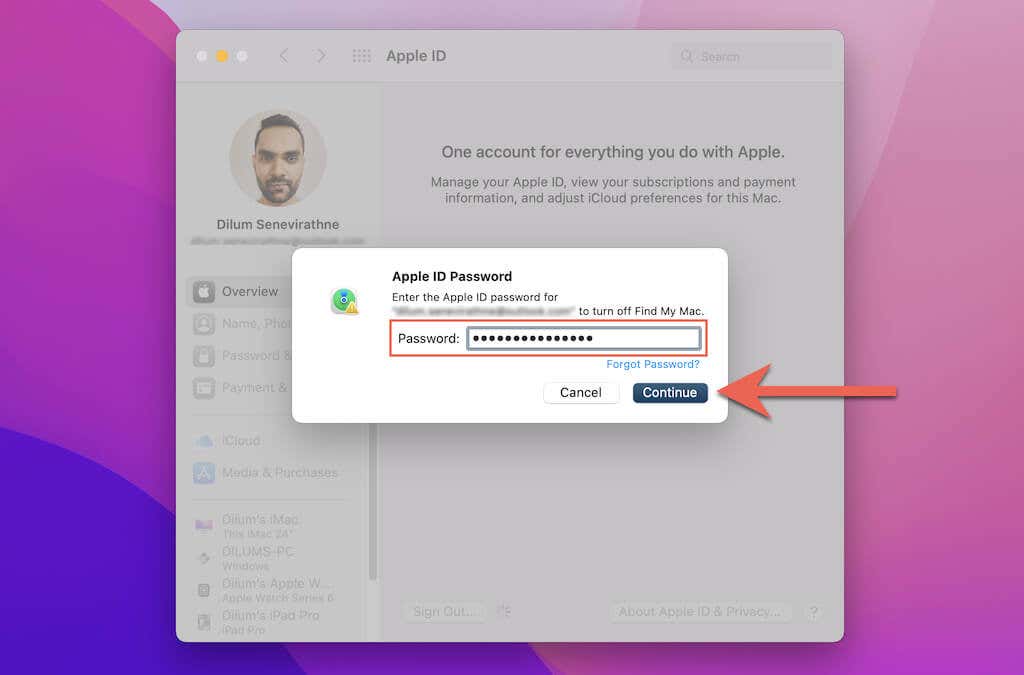
5. Restart your Mac. Then, re-open the System Preferences app and select Sign In to sign back into your Mac.
It’s Time to Contact Apple Support
If none of the fixes above help, your only option is to contact Apple Support. You’ve got several ways to do that:
- Use the Apple Support app on your iPhone.
- Visit the Apple ID, App Store, and iTunes support pages on the Apple Support website.
- Chat with Apple Support via iMessage using another iOS device.
Alternatively, book an appointment at your nearest Apple Store and let an Apple Genius troubleshoot the issue.
[related_posts_by_tax posts_per_page="5"]