Mac users can experience bugs or glitches that prevent their machines from connecting to Wi-Fi. There could be an issue with the network or the router, downtime on the broadband provider’s end, an issue with macOS, selecting the wrong SSID, or entering the wrong Wi-Fi network password, among others.
Whatever the reason, this guide lists some steps and tips to help troubleshoot when your Mac won’t connect to Wi-Fi.
What to Do When Your Mac Won’t Connect to Wi-Fi
Fortunately, you can follow the various fixes below to identify the problem and resolve it.
Quick Tips
- Check whether you’re trying to connect to the right SSID or that you’re using the correct Wi-Fi login credentials.
- Connect to a different Wi-Fi network if possible, to identify if the issue is with the computer or your primary Wi-Fi router.
- Restart your router. If there’s any interference like metal objects, a microwave oven, baby monitors, filing cabinets, wireless headsets, video game controllers, activity trackers, walkie-talkies, or other radios around the router, they may affect the connection. Move or remove such objects, or move your Mac closer to the router and try connecting to Wi-Fi again.
- Get a Wi-Fi booster to expand your wireless network or use a spare router as a Wi-Fi extender instead of moving things around.
- Make sure your router is kept in a cool, dry spot and that it isn’t covered, otherwise it may overheat and stop working properly.
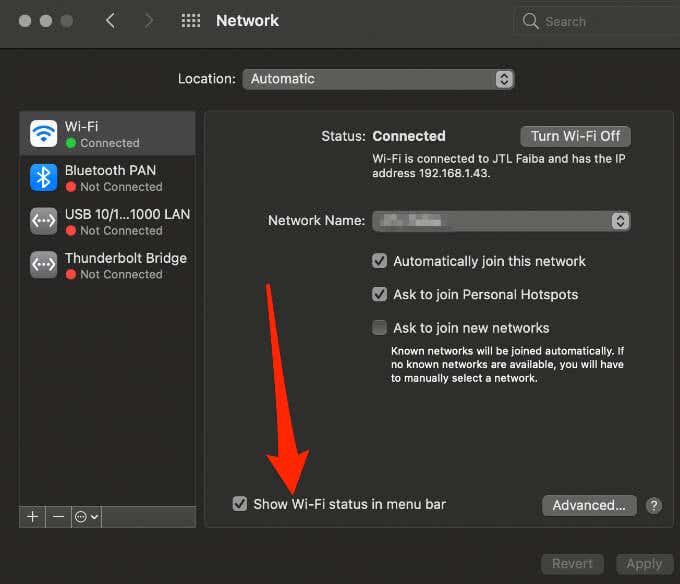
- Check whether the Wi-Fi icon appears in the menu bar. If not, select Menu > System Preferences > Network. Select Wi-Fi > Show Wi-Fi status in menu bar.
- Restart your Mac and try connecting to Wi-Fi again.
- Check whether the issue could be with your broadband provider. You can quickly check this by using a device connected via Ethernet to see if you can reach the Internet.
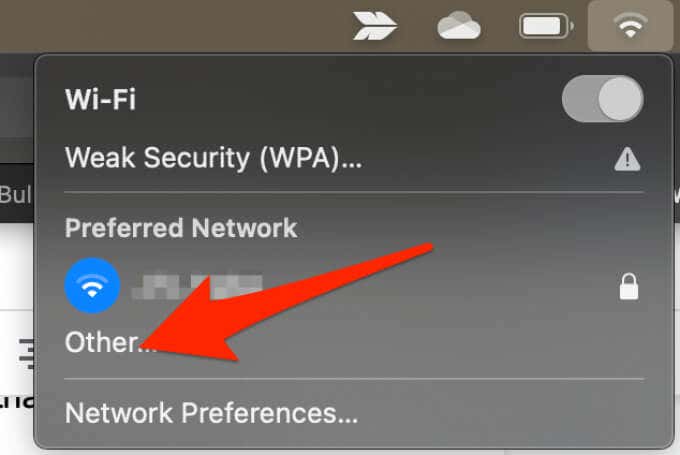
- If the Wi-Fi network is hidden, select the Wi-Fi menu and then select Join Other Network or Other. Enter the network name, security and password details and select Join.
- Try connecting using Ethernet to see if it’s an external issue or something wrong with your Mac. Get an Ethernet cable and connect it to your router and the Ethernet port on your Mac. If your Mac doesn’t have an Ethernet port, get an Ethernet adapter like the Apple Thunderbolt to Gigabit Ethernet Adapter or the Belkin USB-C to Gigabit Ethernet Adapter.
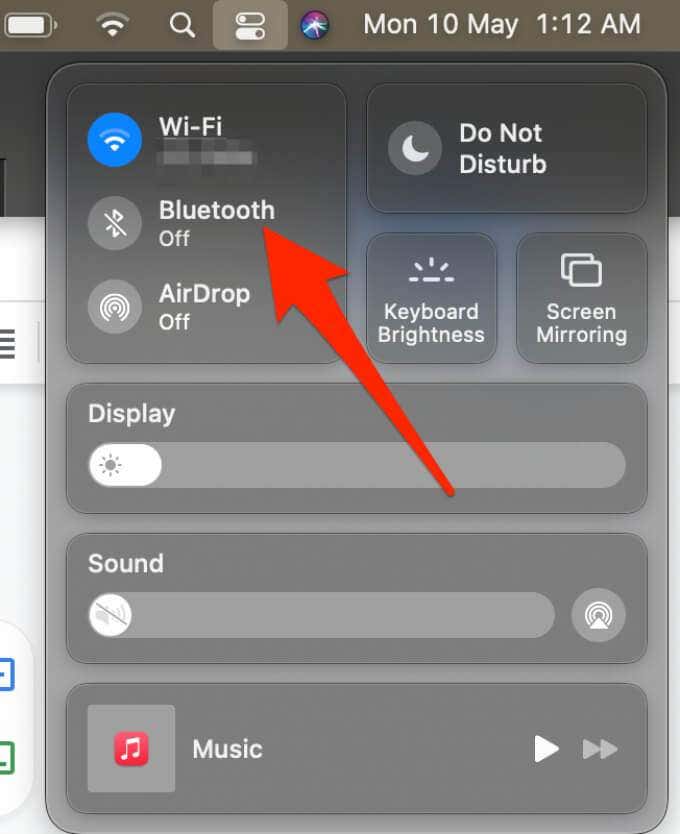
- Disconnect Bluetooth on your Mac. Open the Control Center from the menu bar and disable Bluetooth.
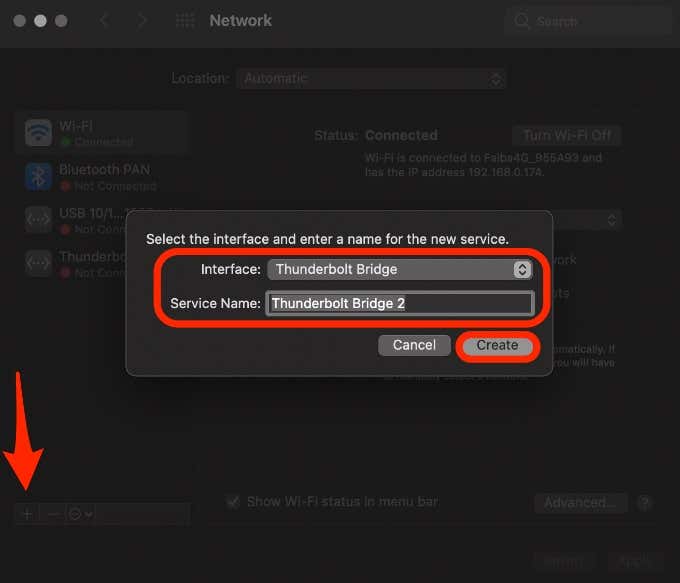
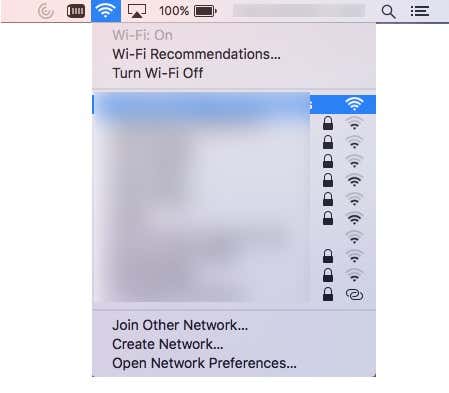
- If you don’t see your Wi-Fi network in the list of available networks, create the network. Select the Wi-Fi status icon in the menu bar and then select Network Preferences. Select the Add (plus) button, select the interface, enter a name for the service and then select Create.
- If the Wi-Fi network you’re trying to connect to is created by an AirPort Time Capsule or AirPort base station, unplug the power cord to restart the device and plug it back in after a few minutes. If the network is available again, try connecting to it.
- Update macOS. Select Menu > System Preferences > Software Update to check for and install available updates.
- When your Mac tries to connect to Wi-Fi, it checks and detects any issues that may affect its ability to create a stable, fast, and secure connection. Check Wi-Fi Recommendations in the Wi-Fi status menu for any recommended solutions.
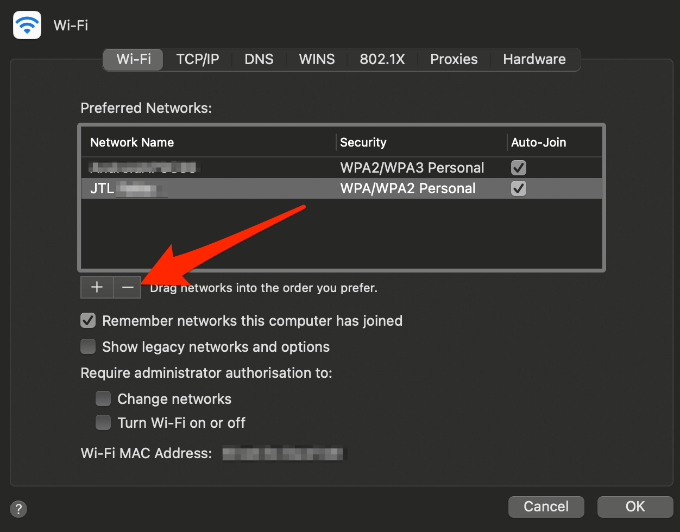
- Forget the network and try connecting to it again. Select System Preferences > Network > Wi-Fi > Advanced. Select the network, press the (-) button and select OK.
- Change your Wi-Fi channel. Also, while in your router settings, make sure you don’t have MAC address filtering or other restrictive security features enabled.
- Reset the SMC, PRAM or NVRAM on your Mac.
- If the problem is the router, you can try and boost the signal strength or replace it with a new one.
- Contact your network administrator or ISP to make sure there is no issue on their end.
- Use a personal hotspot to connect to Wi-Fi. Depending on your mobile carrier, you can share your phone’s cellular data connection with your Mac and access the web. If you can connect via the hotspot, the issue is most likely with your router or ISP, not your Mac.
- If the issue is with your router, and you’re unable to fix it, you can replace it with a new router.
Use Apple Wireless Diagnostics
Wireless Diagnostics is a little-known utility that ships with your Mac and helps you analyze and diagnose your Wi-Fi connection. The utility helps analyze your connection especially when you can connect to your router but can’t stream video or music, load pages, or receive emails.
To open Wireless Diagnostics:
- Close any open apps and try to connect to your Wi-Fi.
- Press and hold the Option key, select the Wi-Fi icon and then select Open Wireless Diagnostics from the menu.

- Type your Mac user credentials (name and password) if prompted and the utility will begin analyzing your wireless environment.
- Wireless diagnostics will ask for more information about any other router or your base station, which it will include in the diagnostics file it saves to your Mac. Once the analysis is complete, you’ll receive a compressed file that lists the issues the utility detects along with possible solutions and best practices for your Wi-Fi connectivity.
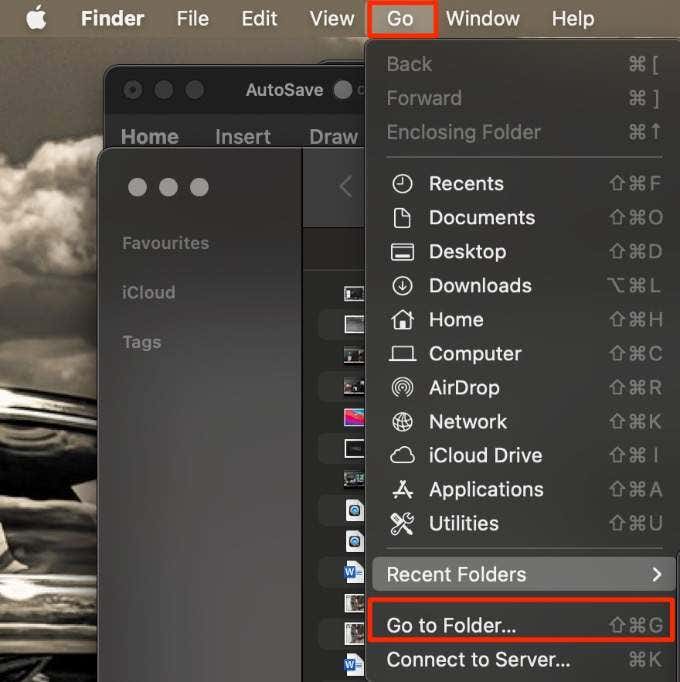
- The diagnostics file is saved in the /var/tmp folder, which you can open from Finder in the Dock. Select Finder > Go > Go to Folder, type /var/tmp as the folder name and then select Go to open the folder containing the diagnostics file. Look for a file that starts with WirelessDiagnostics and ends with .tar.gz.
Note: To see the details of the items on the diagnostics report, select the info button next to each item. Make sure to back up or note down your router or network settings before changing them based on the diagnostics recommendations just in case you’ll need to use the settings later on.
Renew DHCP Lease
The DHCP (Dynamic Host Configuration Protocol) gives out IP addresses to devices on your network so that they can communicate. These include your Mac, router, phone, and any other devices connected to your network.
If the DHCP Lease has issues, it could explain why your Mac won’t connect to Wi-Fi. Renewing the lease may resolve the problem.
- Select Menu > System Preferences > Network.
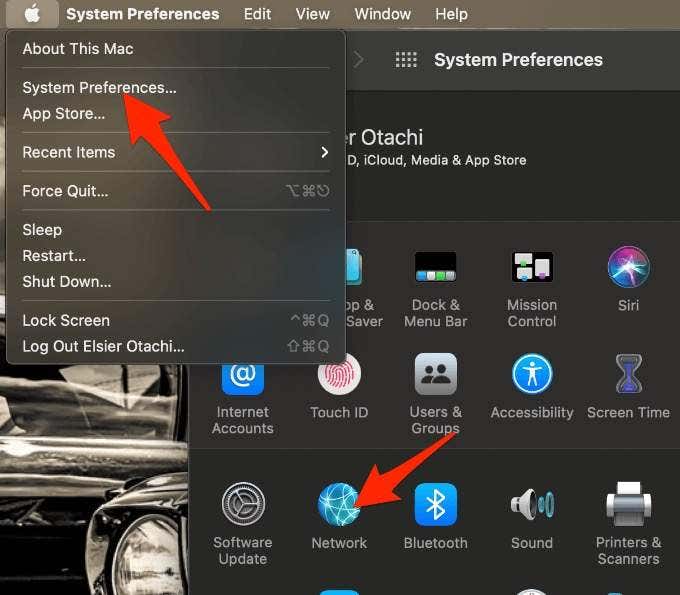
- Select Wi-Fi > Advanced.
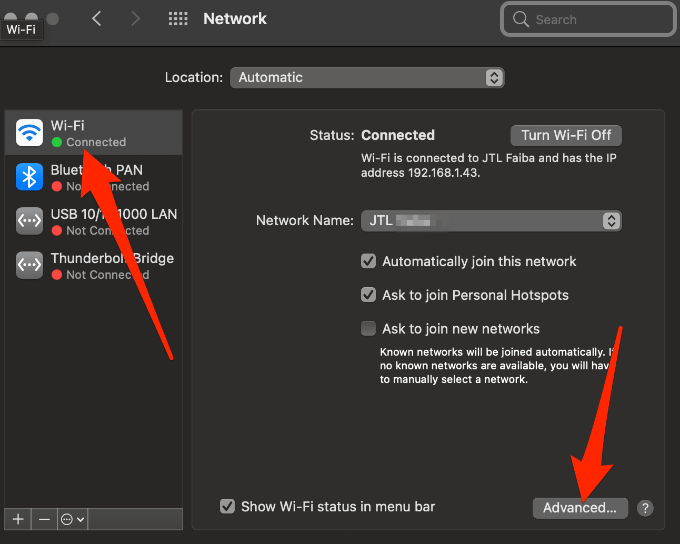
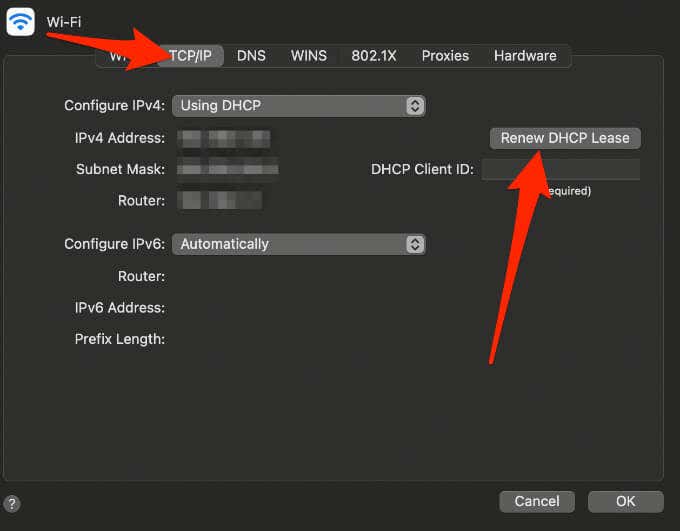
- Select Renew DHCP Lease under the TCP/IP tab.
Start Your Mac in Safe Mode
Safe Mode is one of the startup options in your Mac that can help you figure out whether an issue is caused by software or apps that load as your Mac boots up. Safe Mode prevents software from launching during your Mac’s booting process, including login items, third-party fonts and non-essential system extensions.
You can boot your Mac into Safe Mode and check whether the Wi-Fi connectivity issue still happens.
- Restart your Mac and down press the Shift key immediately as your Mac boots up.
- When the login screen appears, release the Shift key and log in to macOS.
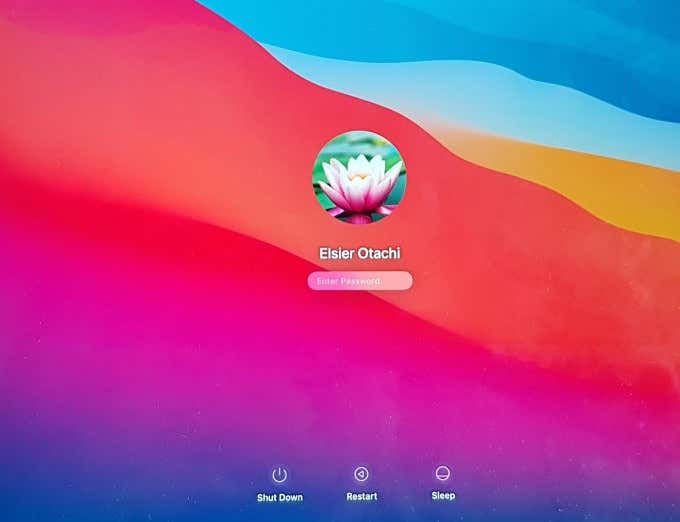
- If asked to log in again, enter your login details, and you’ll see the words “Safe Boot” in the top right corner of the window.
Note: If the issue doesn’t occur in Safe Mode, it’s probably been solved so you can restart your computer normally and test whether you can connect to Wi-Fi again. However, if you’re still having Wi-Fi connection issues in Safe Mode, reinstall macOS and update Apple software and third-party apps.
Run Apple Diagnostics
Mac still won’t connect to Wi-Fi? Run Apple Diagnostics to check for network or Wi-Fi issues.
- Unplug all peripherals connected to your Mac and shut down the computer.
- Power on your Mac while pressing and holding down the D key.
- If you get a screen asking you to select a language, pick the language and then wait a few minutes.

If there’s a problem, Apple Diagnostics will suggest possible solutions.
Fix Wi-Fi Issues on Mac
With the tips and fixes in this guide, you should be able to troubleshoot the problem and get connected again. However, if none of these steps helped, make a Genius Bar appointment to get your Mac fixed.
Leave a comment and let us know which tips or solutions worked for you.