Siri has improved a lot on Apple devices, but it doesn’t hold a candle to Google Assistant. So if you’re frustrated with Siri, we’ll show you how to use Google Assistant on your iPhone.
How to Install and Set Up Google Assistant on iPhone and iPad
You can download Google Assistant on your iPhone or iPad from the App Store. Once you’ve installed the app, you can begin setting up Google Assistant. The Google Assistant app will first ask you to sign in with a Google account. Once you’ve done that, you’re ready to start using the app.
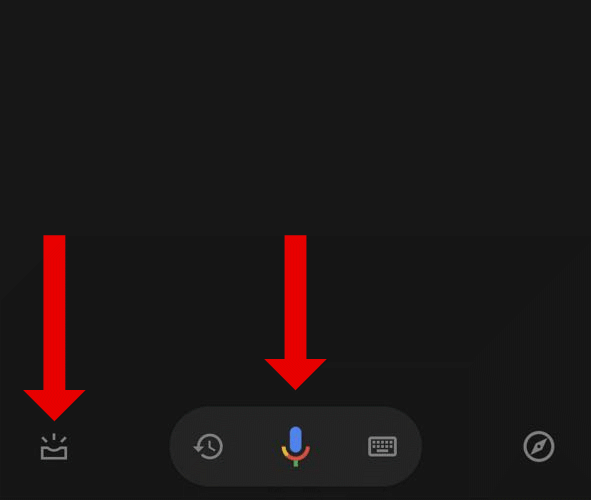
To make the most of the app, Google Assistant will ask you to grant a couple of permissions. As part of the initial Google Assistant setup process, you should tap the microphone icon in the app at the bottom of the screen.
Now, Google Assistant will ask permission to access the microphone on your iPhone or iPad. Tap OK to grant this permission.
Tap the icon in the bottom-left corner of the app’s home page. You’ll see a message informing you that Google Assistant needs Bluetooth permission. This is required if you use any Bluetooth device with the Google Assistant integration, such as a pair of headphones or a Google Home speaker.
Tap the Continue button below this message and then tap OK when you see the pop-up requesting Bluetooth permission for Google Assistant.
Finally, Google Assistant may ask for access to your contacts and the Web & App Activity data saved under your Google account. If you plan to ask Google Assistant to make a phone call or send text messages to people in your contacts, you should grant access to your address book. Google uses Web & App Activity data to sync your history, location data, and activity across devices.
Google Assistant will work fine even if you don’t grant it access to your Web & App Activity data. Still, if you use the service on multiple platforms, such as on an Android device, you might want to consider enabling it.
Google Assistant: Supported Languages on iPhone and iPad
When you’ve installed and set up Google Assistant, enable it in your preferred language. The list of supported languages is the same on Google Assistant for iPhone, iPad, and Android. Here’s the full list of supported languages:
- Arabic
- Bengali
- Chinese (Simplified)
- Chinese (Traditional)
- Danish
- Dutch
- English
- French
- German
- Gujarati
- Hindi
- Indonesian
- Italian
- Japanese
- Kannada
- Korean
- Malayalam
- Marathi
- Norwegian
- Polish
- Portuguese (Brazil)
- Portuguese (Portugal)
- Russian
- Spanish
- Swedish
- Tamil
- Telugu
- Thai
- Turkish
- Urdu
- Vietnamese
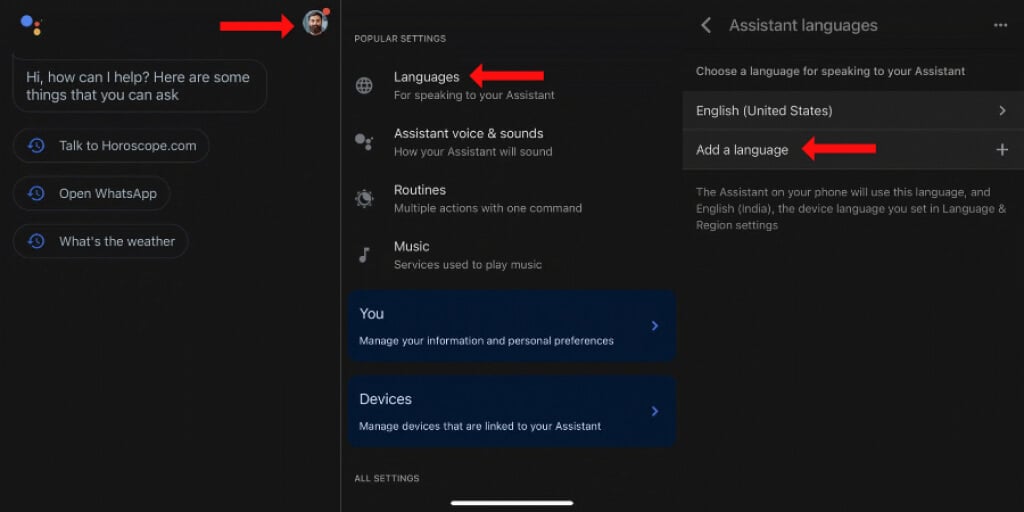
Google keeps adding more languages periodically, and this list may change in the future. Once you’ve verified that your language is in the list, you can open Google Assistant on your iPhone and tap the profile icon in the top-right corner.
Select Languages > Add a language and pick your language from the list to use it with Google Assistant.
How to Use Google Assistant on iPhone and iPad
Look no further if you’re wondering how to use Google Assistant on your iPhone. First, you can open the Google Assistant app on your Apple device, tap the microphone icon, and speak.
Alternatively, you can tap the keyboard icon in the Google Assistant app and type your query. The keyboard icon is to the right of the microphone icon.
You can also open the Google Assistant app, use trigger phrases such as “Hey Google” or “OK Google”, and speak.
Finally, Google Assistant is also a part of the Google Home app, which controls smart home devices via iOS. You can download Google Home from the App Store and use the voice assistant there too.
Add Google Assistant to the Hey Siri Command on iOS
Apple doesn’t allow other voice assistants such as Amazon’s Alexa, Microsoft’s Cortana, or Google Assistant to replace Siri as the default option on iOS. However, a workaround lets you send voice commands directly to Google Assistant on an iPhone or an iPad.
We will use Apple’s Shortcuts app to create an automation routine to make this work. You can download Shortcuts from the App Store and follow these steps to get started:
- Open the Shortcuts app and tap the My Shortcuts tab in the bottom-left corner of the app’s home screen.
- Tap the + icon in the top-right corner to make a new Siri Shortcut.
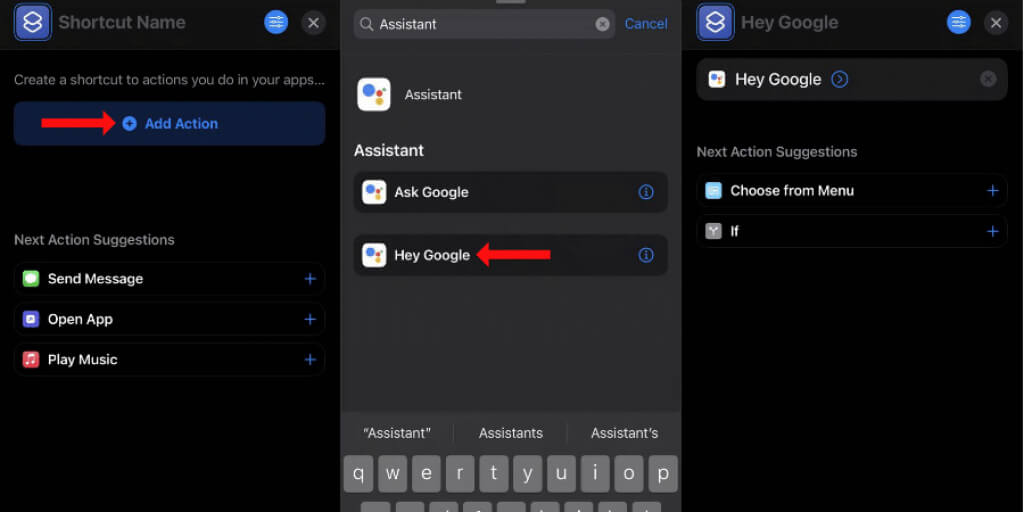
- Tap the Add Action button.
- Use the search bar to look for Google Assistant.
- Tap the Assistant icon, and the app will present you with a list of commands to choose for your Siri Shortcut.
- Select Hey Google.
- Tap the X button in the top-right corner to finish creating your shortcut.
This simple Siri Shortcut adds Google Assistant to the Hey Siri command on your iPhone. You can now quickly launch Google Assistant using the following ways on your iOS device:
- If Hey Siri is enabled on your iPhone, say, “Hey Siri Hey Google.”
- In case you’ve disabled the Hey Siri phrase to launch Siri, you can press and hold the power button on your iOS device to fire up Apple’s voice assistant, and then you can just say, “Hey Google.”
Both these methods will launch the Google Assistant app instantly. The only limitation is that you will have to unlock your iPhone to use Google Assistant. If your iPhone is locked and you use the “Hey Siri Hey Google” command, Siri will ask you to unlock your iPhone. When you do, it’ll run the query in Google Assistant.
It’s not as smooth as using Google Assistant on Android phones, but it’s the fastest way to use Google’s voice assistant on an iPhone. Unfortunately, you cannot use Google Assistant with an Apple Watch. Even if you add this Siri Shortcut to the Apple Watch, it doesn’t work because the Google Assistant app is unavailable for Apple’s wearable devices.
Useful Google Assistant Settings on iPhone
Once you have Google Assistant up and running on your iPhone, make a few tweaks to personalize your experience. To get started, open the Google Assistant app on your iPhone and tap the compass icon in the bottom-right corner of the app.
This lists popular Google Assistant queries and shows you what the Google service can do for you. You can tap the three horizontal lines icon next to each of these popular actions and hit the bookmark icon at the top of the page. You can access these by tapping the compass icon on the Google Assistant app home screen and scrolling to the bottom. Finally, tap Your actions to see your bookmarks.
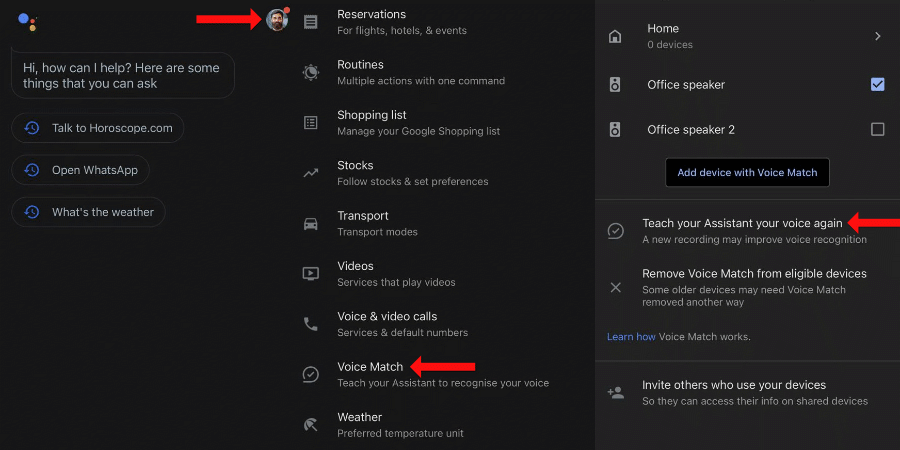
You can then return to the app’s home screen and hit the profile icon in the top-right corner. Here you can check out Assistant voice & sounds to change the voice of Google Assistant. While at it, scroll down on the settings page and select Voice match > Teach your Assistant your voice again to ensure that Google Assistant recognizes your voice.
This helps it recognize you and serve personal requests such as reading your emails from Gmail.
Return to the settings page and scroll down to the All Settings section. You can go through the options here one-by-one to set default services to play music, videos, make voice and video calls, choose preferred temperature units, etc.
Finally, you should tap the Transport option to select your preferred modes of transport. This will influence your directions from Google Maps and save you the trouble of tapping a few extra buttons to set the desired mode each time.
Use Routines With Google Assistant to Automate Repetitive Tasks
Voice assistants are supposed to make your life easier, and that can’t happen if you’re forced to use a voice command for every tiny bit of information you need daily. This is why Google Assistant has Routines, which allows you to assign a single voice command to multiple actions.
Effectively, you could launch Google Assistant and say, “Good morning.” The voice assistant can tell you about the weather, read your emails, inform you about important reminders, birthdays, and other calendar events, read the news, and let you know if your battery is running low. You can assign all these to a single voice command.
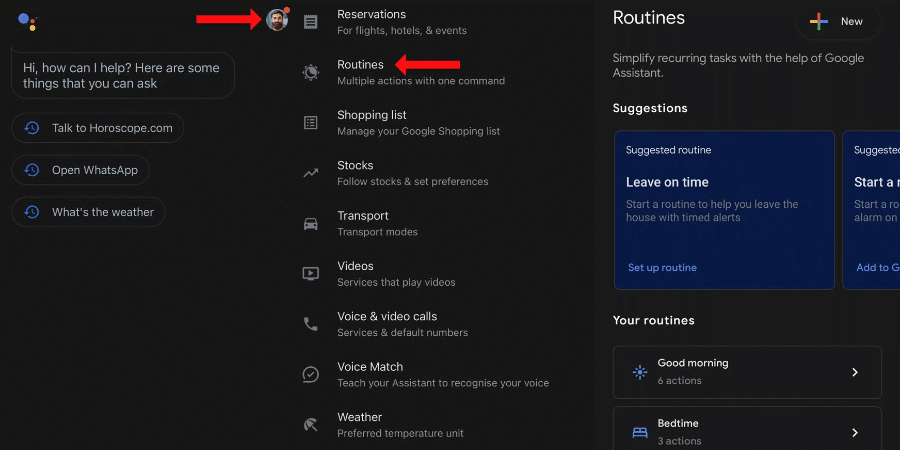
If this sounds like what you need, you should open Google Assistant, tap the profile icon in the top-right corner, and select Routines. Google suggests plenty of helpful routines on this page, but if that doesn’t have what you need, you can tap the New button in the top-right corner and create your own.
Make the Most of Google Assistant
Google Assistant is one of the most useful voice assistants you can use. Once you unlock the full potential of this service, it’s hard to look back. However, it’s also a good practice to periodically check out alternatives to Google Assistant because newer services are constantly improving.
For all its advantages, Google Assistant is far from ideal for the privacy-conscious. However, if you are concerned about privacy, here’s how to stop Google from constantly listening to you.
[related_posts_by_tax posts_per_page="5"]