On the iPhone, iPad, and Mac, you can share photos with Apple and Android users through shared iCloud albums. They are quick to set up, easy to access, and fun to use. We will show how to share photos via iCloud.
Thanks to the device’s stellar camera system, you will probably come across lots of share-worthy photos and videos if you use an iPhone. However, sending them out to friends and family doesn’t have to be complicated. Instead of sharing them via instant messaging or email, you can simply use shared albums.
Read on to learn what you must do to share iCloud Photos on iPhone, iPad, and iPod touch. You will also learn how to use the feature on Mac.
How iCloud Photo Sharing Works
If you have a bunch of photos and videos on your iPhone, iPad, or Mac you want to share with friends and family, the best way to do that is to use the Photos app’s Shared Albums feature. You can quickly set up a shared iCloud album, add the items you want, and invite the people you want to share them with.
Anyone who joins—Apple calls them subscribers—can view, like, and comment on your shared photos and videos and even add their stuff to the album. You can also allow non-Apple users to view shared albums via iCloud.com on any web browser.
However, before you start, here are a few things to keep in mind:
- Shared albums don’t consume your iCloud storage quota.
- Shared albums support all popular photo and video file types, including special formats such as Live Photos and slow-mo video clips.
- You can delete photos from your library, and they will remain in your shared album.
- Subscribers can save photos and videos to their iCloud Photo Library or device.
- You can change a shared album’s preferences, remove subscribers, or delete the entire album anytime.
Additionally, shared albums have the following limitations:
- A shared album can only have a maximum of 5,000 photos.
- A shared album can only have a maximum of 100 subscribers.
- Photos are downscaled to a width of 2048 pixels. However, panoramic photos can be 5400 pixels wide.
- GIFs must be 100MB or smaller.
- Videos are downscaled to 720p and can only be up to fifteen minutes long.
- You or your subscribers can’t edit photos in the shared album.
Activate iCloud Photo Sharing
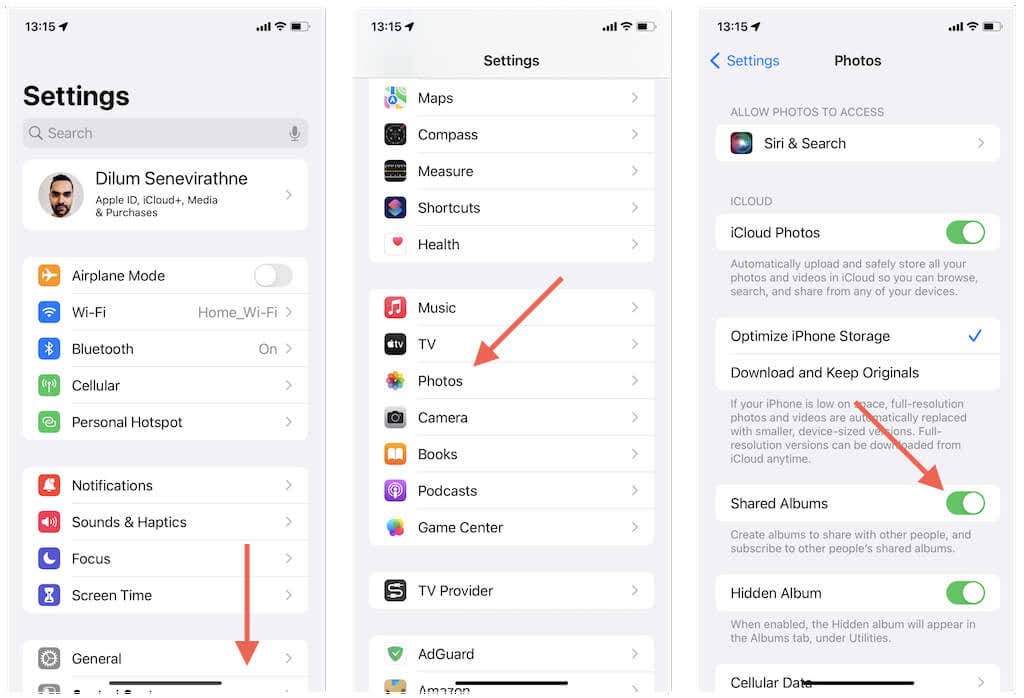
Before setting up a shared album, it’s good to check if the feature is active on your iPhone, iPad, or Mac. You can do that via the Photos preferences.
iPhone & iPad
1. Open the Settings app on your iOS device.
2. Scroll down and tap Photos.
3. Turn on the switch next to Shared Albums.
Mac
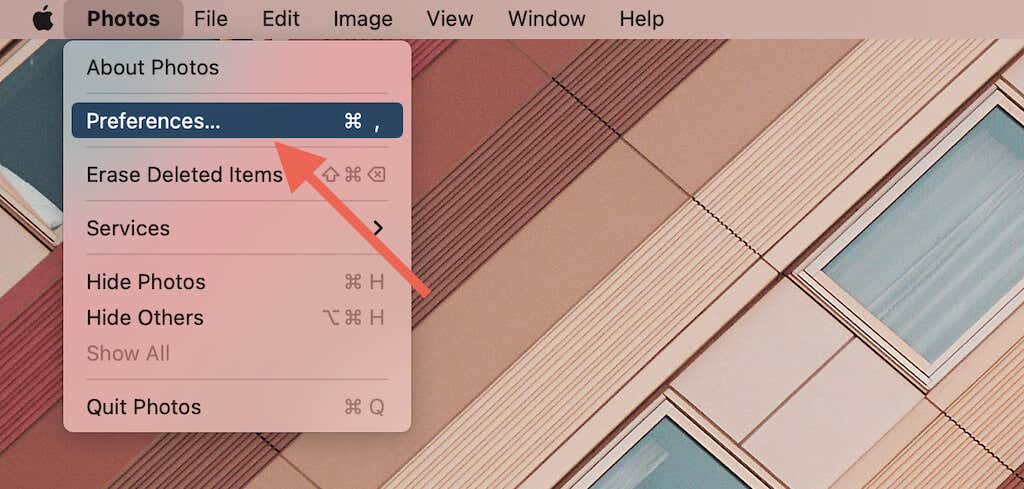
1. Open the Photos app and select Photos > Preferences on the menu bar.
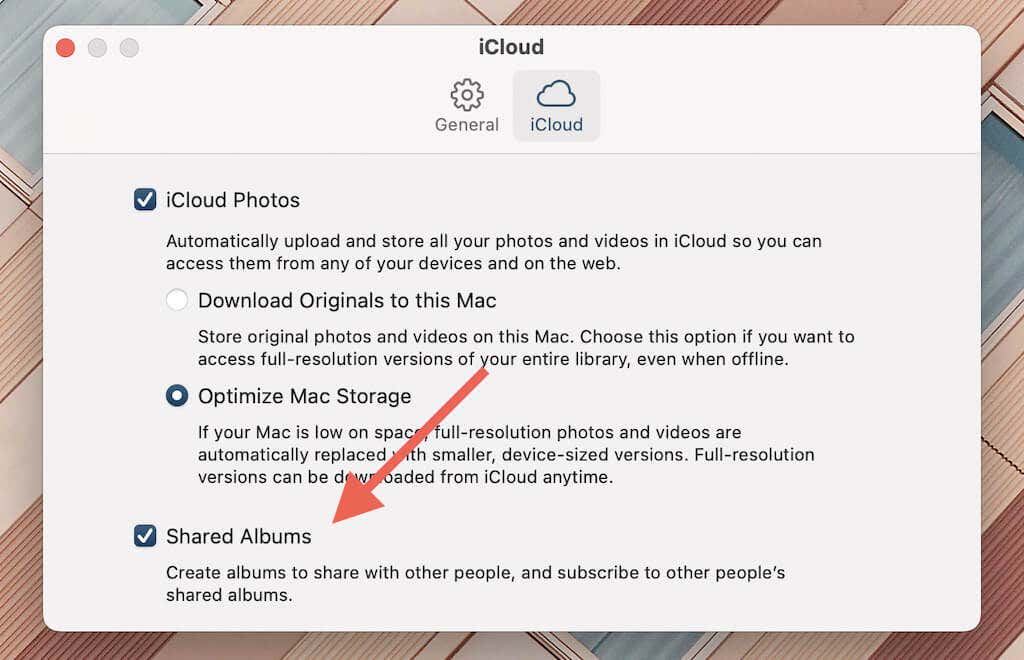
2. Switch to the iCloud tab.
3. Check the box next to Shared Albums.
Create New Shared Album
Go through the following steps to create a shared iCloud album on your iPhone, iPad, or Mac, invite people, and add photos and videos.
Note: If you’re part of an Apple Family, you can use the default Family album to share phones between your family.
iPhone & iPad
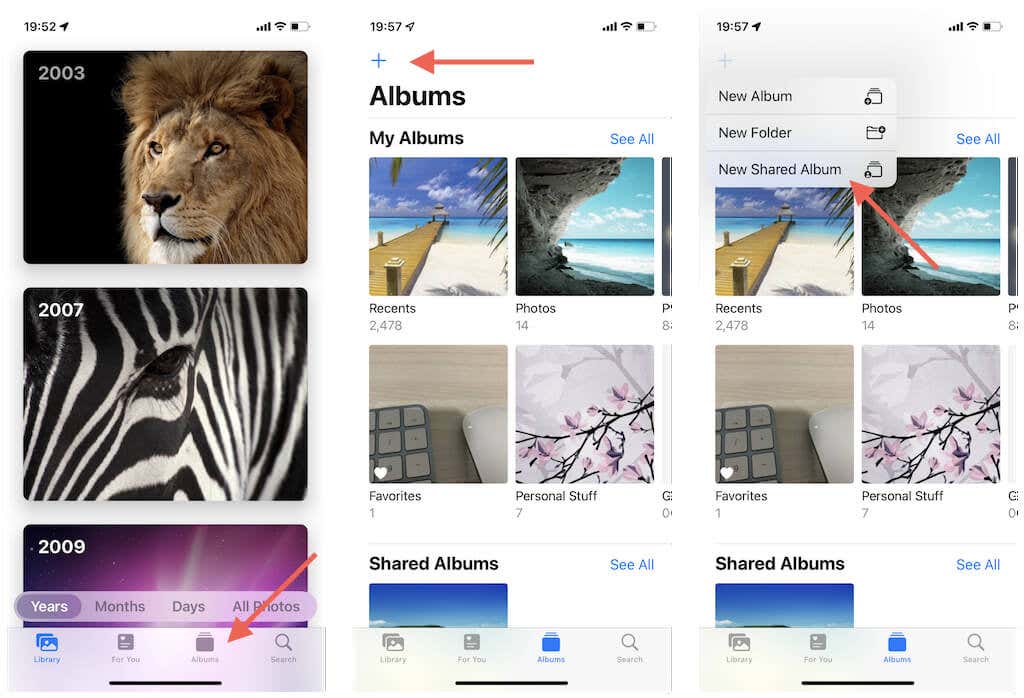
1. Open the Photos app and switch to the Albums tab.
2. Select the Plus button at the top left of the screen and select New Shared Album.
3. Give the album a name.
4. Add the name of at least one person with whom you want to share the photos. Then, select how you want to share the invite—via text message or email. You can always add more people later.
5. Tap Create.
6. Tap Plus and start adding photos. Then, tap Done. You can add more items later.
7. Add a custom message and tap Post.
Mac
1. Open the Photos app on your Mac.
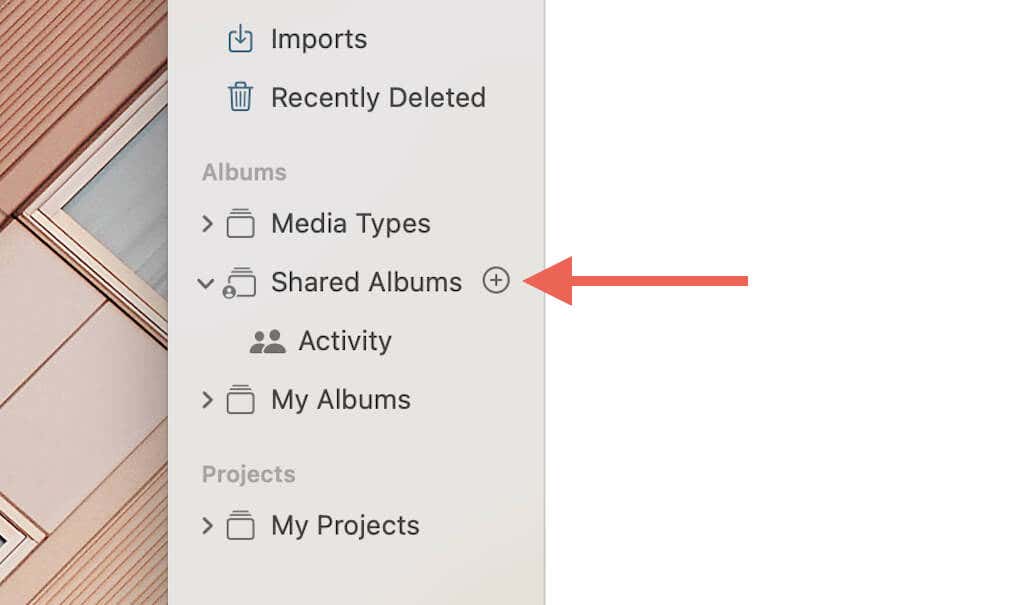
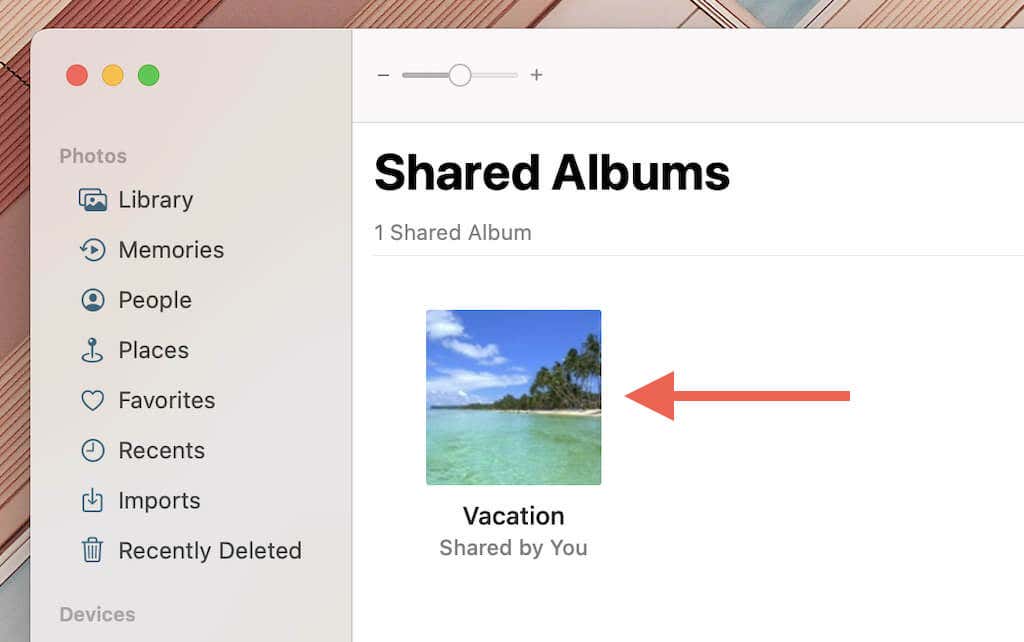
2. Point your cursor at Shared Albums on the sidebar and select the Plus icon.
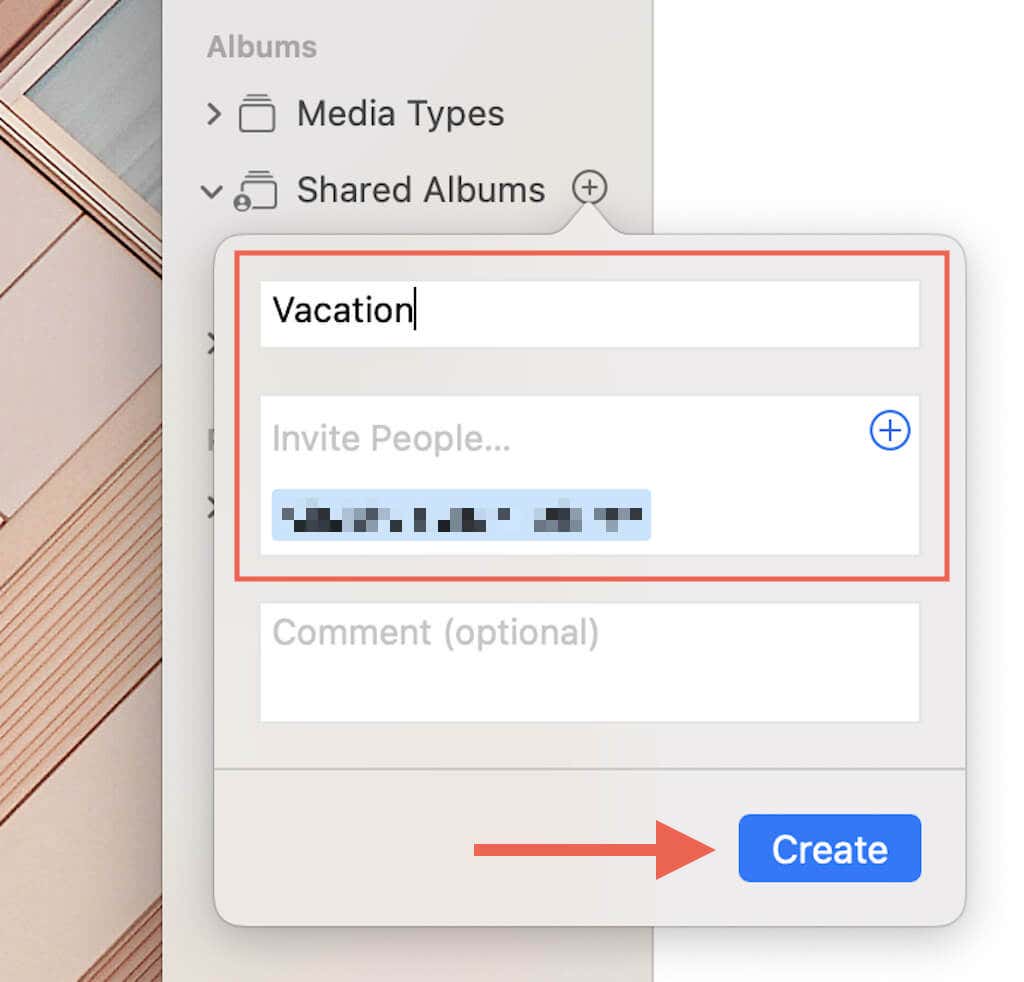
3. Assign a name.
4. Add the name of at least one person, choose how to want to share the invite, and select Create.
5. Select the Add photos and videos to add items to the shared album.
6. Select Add.
Add New People and Manager Other Settings
After creating your shared album, you can add more people and specify your shared album preferences.
iPhone & iPad
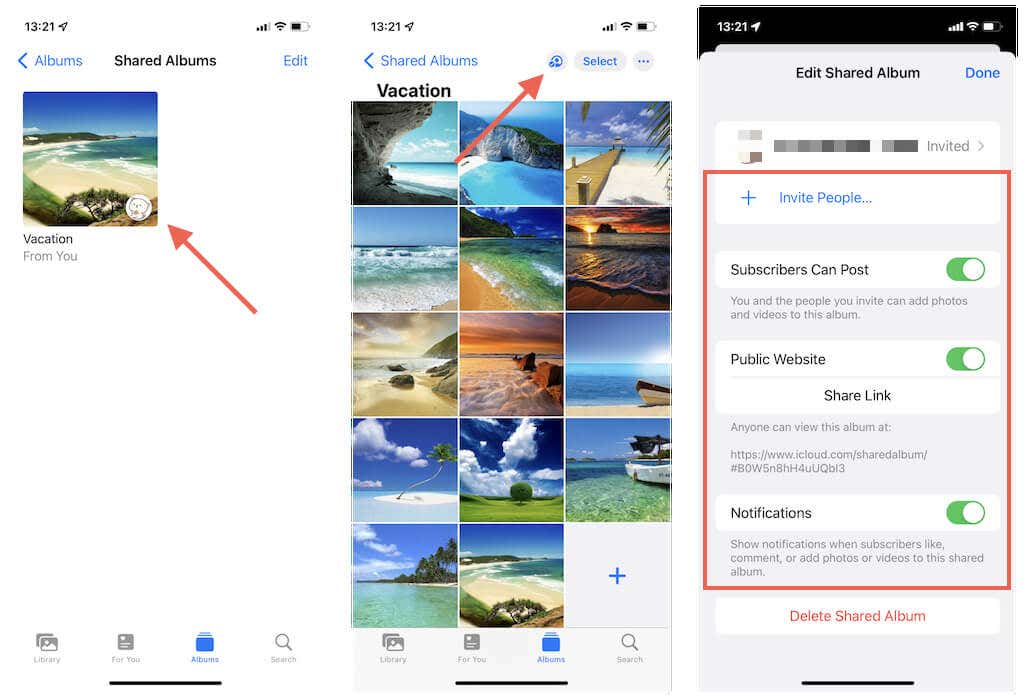
1. Open the shared album.
2. Tap the People icon at the top right of the screen.
3. Use the following options to manage the shared album:
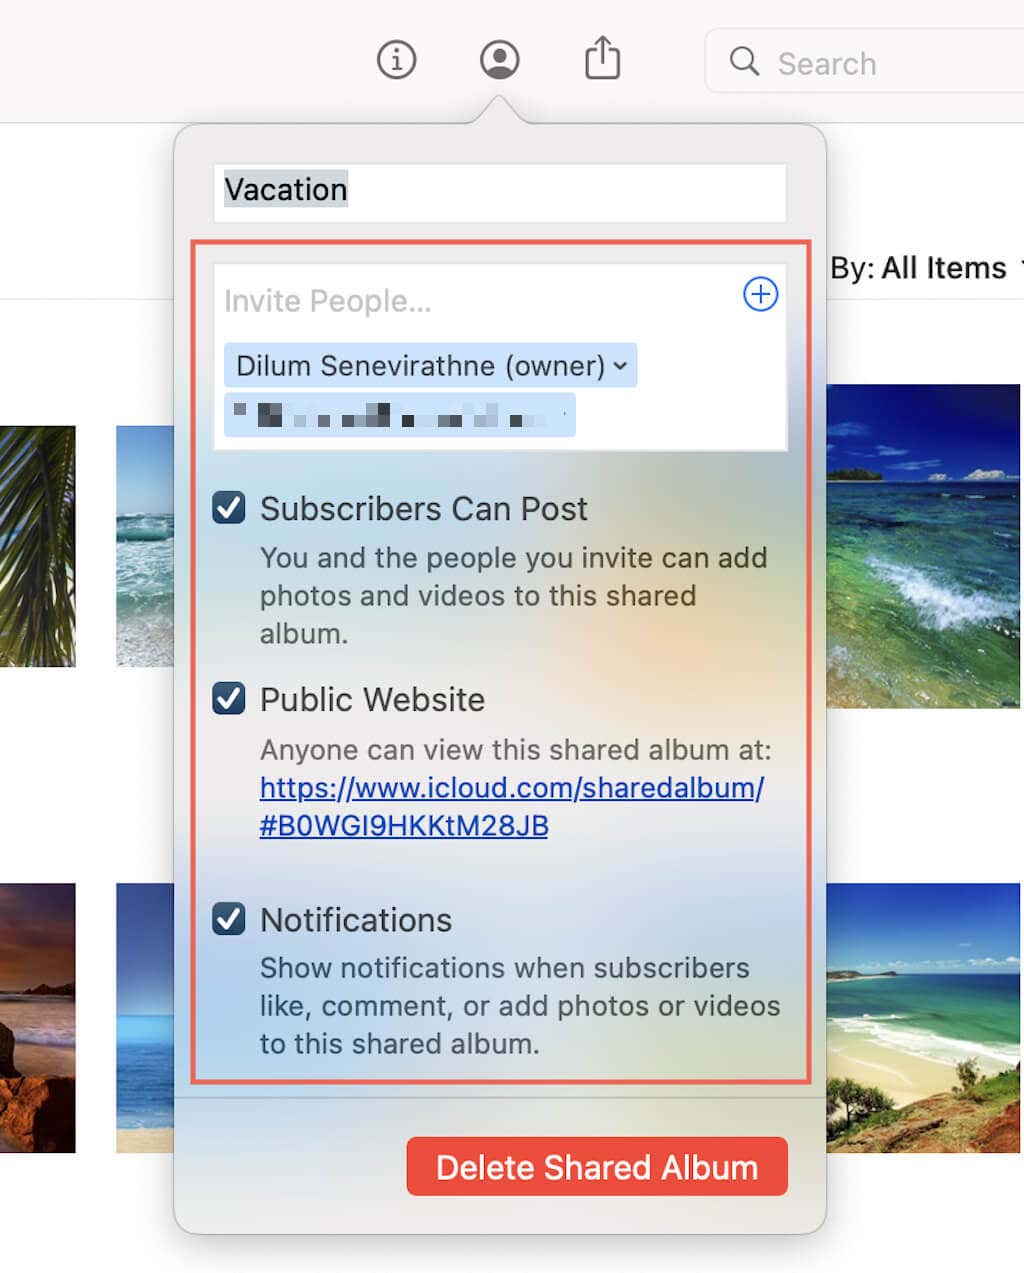
- Tap the Invite People and invite people.
- Activate the Public Website option to let others view the album via iCloud.com. You can tap Share Link to copy the iCloud link to your clipboard and share the album with anyone. This won’t affect your subscriber limit.
- Activate the switch next to Subscribers Can Post if you want to provide your subscribers the permission to post their own photos and videos.
- Turn on the switch next to Notifications to receive notifications when other people like, comment, or add photos and videos.
Mac
1. Open the shared album.
2. Select the People icon at the top right of the Photos window.
3. Invite people, allow subscribers the ability to post, set up the album as a public website, and determine if you want to receive notifications.
View Shared Albums
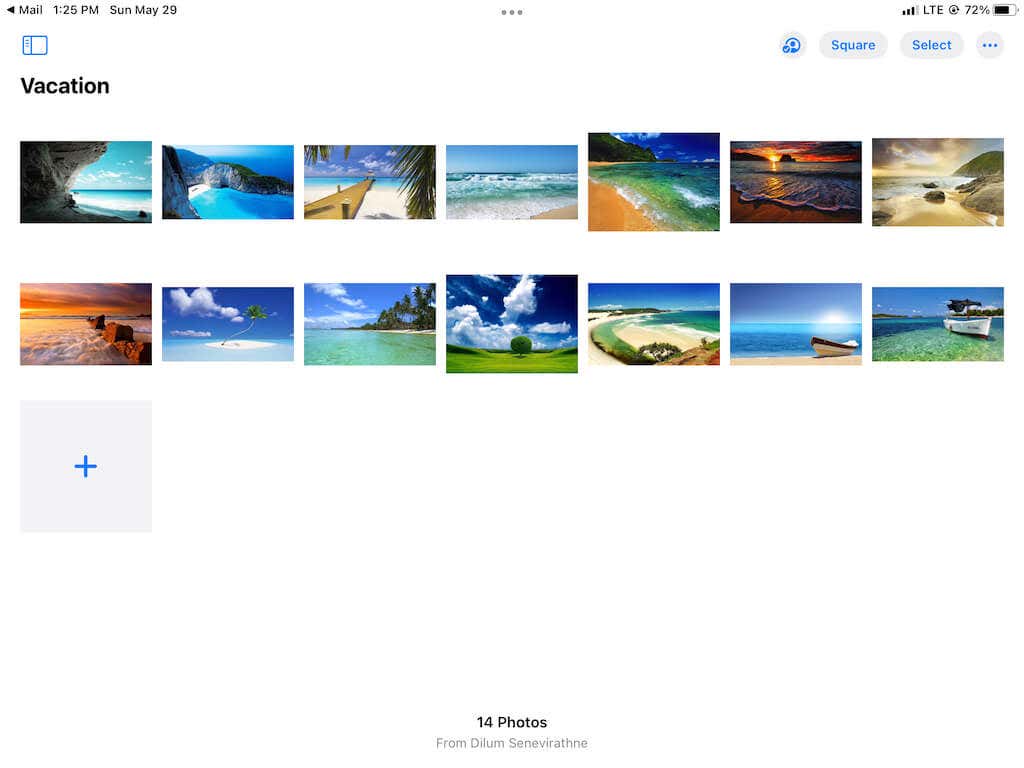
When you share an album with another person, they can view the shared album immediately by tapping the invitation they receive over text or email. The link on the iPhone, iPad, and Mac will automatically cause the album to open in the Photos app.
Depending on the shared album’s settings, the person can view, like, and comment on your photos and add their pictures and videos to the album. They can also download anything offline. You can also comment, reply, and interact with photos and videos others upload.
If a person does not use an iOS, iPadOS, or macOS device, they can view the album via iCloud.com, so long as you set up the album as a Public Website. They do not need to sign in with an Apple ID or iCloud account.
Delete Items From iCloud Shared Albums
As the creator of the shared album, you can delete photos and videos whenever you want. You will lose items within the folder, so make sure to save any items to your iPhone or Mac if you don’t have any copies within your photo library.
iPhone & iPad
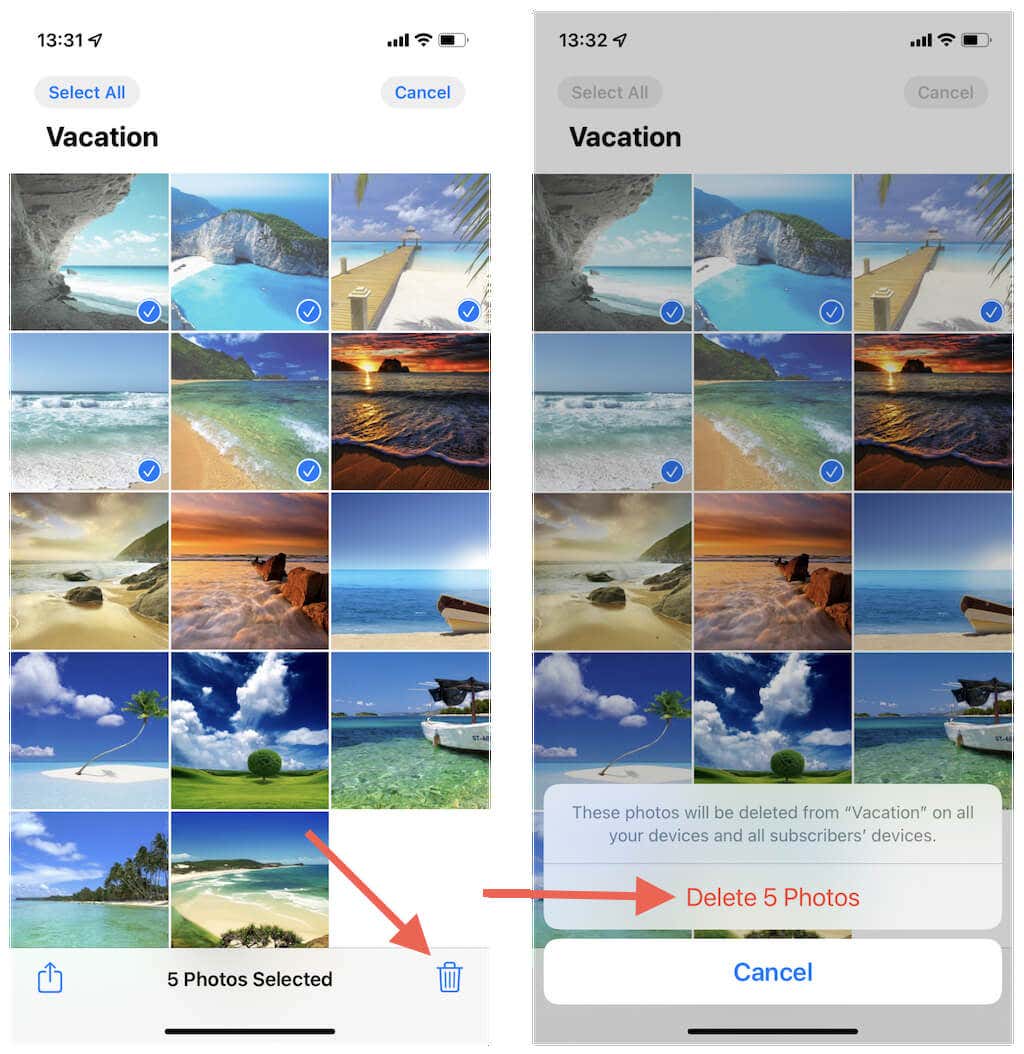
To delete a photo or video on the iPhone, long-press the item and tap Delete From Shared Album. Or, tap Select to enter selection mode, pick multiple items, and tap the Trash icon.
Mac
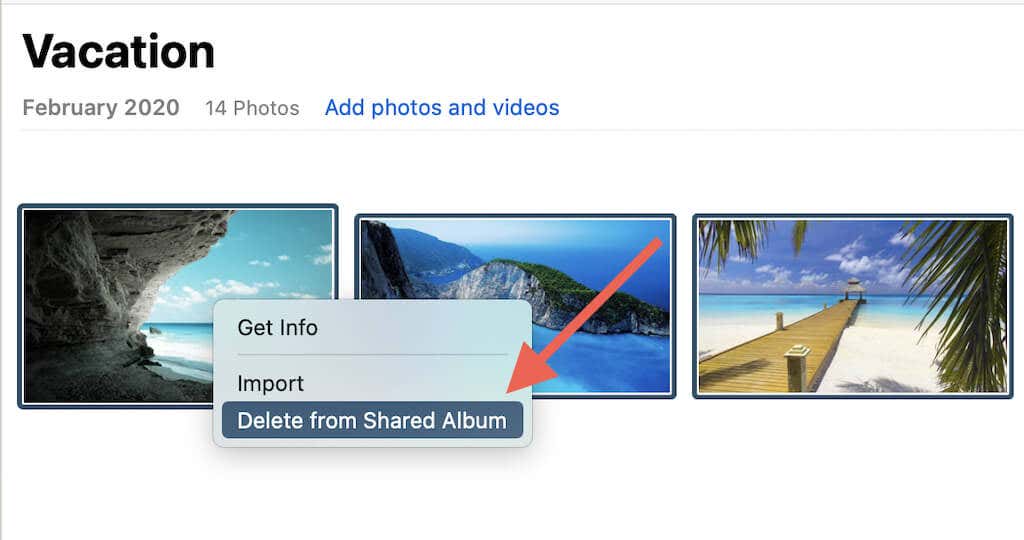
To delete a photo on Mac, Control-click or right-click the image and select Delete From Shared Album. You can also delete multiple items after highlighting them.
Remove Subscribers From Shared Albums
You can remove people from a shared album whenever you want.
iPhone & iPad
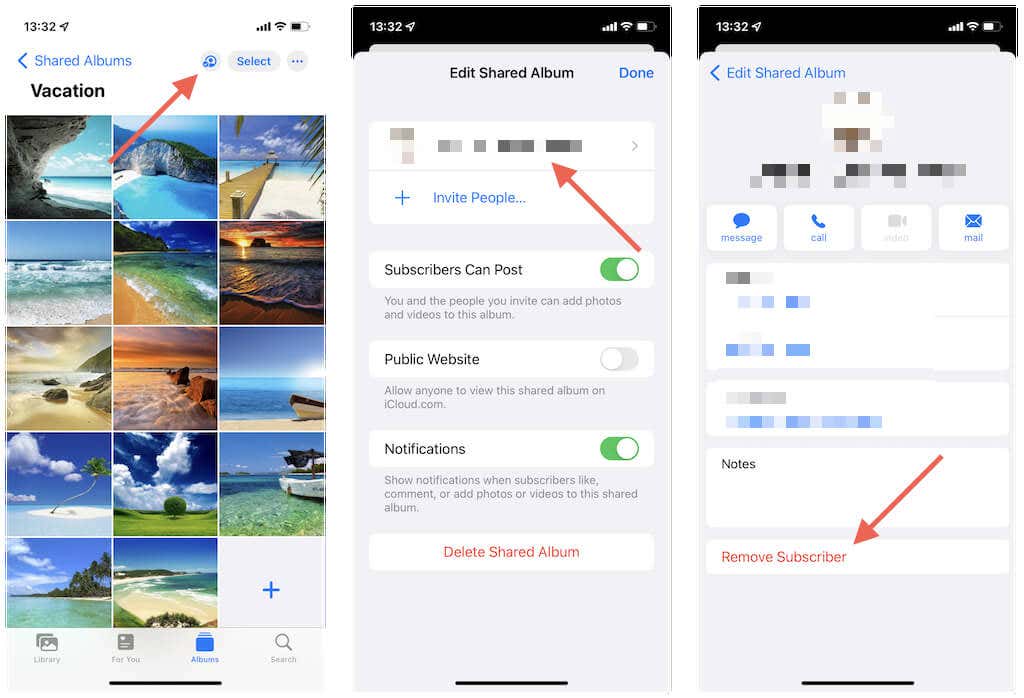
1. Tap the People icon at the top right of the screen.
2. Tap the name of the person you want to remove.
3. Tap Remove Subscriber at the bottom of the screen.
Mac
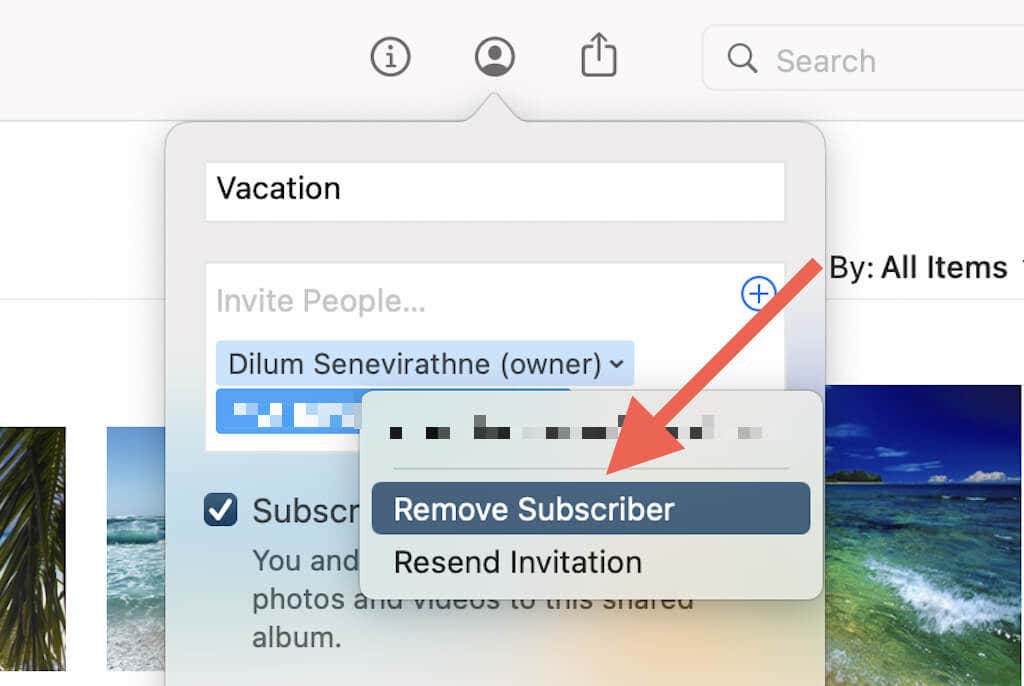
1. Select the People icon at the top right of the screen.
2. Control-click the name of the person you want to remove.
3. Select Remove.
Note: If you want to stop people from viewing the album on a web browser, you must disable it as a Public Website.
Delete Shared Photo Albums
You can stop sharing an album whenever you want by deleting it. However, you will lose all photos and videos within the album, so save any before proceeding. That will also delete it from the devices of your subscribers.
iPhone & iPad
1. Open the shared album.
2. Tap the People icon.
3. Tap Delete Shared Album.
Mac
1. Open the shared album and select the People icon.
2. Select Delete Shared Album.
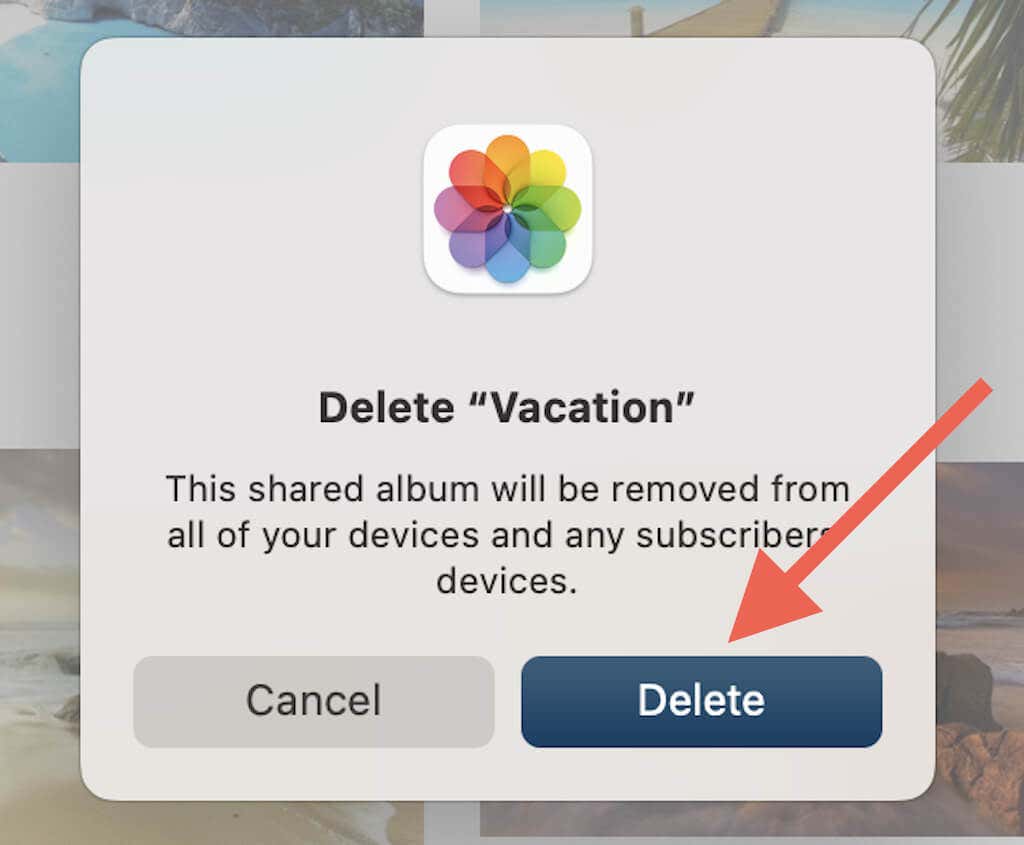
3. Select Delete to confirm.
Photo and Video Sharing Made Easy
Sharing photos with people via shared iCloud albums on the iPhone, iPad, and Mac is not only straightforward but ridiculously convenient from a management standpoint. Keep the limitations and potential privacy implications with shared albums in mind, and you should be fine.
[related_posts_by_tax posts_per_page="5"]