A helpful feature for those 55+
Fall Detection is an advanced safety feature on your Apple Watch that uses the device’s built-in gyroscope and accelerometer to identify hard falls. Whenever it detects that you’ve fallen, tripped, or slipped, it promptly displays an Emergency SOS alert that you can use to call in help should you want. Sounds useful, right?
But that isn’t all. Fall Detection is also intelligent enough to contact emergency services—on its own—and relay your location if you remain immobile for over a minute. That makes it a potential lifesaver if you, for example, have a medical condition that puts you at risk of falling and hurting yourself.
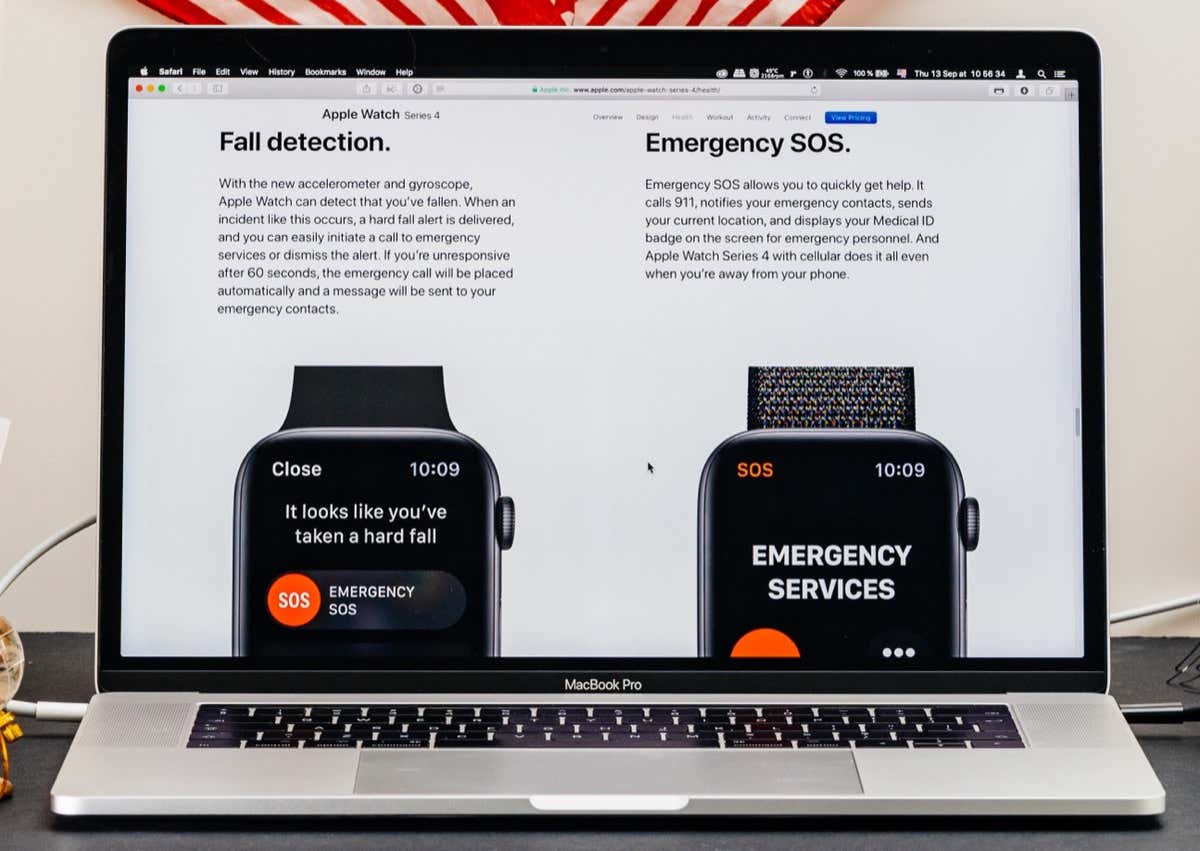
By default, Fall Detection is only active on the Apple Watch if you’re 55 years or older. While that makes sense, there’s no reason why you shouldn’t have the feature up and running, even if you’re much younger.
If you want to enable Fall Detection on your Apple Watch (Amazon, Best Buy), you’ll figure out what you must do to set it up below. You’ll also get to know what to expect while using the feature in the case of an emergency.
How to Enable Fall Detection on Apple Watch
Fall Detection is available on the Apple Watch Series 4 and newer, including the Apple Watch SE. You can enable it using your iPhone or Apple Watch. Before you do that, however, it’s always a good idea to take a few minutes to update the system software on your Apple Watch.
Enable Fall Detection Using iPhone
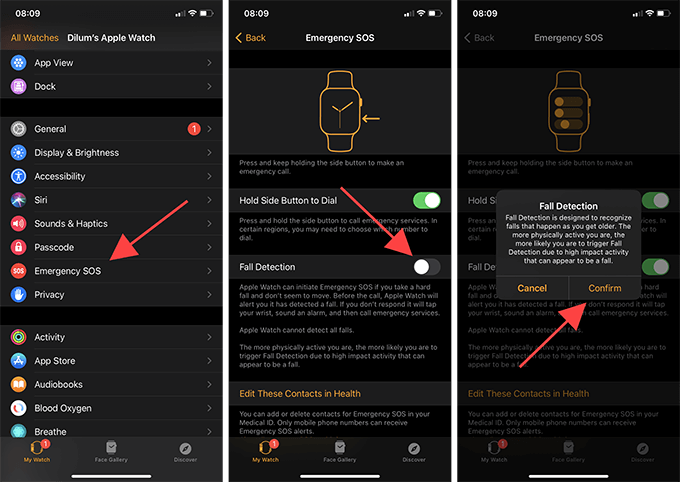
1. Open the Watch app on the iPhone.
2. Tap Emergency SOS.
3. Turn on the switch next to Fall Detection and tap Confirm.
Enable Fall Detection Using Apple Watch
1. Press the Digital Crown on your Apple Watch and open the Settings app.
2. Select SOS.
3. Select Fall Detection.
4. Turn on the switch next to Fall Detection.
5. Tap Confirm.

How to Enable Wrist Detection on Apple Watch
Besides activating Fall Detection, you must also enable Wrist Detection. It’s a primary feature on the Apple Watch that allows the system software to determine if you’ve strapped the device to your wrist.
Wrist Detection is active by default. But if you’ve disabled it previously for some reason, Fall Detection won’t contact emergency services automatically unless you turn it back on.
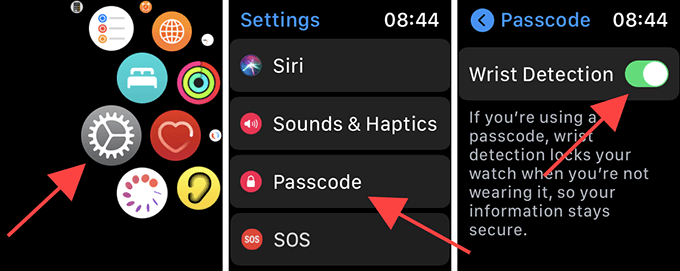
1. Open the Settings app on the Apple Watch.
2. Tap Passcode.
3. Scroll down and activate Wrist Detection.
How to Add/Edit Medical ID and Emergency Contacts
Once you’ve finished activating Fall Detection, you must ensure that your Medical ID is up-to-date. You can then configure your iPhone and Apple Watch to share your medical details over an emergency call (available in the U.S. only) or make them accessible via the device’s Lock screen. That should provide emergency responders with vital information regarding any medical conditions that you might have.
You can set up your Medical ID and emergency contacts using your iPhone or Apple Watch. While you’re at it, you may also want to add or edit your emergency contacts.
Set Up Medical ID and Emergency Contacts Using iPhone
1. Open the Settings app on the iPhone.
2. Scroll down and tap Health. Then, select Medical ID.
3. Tap Edit.
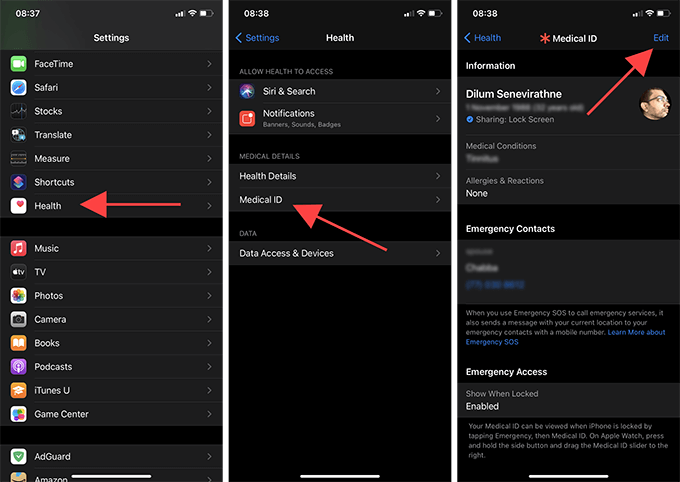
4. Fill in or update your medical information and emergency contacts.
5. Turn on the switches next to Share During Emergency Call (U.S. only) and Show When Locked.
6. Tap Done.
Set Up Medical ID and Emergency Contacts on Apple Watch
1. Open the Settings app on the Apple Watch.
2. Scroll down and select SOS.
3. Tap Medical ID.
4. Scroll down and tap Edit Medical ID.

5. Fill in or update your medical information and emergency contacts.
6. Activate the Share During Emergency Call (U.S. only) and Show When Locked options.
7. Tap Done.
How to Use Fall Detection on Apple Watch
When Fall Detection detects a hard fall, your Apple Watch shall instantly display an Emergency SOS alert. You can drag the SOS slider to the right to initiate a call to emergency services. If you feel fine, tap I’m OK instead. Fall Detection will also assume there’s nothing wrong if you get up and start moving.
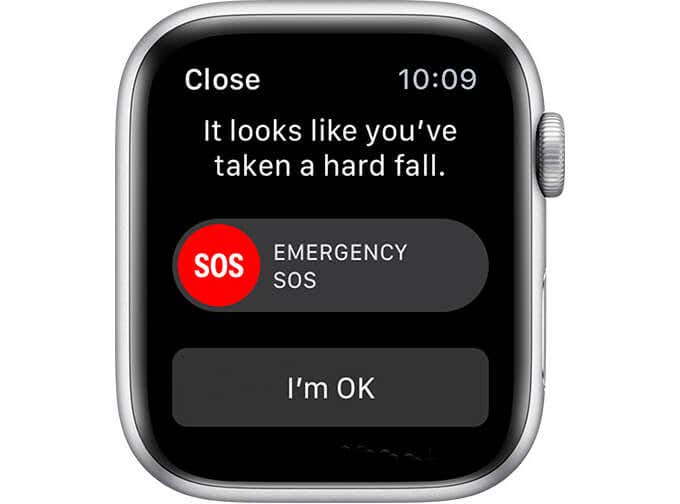
But if Fall Detection fails to detect movement, it shall begin a 30-second countdown while sounding off an alarm that gradually ramps up in volume. That should allow anyone nearby to come to your aid if you’ve seriously hurt yourself or lost consciousness.
You can stop the countdown during this time by tapping Cancel. If not, your Apple Watch will automatically dial emergency services and share your location details over an audio message. If you’re able to, you—or someone else near you—can stop the audio message and talk to the emergency dispatcher.
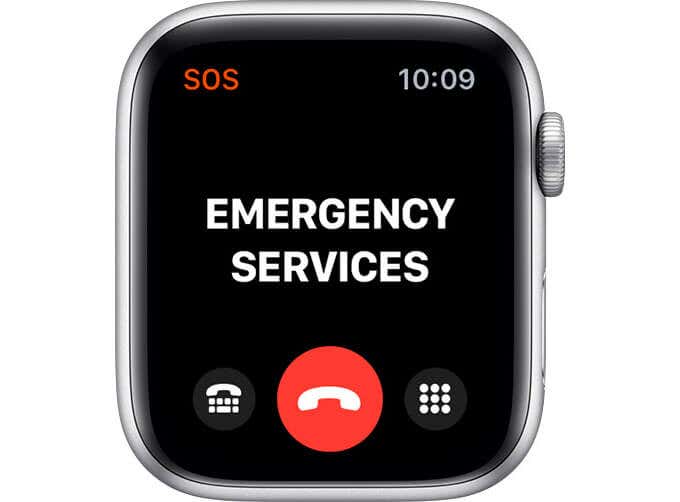
Should you or your Apple Watch end up contacting emergency services, any emergency contacts you’ve added to your Medical ID should automatically receive a message with your location details.
How to Disable Fall Detection on Apple Watch
If you’re physically active, Fall Detection may end up throwing false positives. In case that distracts you, you can choose to disable Fall Detection. You can always activate the feature whenever you want.
Disable Fall Detection Using iPhone
1. Open the Watch app on the iPhone.
2. Tap Emergency SOS.
3. Turn off the switch next to Fall Detection.
Disable Fall Detection Using Apple Watch
1. Open the Settings app on the Apple Watch and select SOS.
2. Select Fall Detection.
3. Turn off the switch next to Fall Detection.
Don’t Take a Fall
Fall Detection probably isn’t the most popular of the Apple Watch’s incredible arsenal of health and safety features. But it surely is among the most important and already has a solid track record of saving lives.
Nonetheless, Apple Watch Fall Detection does not detect all falls, so you must not count on it solely or take unnecessary risks after activating it.


