For a convenient way to purchase items on an installment plan and with Apple Pay, you can take advantage of Apple Pay Later. With it, you simply make payments in equal installments, interest free, until you pay off your purchase.
Interested? Here’s how to set up and use Apple Pay Later on your iPhone.
What Is Apple Pay Later?
When you want to make a purchase but don’t have the full amount available, you can buy the item from a participating retailer using Apple Pay Later. With it, you divide the purchase price into four equal installments over six weeks.
The Apple Pay Later process is a simple one. Apple pays the merchant for the item for you, and you then repay Apple. While you can think of it as a super short-term loan because you do have to apply first, there is no impact on your credit and no interest or fees.
You can use Apple Pay Later for purchases between $75 and $1,000, and the payment option is available on your iPhone or iPad from most retailers who accept Apple Pay.
You’ll make a 25 percent down payment of the total purchase amount. This payment is due at the time of purchase and counts as your first installment payment.
Each time you buy an item using Apple Pay Later, it’s considered a new loan. This means you do have to apply each time; however, you only have to provide your basic details the first time.
Apple Pay Later Requirements
You must meet a handful of requirements to apply for and use Apple Pay Later.
- You must be at least 18 years old.
- You must be a U.S. citizen or legal resident with a valid U.S. address, not a P.O. box.
- You must have set up Apple Pay with a supported debit card on your device.
- You must have the latest version of iOS or iPadOS (iOS 16.4 or later or iPadOS 16.4 or later) with two-factor authentication for your Apple ID.
- You may need to verify your identity using your driver’s license or state-issued ID.
How to Set Up and Use Apple Pay Later
You can set up Apple Pay Later in the Apple Wallet app before purchasing or during the checkout process for your item. Either way, you’ll start by applying for the Apple Pay Later loan.
Apply in the Wallet App
If you’re planning a purchase ahead of time and know the amount you’ll need, you can save time during checkout by setting up Apple Pay Later in your Wallet.
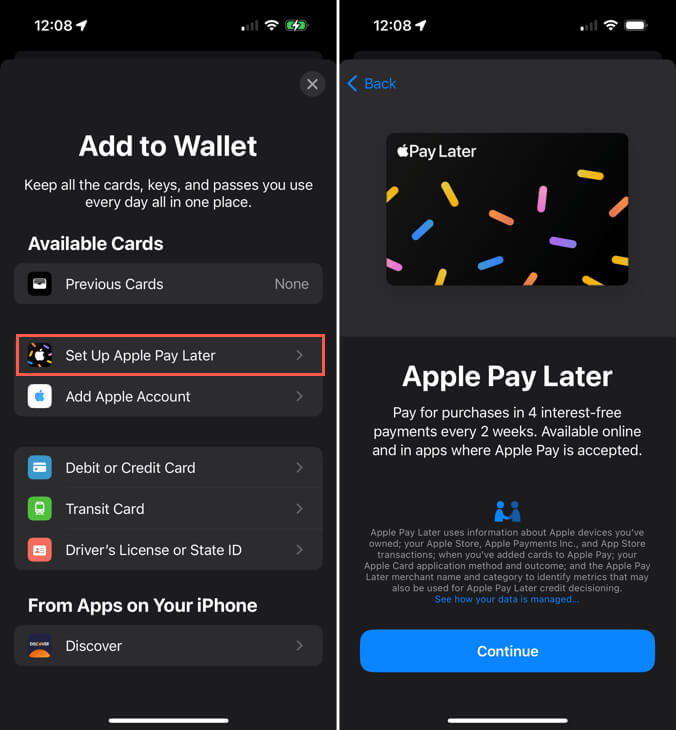
- Open the Wallet app and tap the plus sign (+) on the top right to add the payment method.
- Choose Set Up Apple Pay Later.
- Follow the subsequent prompts, which briefly explain Apple Pay Later.
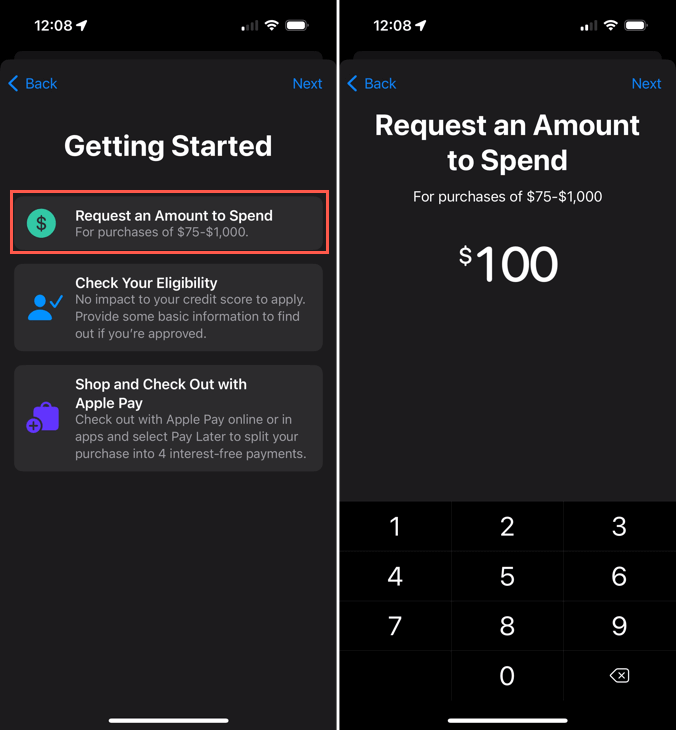
- Select Request an Amount to Spend.
- Enter the total amount for your purchase, including taxes and shipping, and tap Next.
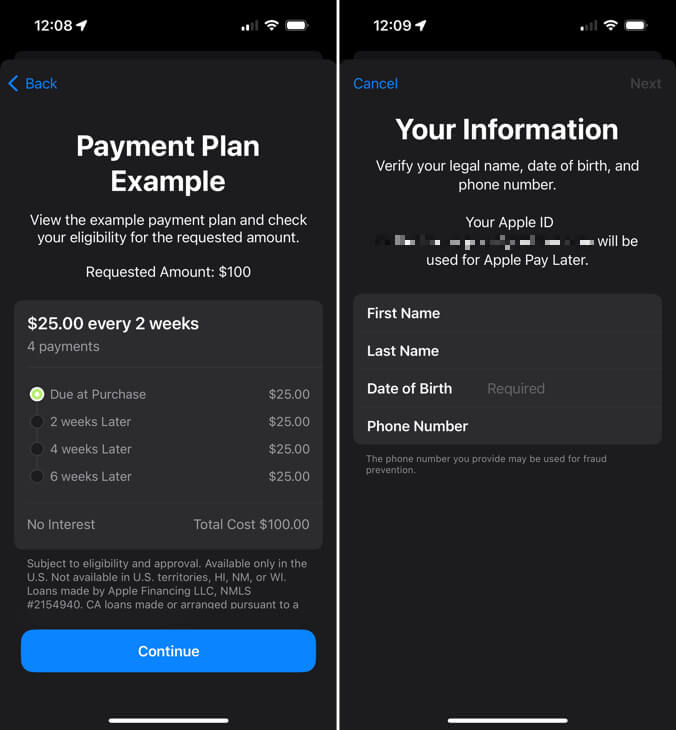
- Check out the Payment Plan Example.
- Confirm or enter your name, address, date of birth, and phone number. Tap Next.
- Review your details and tap Agree & Apply.
- You can then look through your payment plan and loan agreement details. Select Add to Wallet when you finish.
To use Apple Pay Later when you purchase an item, simply follow Steps 1 and 2 below.
Apply During Checkout
If you prefer to wait until you purchase to set up Apple Pay Later, you can apply and use this payment method simultaneously.
- To begin the process, choose Apple Pay when you check out.
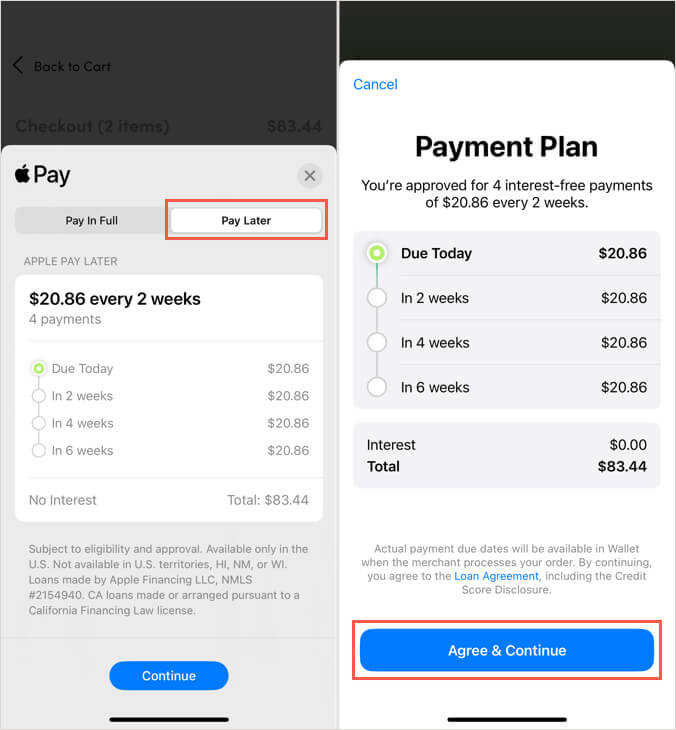
- Select the Pay Later tab at the bottom and review the payment schedule for the total cost. Tap Continue.
- Confirm your personal details and tap Agree & Apply.
- Review the payment plan and loan agreement details, and tap Agree & Continue.
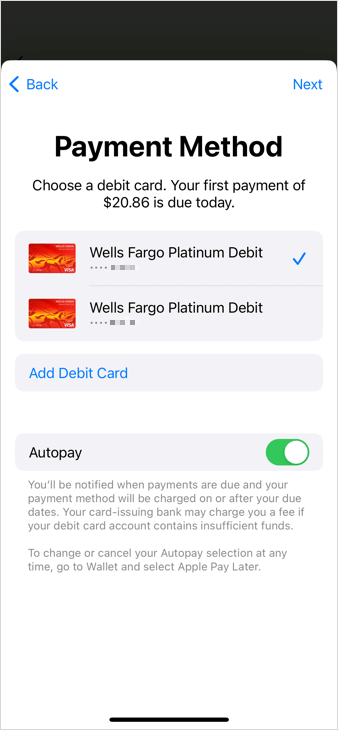
- Choose the debit card you want to use for the down payment, optionally enable Autopay to repay the loan, and follow the subsequent prompts.
- Double-click the side button when prompted and confirm your purchase using Face ID, Touch ID, or your passcode just like a regular Apple Pay purchase.
No Apple Pay Later Option?
If you don’t see the Apple Pay Later option in your Wallet or during the checkout process, there could be a few reasons.
- The retailer doesn’t support Apple Pay later.
- The retailer isn’t located in the U.S., you aren’t located in the U.S., or you’re in a U.S. state or territory that isn’t supported.
- The item you’re purchasing isn’t eligible for financing.
- You do not meet the Apple Pay Later requirements.
- You didn’t select Add to Wallet after you applied but before making your purchase (when applying in the Wallet app).
How to Manage Your Apple Pay Later Loan
After you purchase an item with Apple Pay Later, you can keep track of your loan in the Wallet app. This includes viewing the payment schedule and balance, making manual loan payments, and adjusting the Autopay settings.
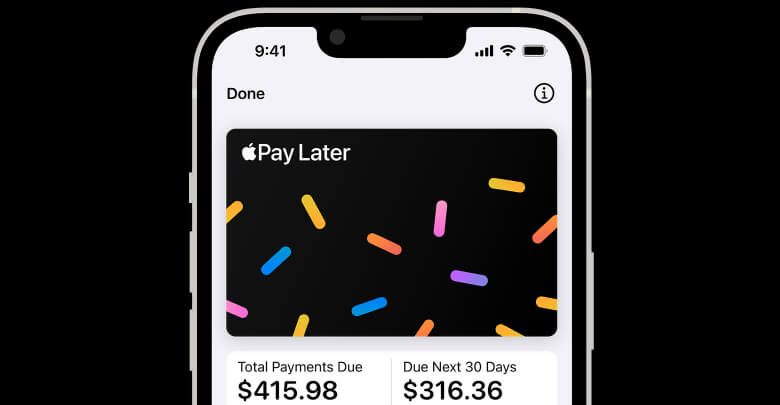
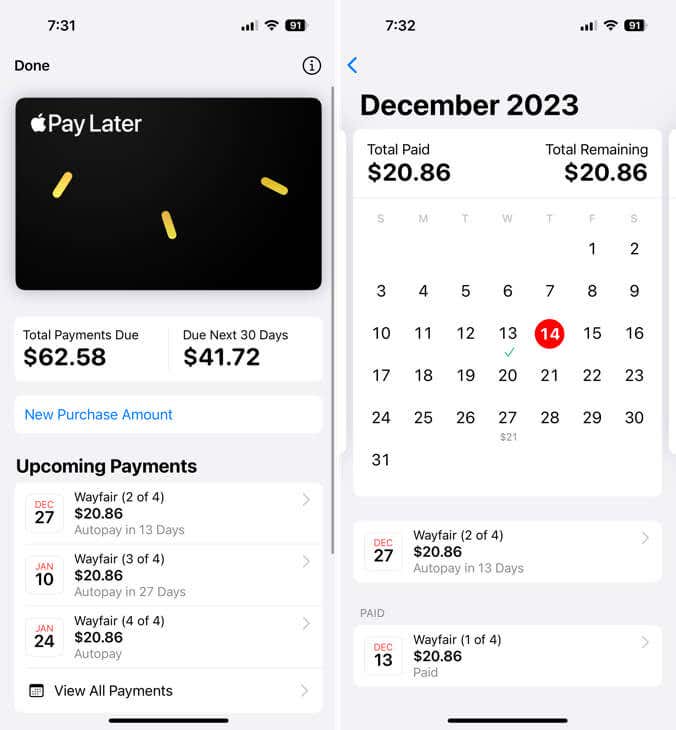
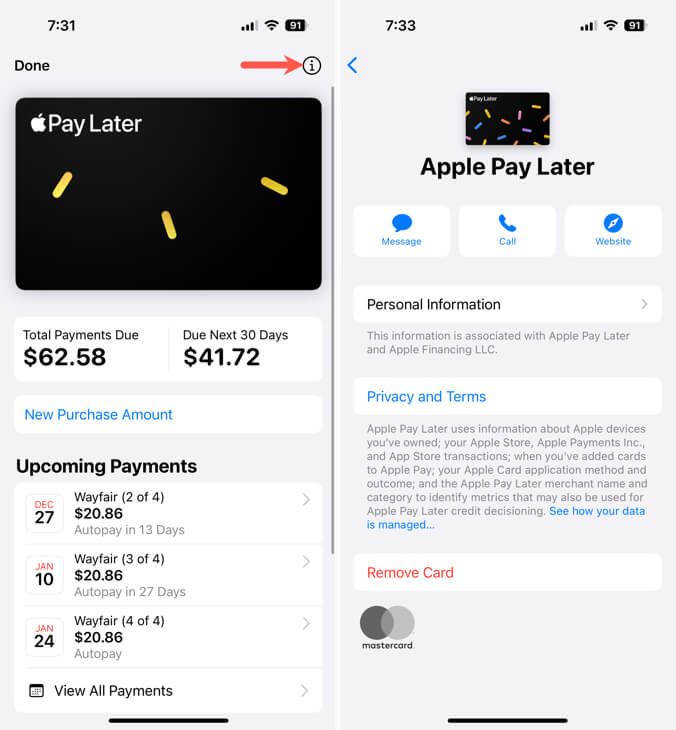
Open the Wallet app on your iPhone and choose the Pay Later “card.”
You’ll then see the Total Payments Due and Due Next 30 Days. You can also see your Upcoming Payments and tap View All Payments for a calendar view.
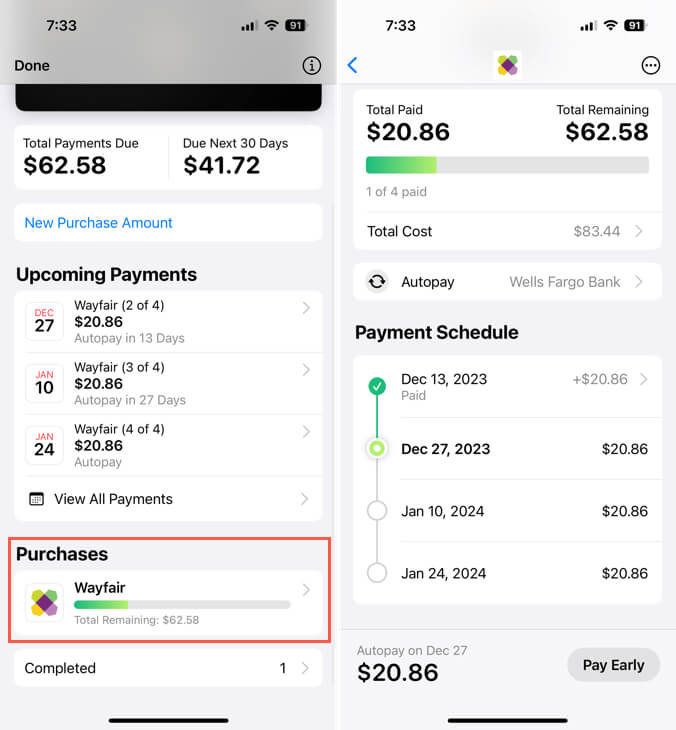
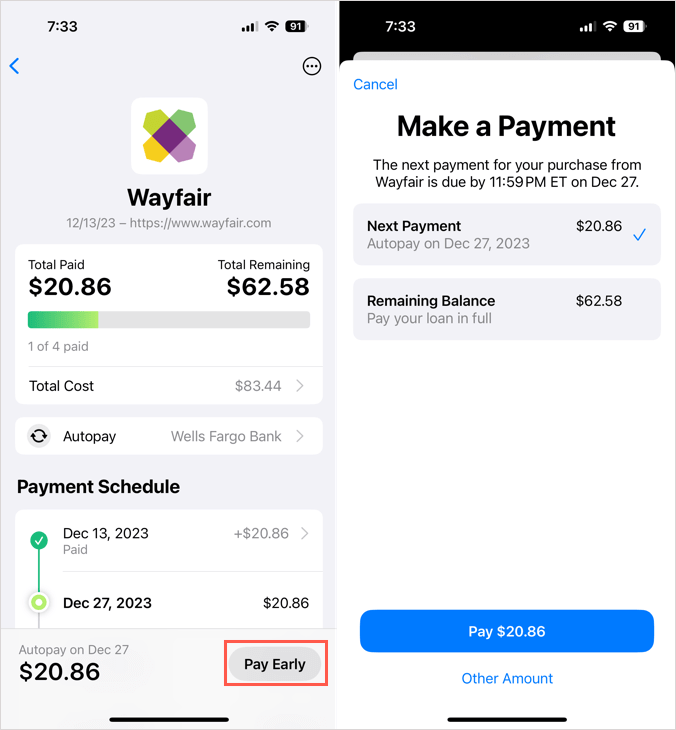
Below Purchases, tap your recent purchase and you’ll see the Payment Schedule and an option to change your Autopay settings. If you have previous purchases, you can review these by selecting Completed.
To make an additional payment outside of the planned schedule or a manual payment if you aren’t using Autopay, choose Pay Early or Pay Now. Then, enter the amount, select the payment method, and follow the prompts to verify and confirm the payment.
Tap the Info icon on the top right to review the personal information you provided when you applied, the privacy and terms, or to remove Apple Pay Later from your payment methods.
For questions or concerns regarding eligibility, returning merchandise, or reporting an issue, visit the Apple Pay Later Support page.
A Handy Way to Pay
Apple Pay Later is a convenient option for a hassle-free and interest-free way to pay for purchases over time. Whether an expensive purchase or one that you simply want to split up over several weeks, it couldn’t be easier.
Now that you know how to use Apple Pay Later, look at what to do if you’re having trouble using Apple Pay in general.
[related_posts_by_tax posts_per_page="5"]