
Your iPhone comes with a native Mail app. Sure—it isn’t as exciting as other third-party email clients. However, it has all the features you need to write, send, and schedule emails.
If you’re new to the iPhone, this tutorial will show you how to set up your email account and send emails with Mail for iOS.
Add an Email Account
Before sending emails, you must add your email account to your iPhone. Here’s how:
- Open the Settings app via the Home Screen or App Library.
- Scroll down and select Mail.
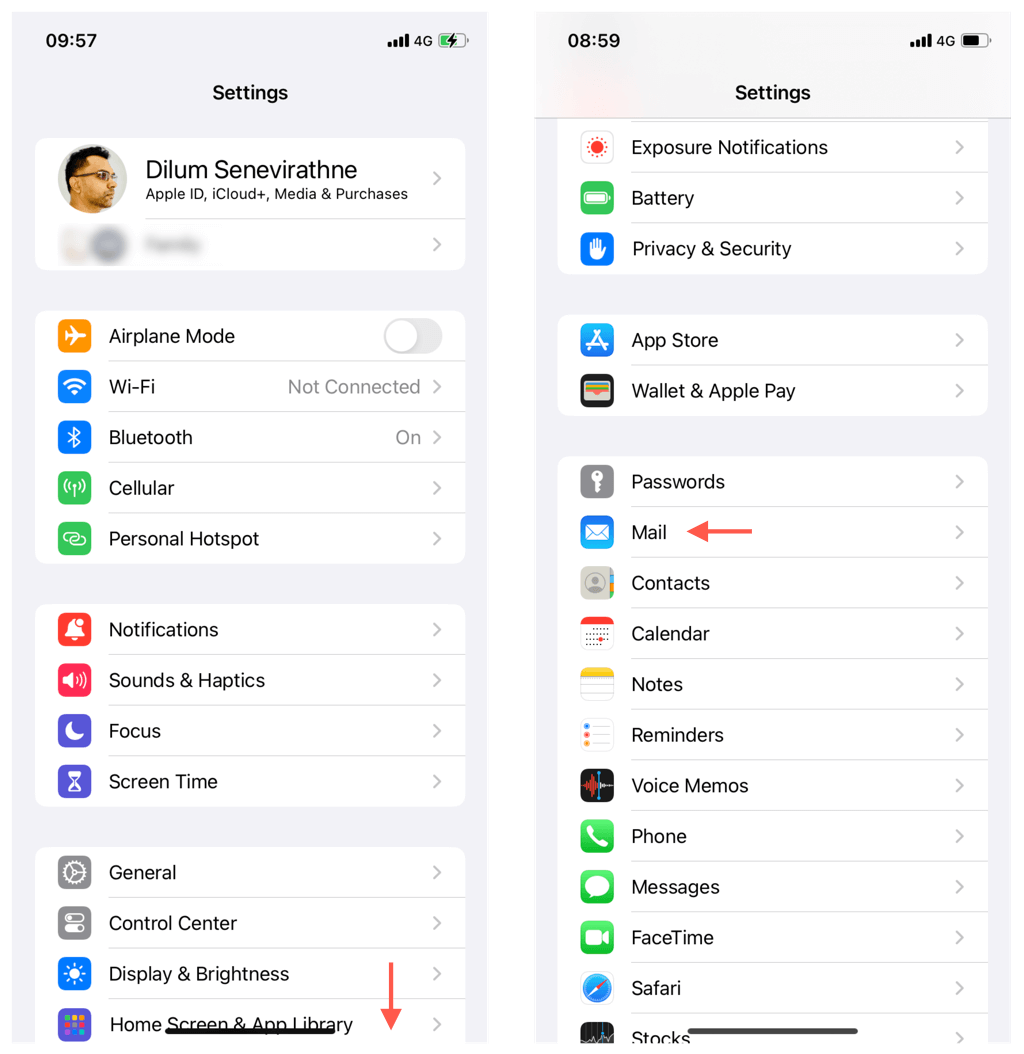
- Tap on Accounts to view a list of email accounts.
- Select Add Account to add a new email account.
Note: If you have an iCloud email account tied to the same Apple ID you’re signed in with to your iPhone, all you have to do is tap iCloud, go to iCloud > iCloud Mail, and enable the iCloud Mail switch.
- Choose from the list of email providers—Gmail, Outlook, or Yahoo—or tap Other > Add Email Account if your provider is not listed.
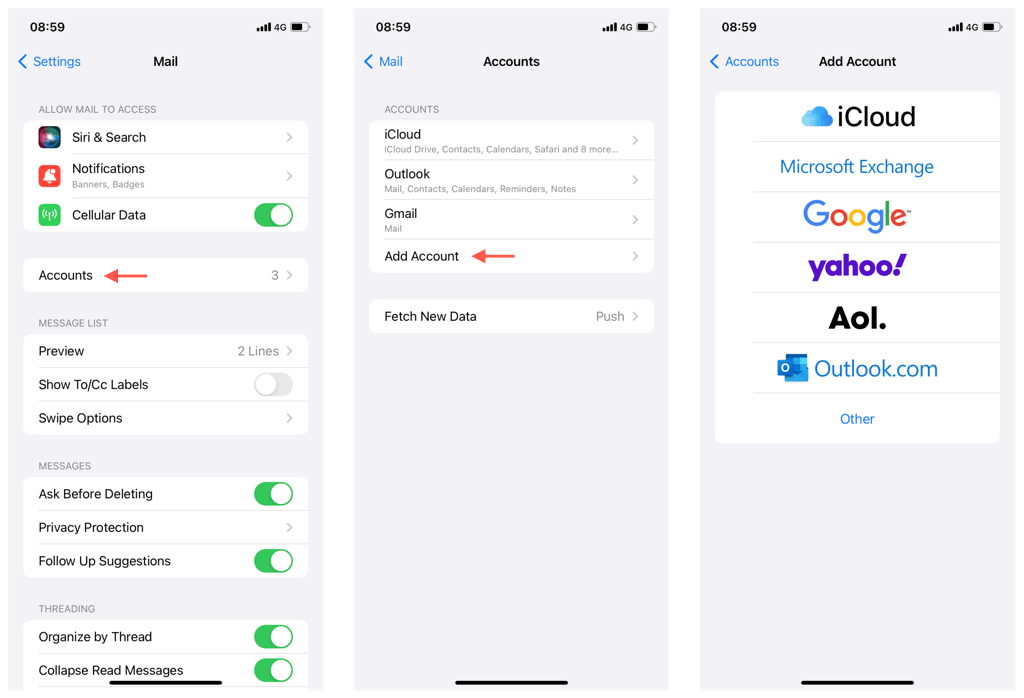
- Enter your email address and password when prompted and follow the on-screen instructions to complete the setup. Check the email provider’s documentation if you encounter problems.
Mail for iOS can handle more than one email account. Repeat the steps above to add any other accounts you might own.
Configure Fetch and Push
After adding your email account, it’s a good idea to configure how the Mail app receives incoming emails before you get started. There are two options—Fetch and Push.
Fetch prompts the Mail app to query the email servers for new mail at predefined intervals, while Push causes the server to push new email to your device. Some email providers, like Gmail, only support Fetch.
Under Mail > Accounts, tap Fetch New Data and tap your email service provider. You can then decide whether to fetch or push email and even configure how data fetching works by mailbox.
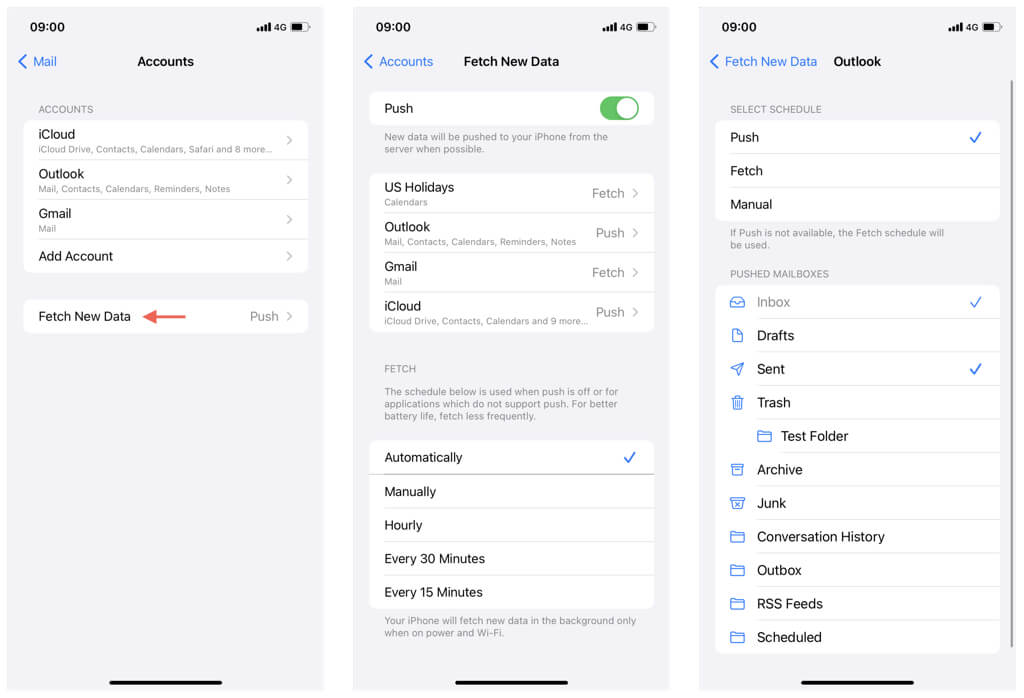
Go back to the previous screen, and you can determine the Fetch schedule that Mail uses to get your email—Automatically, Manually, Hourly, Every 30 minutes, or Every 15 minutes. Shorter Fetch durations tend to drain battery life.
Open Mail and Configure Mailboxes
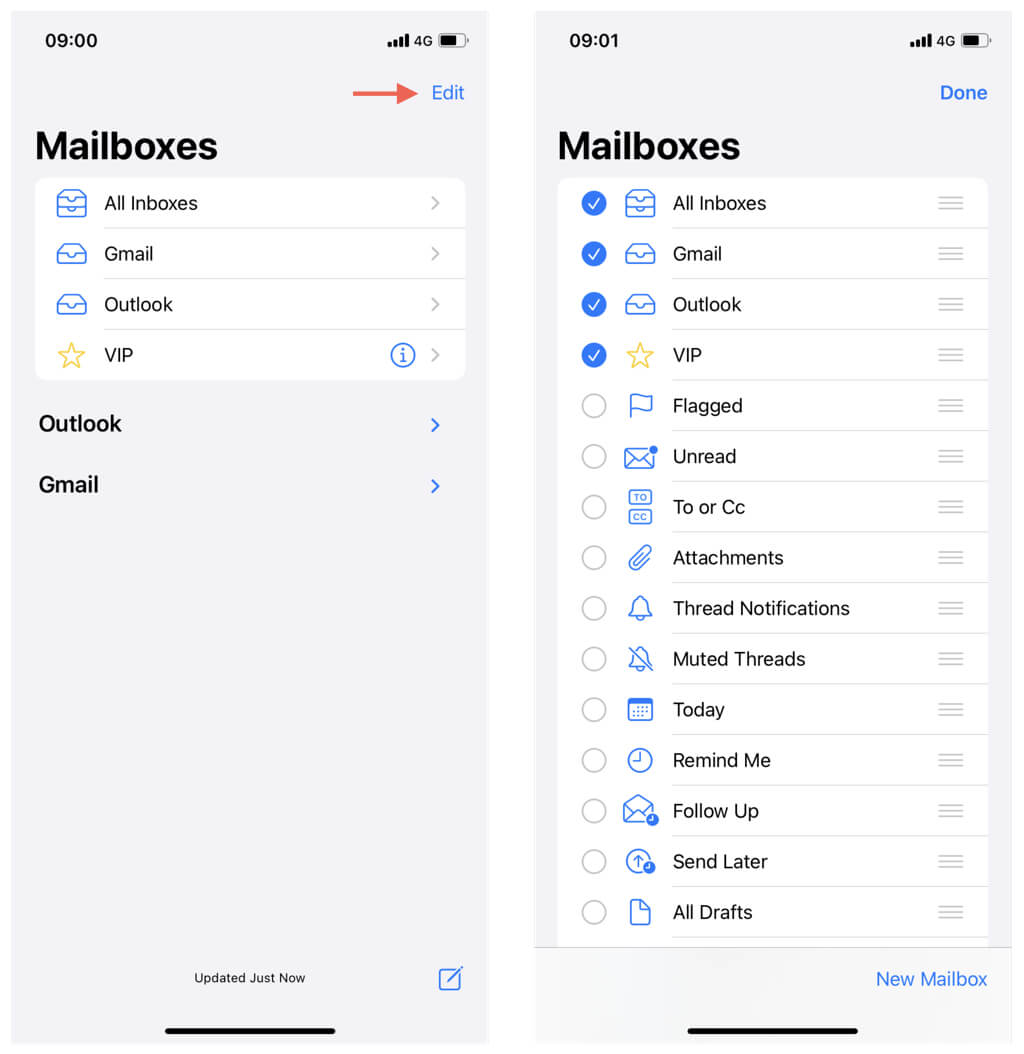
It’s now time to open Mail and use your email account. The main area of the app lists all email accounts you’ve signed in with—tap to reveal the Inbox, Sent, and other folders for each account.
The Mailboxes section at the top of the screen also lists an All Inboxes option you can tap to view incoming mail across all your accounts. Below it, you’ll find links to individual accounts’ inboxes.
The Edit option on the top right corner allows you to add and remove mailboxes. For example, enabling Attachments lets you see all messages containing attached files.
Write an Email Message
Composing an email using the Mail app on your iPhone is pretty straightforward. Just:
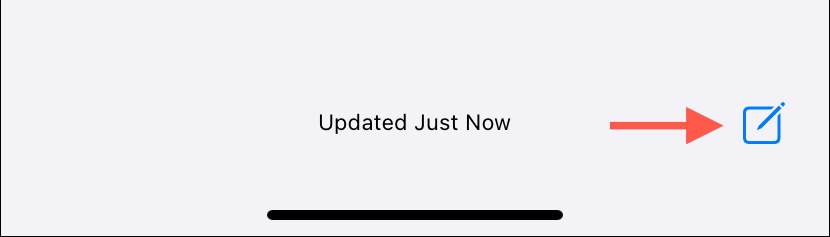
- Tap the Compose icon (a pen inside a square) at the bottom right corner of the Mail app.
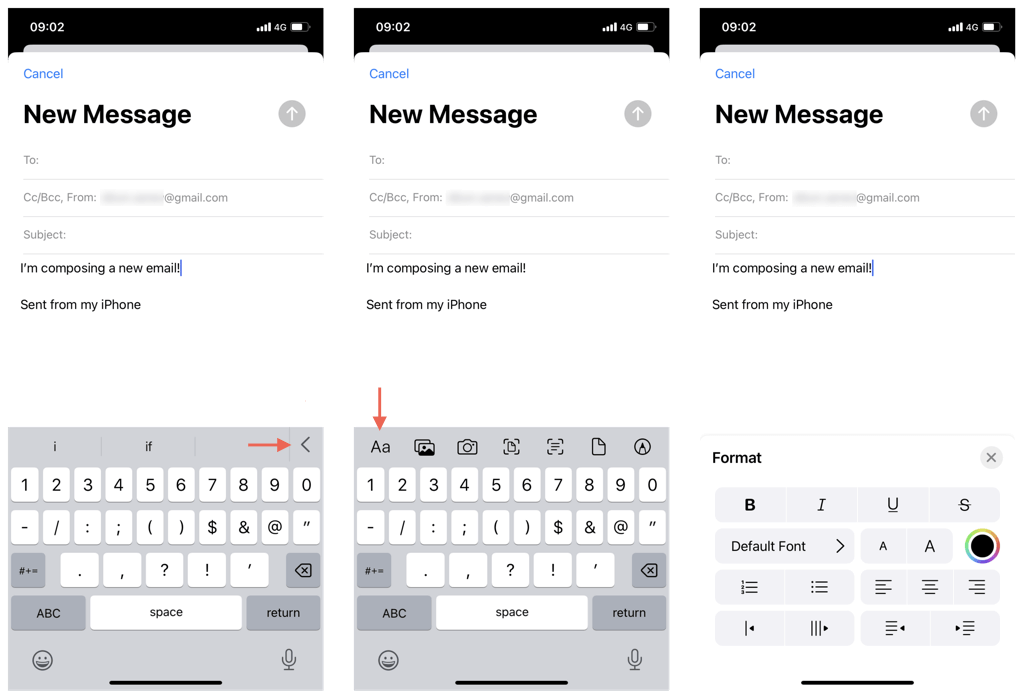
- Tap the area underneath the Subject field and start typing your message. Alternatively, tap the Microphone icon and dictate the message with your voice.
- Tap the arrow-shaped icon on the top left corner of the keyboard and select AA to access formatting options. You can change the font, font size, and font color, bold and italicize text, add bullets and numbers, etc.
Add Attachments
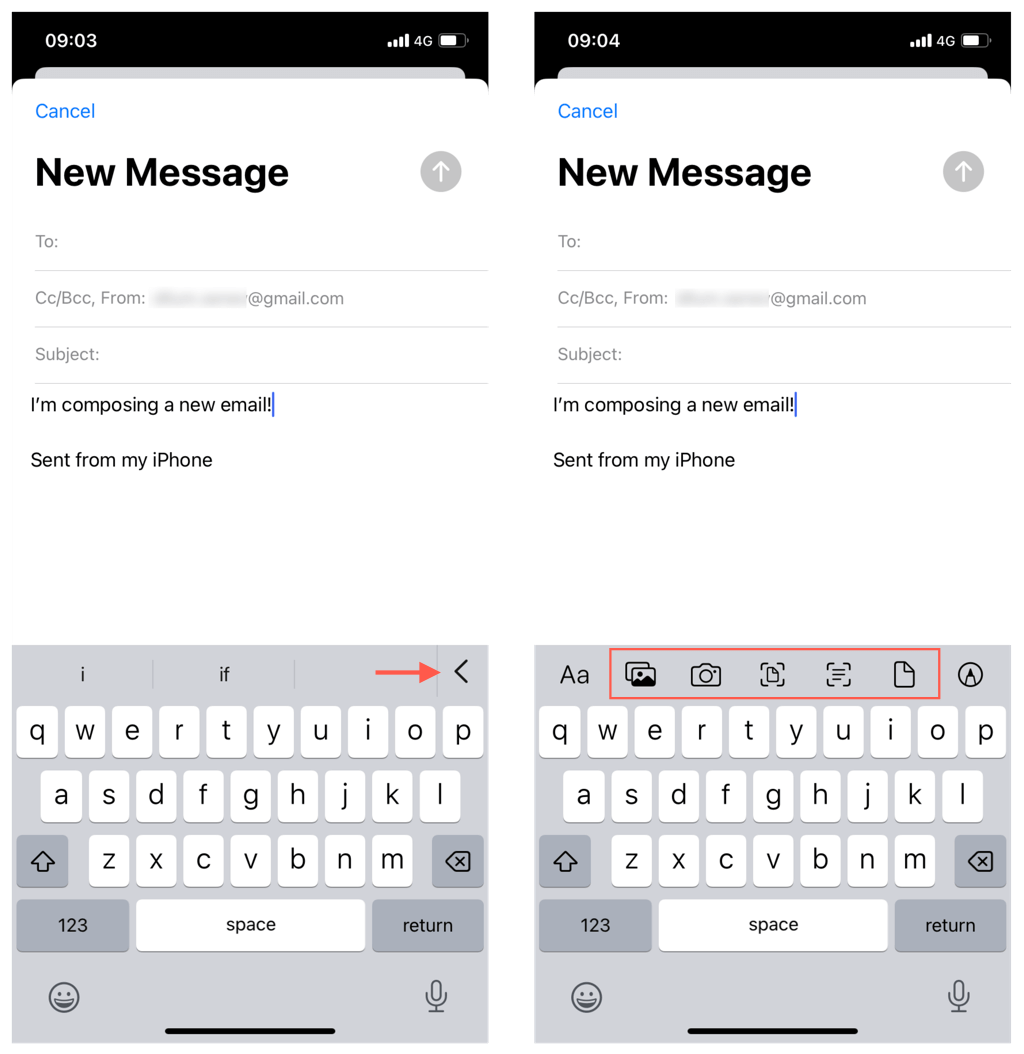
Mail for iPhone allows adding files, images, and scanned documents as attachments while composing a message. All you’ve got to do is:
- Place the cursor where you want to insert the attachment.
- Select an attachment option depending on what you want to insert:
- Document: Add documents from the Files app.
- Photos: Add images from the photos library.
- Camera: Add snapshots directly from the camera.
- Document Scan: Scan and add documents with the camera.
- Text Scan: Scan and add text from documents.
Note: Check the attachment size limits for your mail provider. For example, Gmail allows attachments up to 20 MB per email.
Add and Edit Links
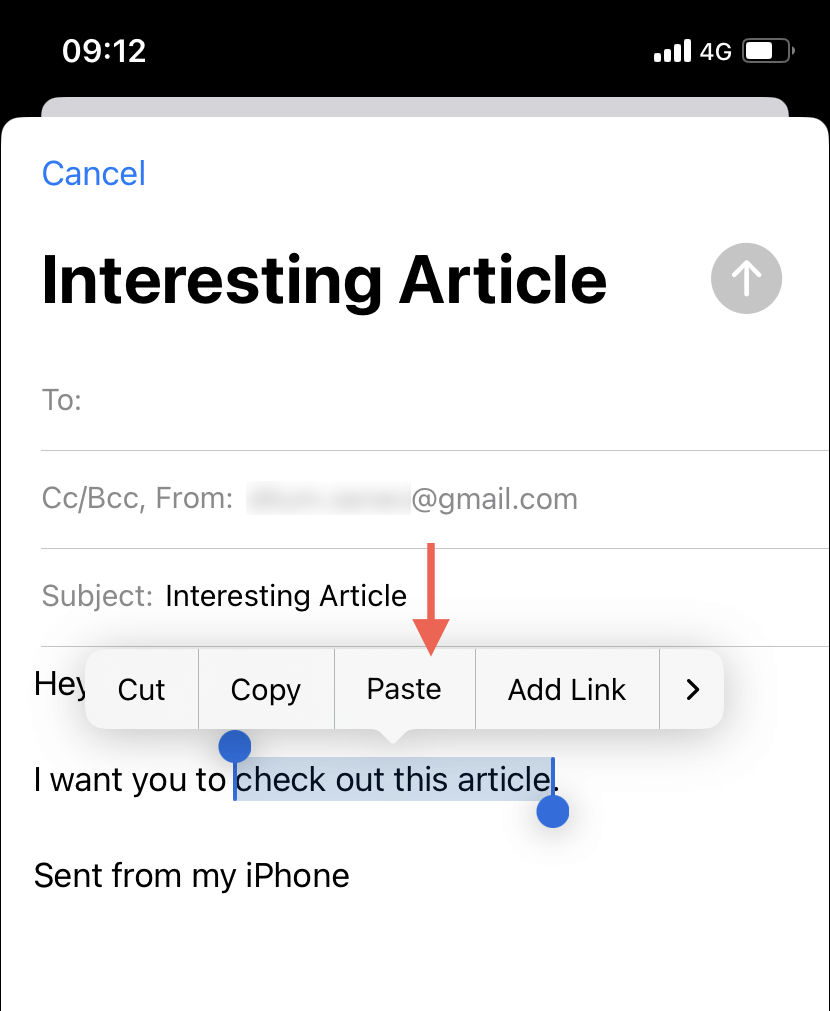
Although it’s possible to copy and paste web URLs directly into the body of an email, you can always add them as hyperlinks to reduce clutter. Just:
- Copy a web URL to your iPhone’s clipboard.
- Highlight the text you want to link to in the message.
- Tap Paste.
To edit a link or the text description afterward, tap the linked text, select the Down Arrow icon, and choose Edit Link or Edit Text Description.
Add Your Recipients
After you finish composing an email, it’s time to add a recipient, or recipients, before you send it out. To do that, type an email address into the To field and tap Return. Or, type in the name of the recipient if you have their information saved on your iPhone. To add multiple contacts, start typing again.
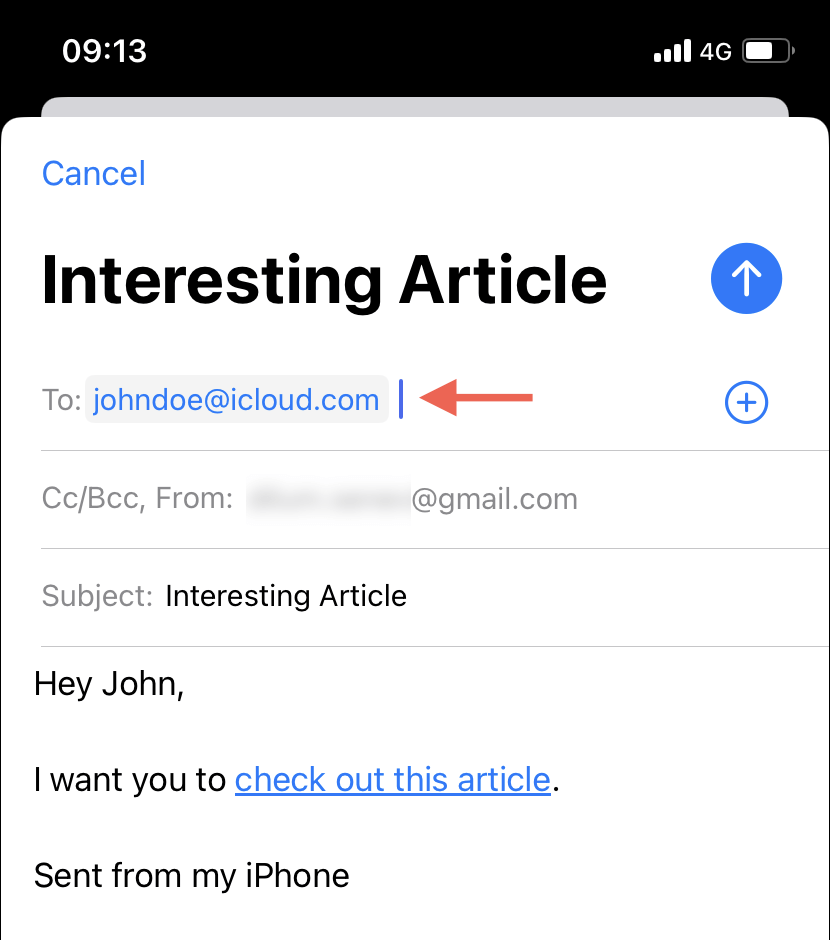
Mail may suggest matching entries from the Contacts app that you can quickly insert to speed things up. You can also tap the Plus icon to the right of the field to bring up a full list of saved contacts.
To CC and BCC outgoing mail, tap CC/Bc, From: and add addresses to the Cc (carbon copy) and Bcc (blind carbon copy) fields.
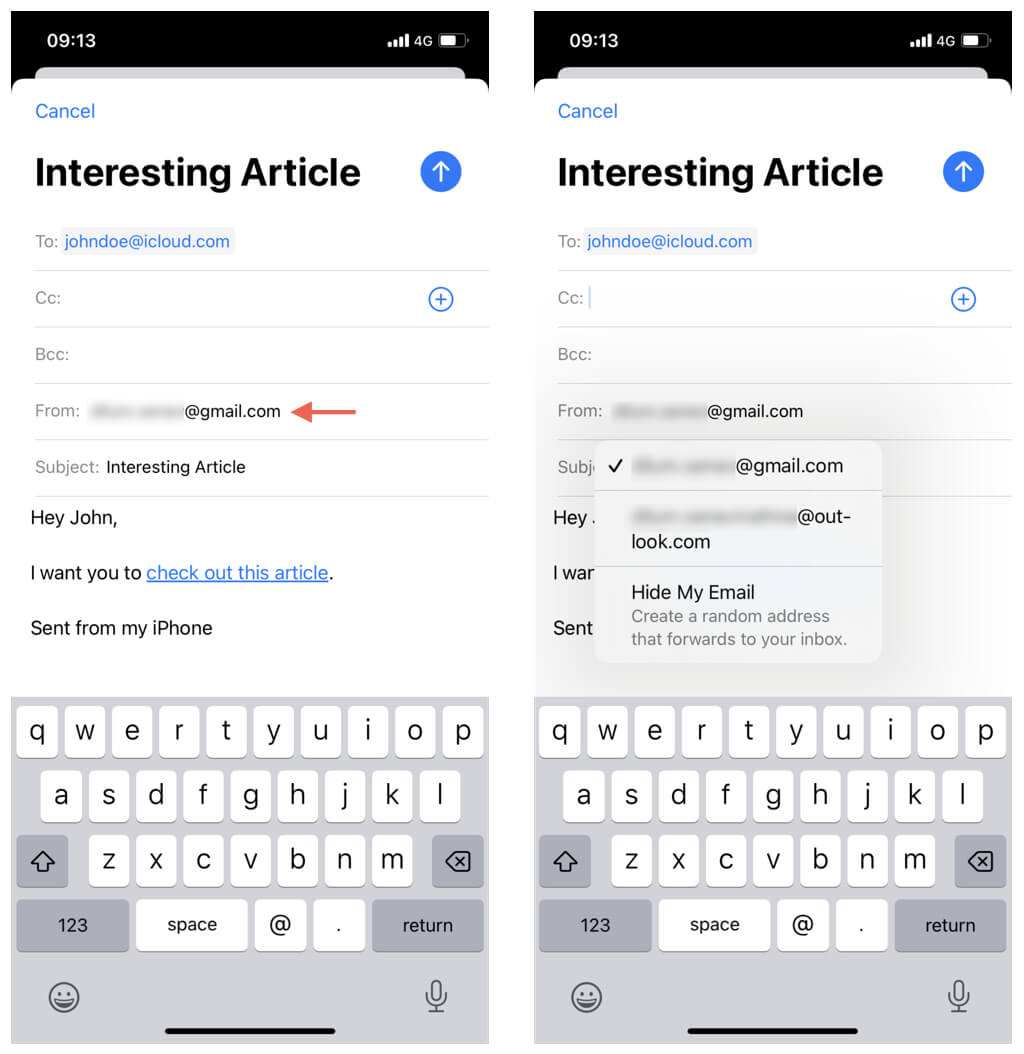
Send Email With a Different Account
If you have multiple email accounts added to the Mail app, you can choose which one to send the email message from. Just:
- Tap on CC/Bc, From:.
- Tap From.
- Choose the email account you wish to send from.
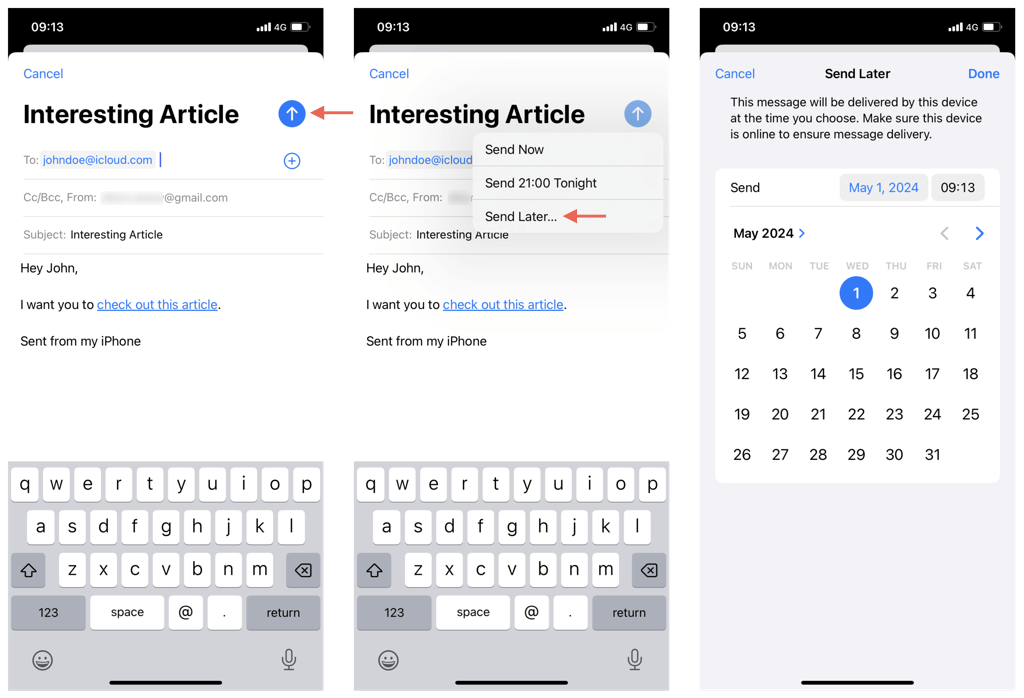
Send or Schedule the Email
After composing an email, you can tap Send (the arrow-shaped icon) at the top right of the screen to send the email immediately. By default, Mail holds onto the email for 10 seconds before sending it out—tap the Undo Email option if you change your mind.
Or, you can schedule it for later. Here’s how:
- Long press the Send icon.
- Tap the option labeled Send Later.
- Set a date and time and tap Done.
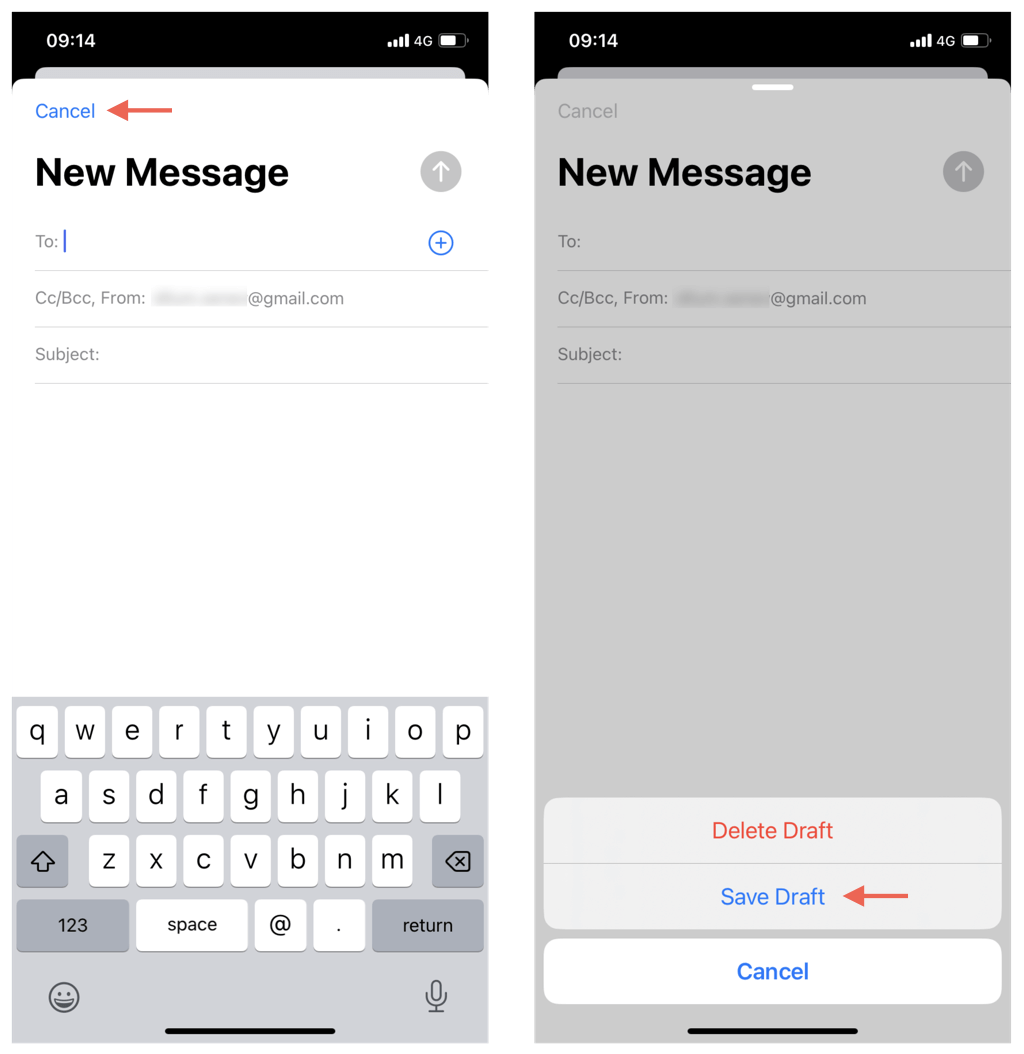
Save an Email Draft
You can continue composing an email later by saving it as a draft. To do so, tap Cancel and choose Save Draft.
To start working on the draft again, tap the Drafts folder under the email provider and tap Drafts. Or, tap All Drafts if you’ve added it to the Mailboxes section.
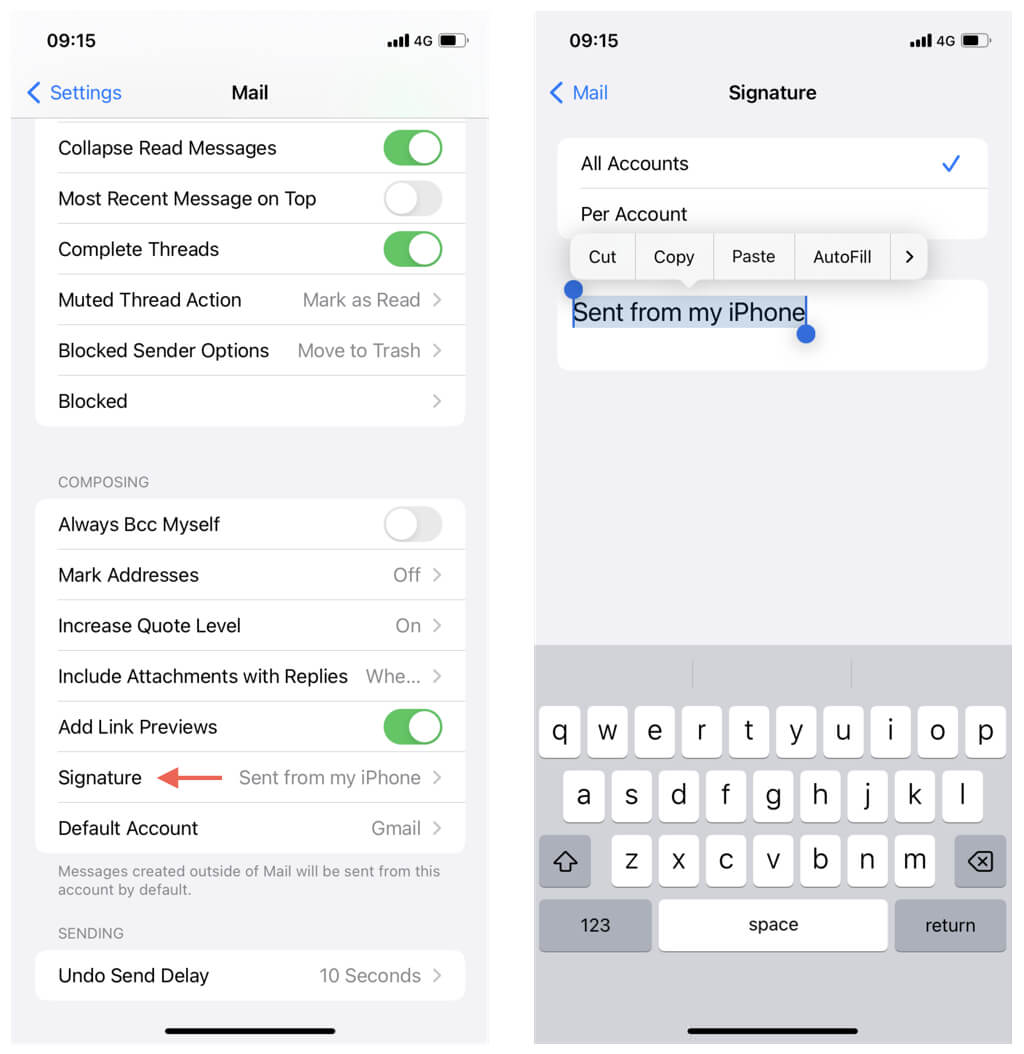
Remove or Edit Signature
By default, the Mail app adds a “Sent from my iPhone” signature to your emails. You can edit or delete it before sending the message. Or, you can customize Mail to always add a different signature. To do that:
- Open Settings and tap Mail.
- Tap Signature.
- Tap All Accounts and edit the signature for all accounts. Or, tap Per Account to edit the signature by account.
Change Send Delay Duration
It’s possible to increase the default 10-second duration to undo-send an email on your iPhone. Here’s how:
- Open the Settings app and tap Mail.
- Tap Undo Send Delay.
- Select 20 seconds or 30 seconds.

Read Incoming Mail
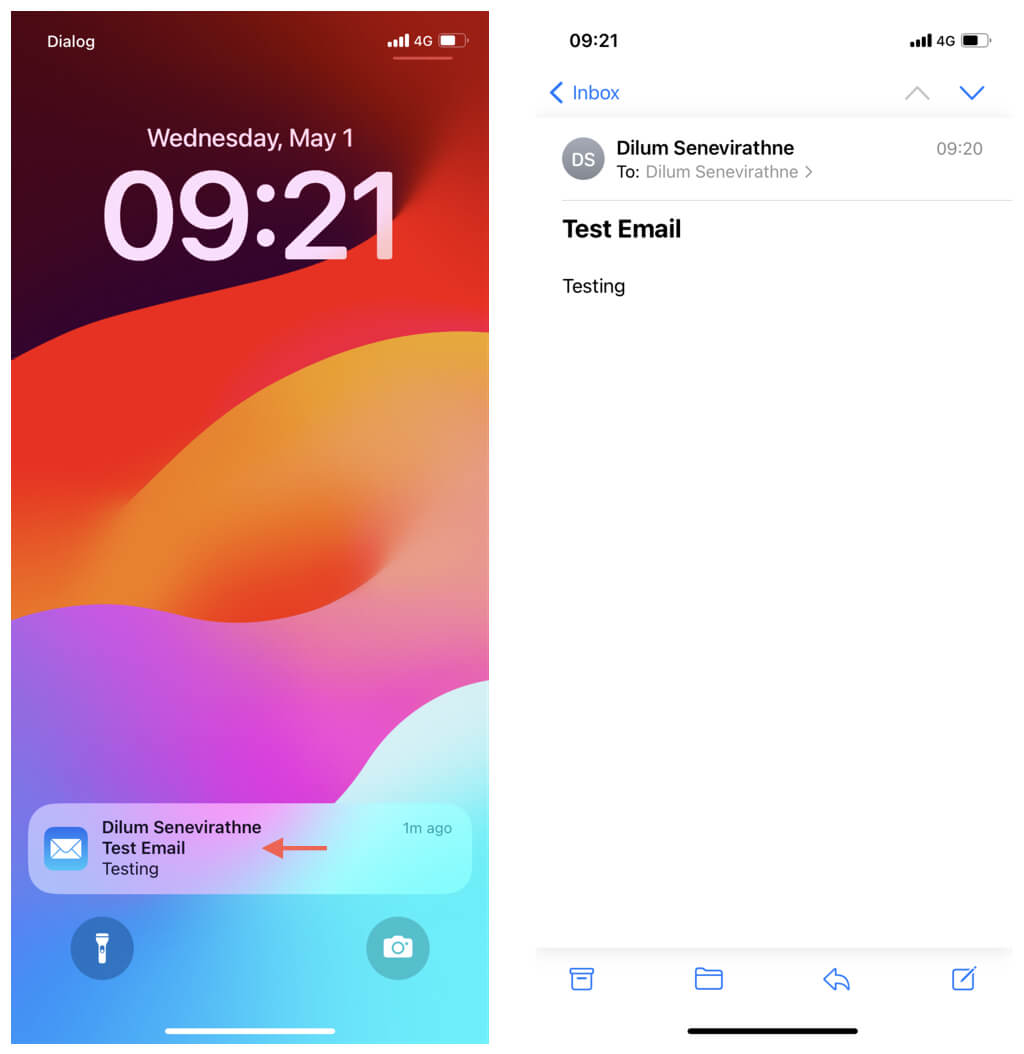
Now that you know how to send emails on your iPhone, watch for banners or Lock Screen notifications for incoming messages and replies. A live unread email counter will also appear over the Mail icon on the Dock.
Tapping a notification opens the email for you to read. You can also tap All Mailboxes (or Inbox of a specific account) in the Mail app to check your messages. Adding an Unread mailbox to the Mailboxes section will act as a filter for unread emails and make accessing them even faster.
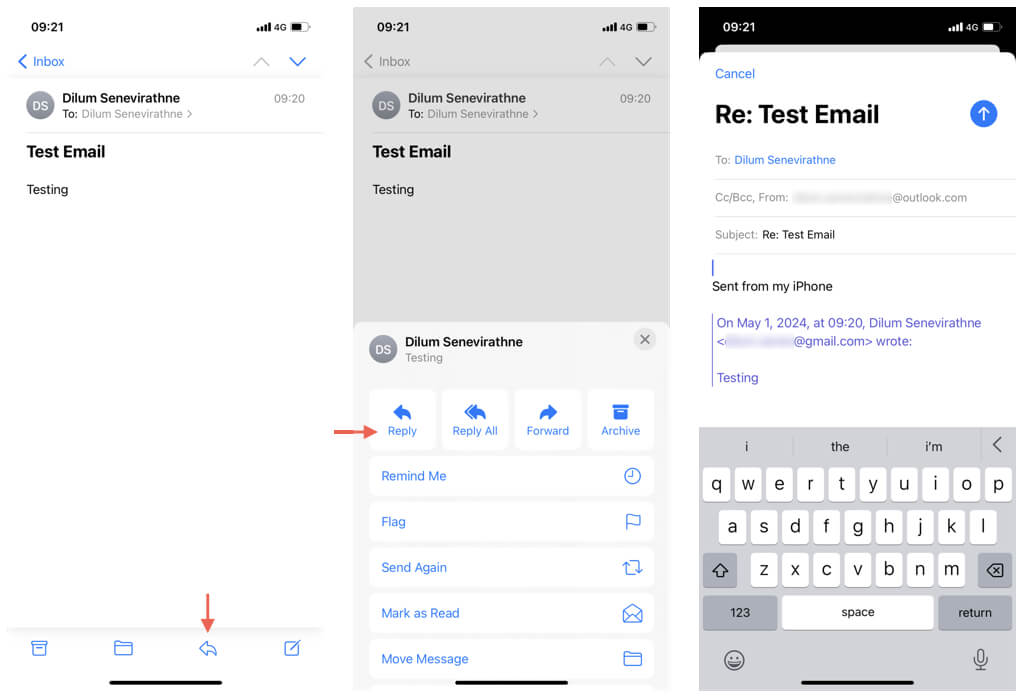
Reply to an Email
While reading an email, tap the Reply icon at the bottom and select Reply if you want to compose a response to the sender. It’s pretty similar to drafting a new email—the main difference is that the To field will already be filled out for you, and you’ll see a copy of the original message underneath the compose area.
Keep Mastering the Mail App on iPhone
We’ve only managed to scratch the surface of what Mail for iOS has to offer, but now that you’ve got the hang of the app, you should be able to figure things out as you keep using it.
An excellent way to start is to swipe on your emails for quick actions like marking as read, flagging, and archiving. You can also tap and hold to peek at emails without opening them and reveal contextual options to reply, move, and delete.
Remember to dive into Settings > Mail for a whole bunch of customization options that let you tweak how the Mail app behaves, from changing preview lines and setting delete confirmations to sorting conversations by thread.
[related_posts_by_tax posts_per_page="5"]