Are you fed up with the never-ending barrage of pings and notifications from the Mac’s Messages app? They’re a distraction and cause you to lose focus. If you want to get some serious work done, you should put a stop to that by muting them.
The Mac allows you to mute individual conversation threads or the Messages app in its entirety. You’ll learn about all possible ways to mute messages on Mac below.
Mute Messages App on Mac
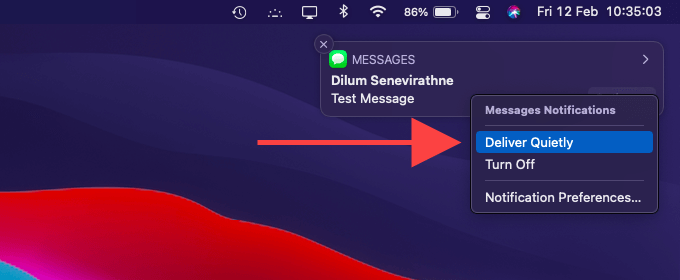
If you want to mute the entire Messages app, just control-click a text or iMessage notification and select Deliver Quietly.
That should prompt your Mac to deliver messages without any banners or alerts. Instead, they will show up directly within the Notification Center. You can bring it up by selecting the Date & Time indicator on the menu bar.
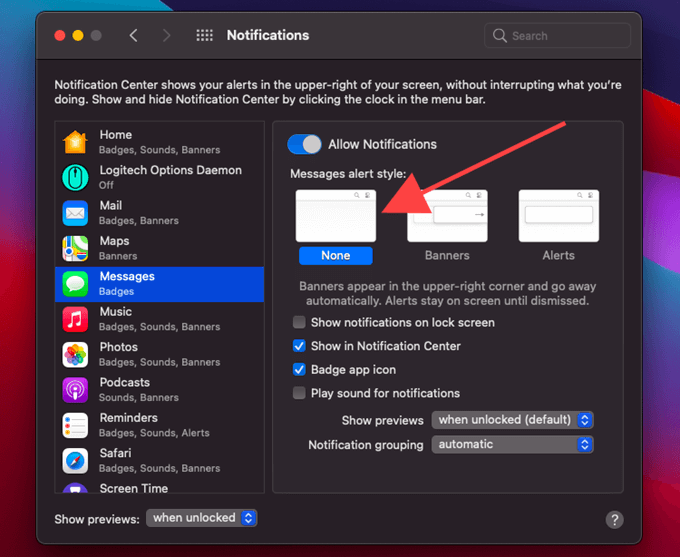
Alternatively, open the Apple menu and go to System Preferences > Notifications. Then, pick Messages on the sidebar and select None to receive Messages app notifications to the Notification Center only.
Make sure to uncheck the Play sound for notifications option as well; if not, you’ll continue to hear notification sounds. Additionally, you can disable the notification badge icon for the Messages app—which in itself is a huge distraction—by unchecking the Badge app icon option.
If you want to unmute the Messages app at a later time, simply control-click a text or iMessage notification within the Notification Center and select Deliver Prominently. Or, go to System Preferences > Notifications > Messages and switch to the Banners or Alerts notification styles.
Mute Individual Conversation Threads
Rather than muting all Messages app-related notifications on the Mac, you can choose to mute conversations threads individually.
Start by opening the Messages app on your Mac. Then, select the conversation you want to mute, swipe to the left on the trackpad or Magic Mouse, and select the bell-shaped Hide Alerts icon. If the thread’s pinned to the app’s sidebar, control-click and select the Hide Alerts context menu option.
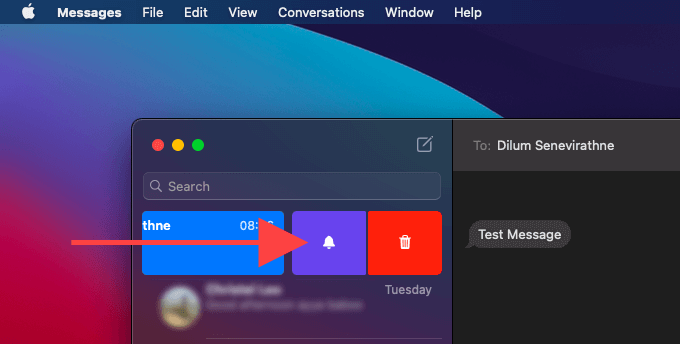
You should then see a tiny moon-shaped icon on the conversation thread. That indicates you won’t receive any text or iMessage notifications from the said thread. They won’t show up in the Notification Center either, so you must manually select the thread to view new messages.
You can also mute group conversations the same way. However, you’ll receive a notification if a participant replies by mentioning you. You can prevent that by modifying the Messages app’s preferences—check the next section to learn how.
If you want to unmute a conversation, simply swipe it to the left again and select the Hide Alerts icon. Or, control-click the conversation thread and select Unhide Alerts.
Modify Messages App Preferences
The Preferences pane in Messages allows you to make several adjustments regarding text and iMessage notifications.
Open the Messages app, select Messages on the menu bar, and choose Preferences. Under the General tab, you can modify the following settings:
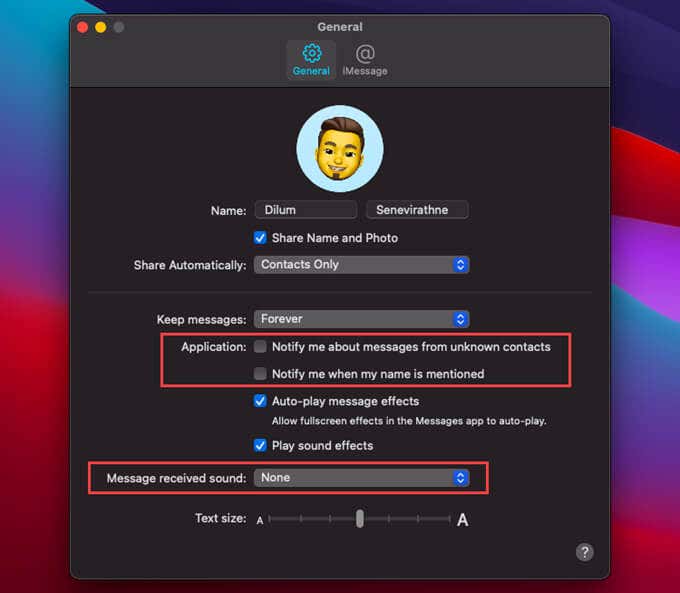
Notify me about messages from unknown contacts — Disables notifications related to messages from unknown contacts. Ideal if you’re only looking to mute text or iMessage alerts from senders not listed within the Contacts app.
Notify me when my name is mentioned — Disables notifications from mentions in group conversations. If you mute a thread, make sure to uncheck this option to avoid notifications when someone tags you in a message.
Message received sound: This allows you to determine the notification sound. You can turn off sounds completely—and still receive notifications as usual—or change it to something less distracting.
Pause Messages With Do Not Disturb
If you want to turn off all banners and alerts from the Messages app quickly, including those from other apps on your Mac, you can use Do Not Disturb. Notifications will still arrive at the Notification Center, so you can check them out in your spare time.
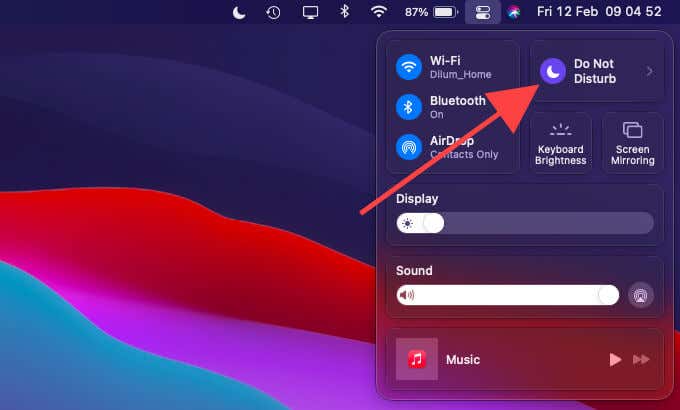
Open the Mac’s Control Center and select Do Not Disturb to enable the functionality. You can also expand the control and set an active time duration—For 1 Hour, Until This Evening, Until Tomorrow, etc.
Besides that, you can set up Do Not Disturb to work on a schedule. Open the Apple menu and go to System Preferences > Notifications > Do Not Disturb. Then, select From and specify a start and end time.
The screen also allows you to perform extra configurations. For example, you should enable the Allow repeated calls option if you want to avoid missing out on any urgent FaceTime calls to your Mac with Do Not Disturb active.
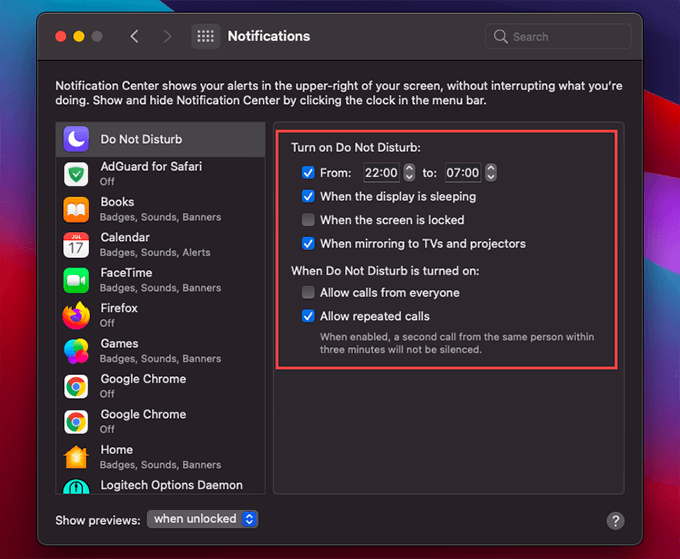
Exit the Notifications pane after setting everything up, and Do Not Disturb will automatically kick into gear at the specified time each day.
Deactivate Messages App on Mac
If you prefer texting or using iMessage on iPhone only, you may want to consider deactivating the Messages app on your Mac.
Open the Messages app. Then, select Messages on the menu bar and pick Preferences. Switch to the iMessage tab and select Sign Out to disable the Messages app on your Mac.
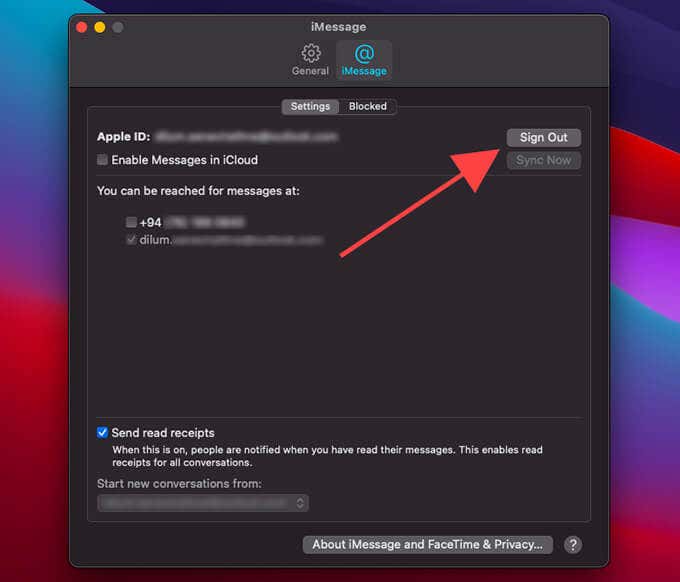
Alternatively, you can disable phone numbers or email accounts that you don’t want to use to receive messages on the Mac from the You can be reached for messages section.
For a complete walkthrough, check out this guide about disabling the Messages app on Mac.
Cut Down the Distractions
If productivity takes top priority on your Mac, it’s vital to keep a lid on the Messages app. Otherwise, you’re bound to get sidetracked easily. As you saw, there are multiple approaches to dealing with annoying message notifications, and it’s up to you to decide on the method that suits you the best.
[related_posts_by_tax posts_per_page="5"]