The iPhone’s Mail app generally works well with most email service providers. But several reasons—such as conflicting system settings, software-related issues, and differences in email protocols—can prevent it from updating your mailboxes.
So if you have any problems with the email not updating in Mail on iPhone, the solutions and suggestions below should help you fix that.
Perform a Manual Refresh
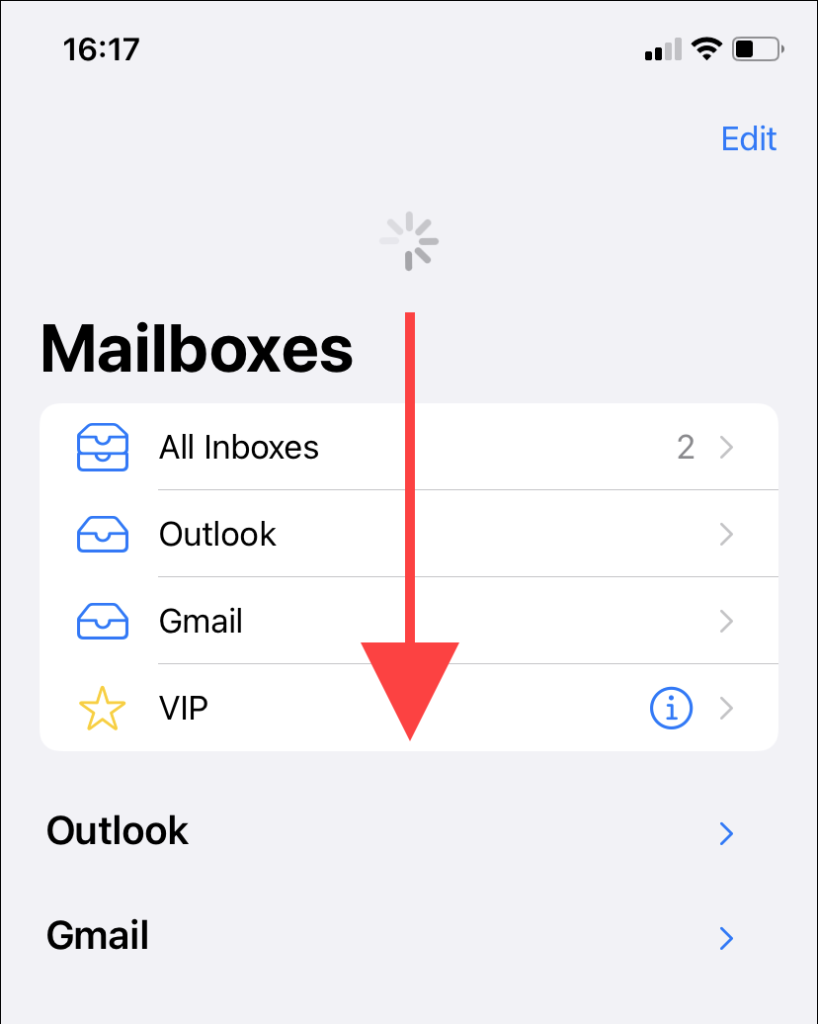
Have you tried refreshing Mail on your iPhone? Just drag your finger down the screen and release it once you see a spinning wheel. That should force the app to start communicating with the email servers.
Refreshing the Mail app also helps update mailboxes manually with accounts that use Fetch instead of Push (more on that later).
Force-Quit and Relaunch Mail
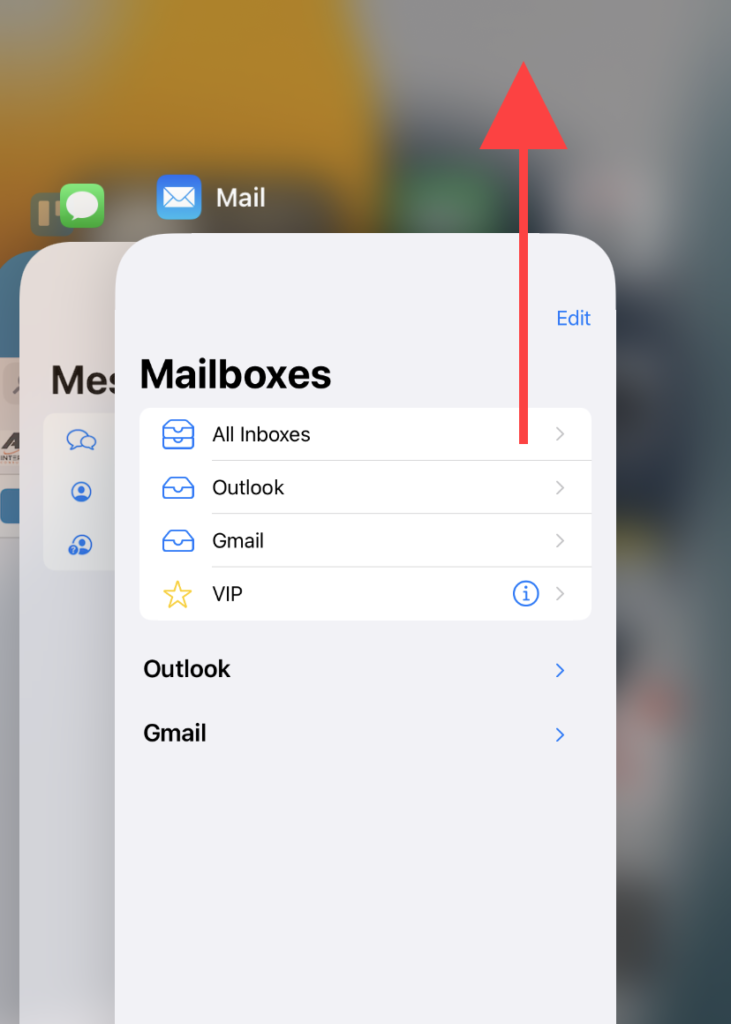
If refreshing the Mail app doesn’t help, try force-quitting and relaunching it instead. That often helps resolve odd technical issues in apps on the iPhone.
To force quit the Mail app, perform a swipe-up gesture from the bottom of the iPhone’s screen. Then, drag the Mail app card up and out of the App Switcher. Follow that by relaunching the app.
Check Notification Settings
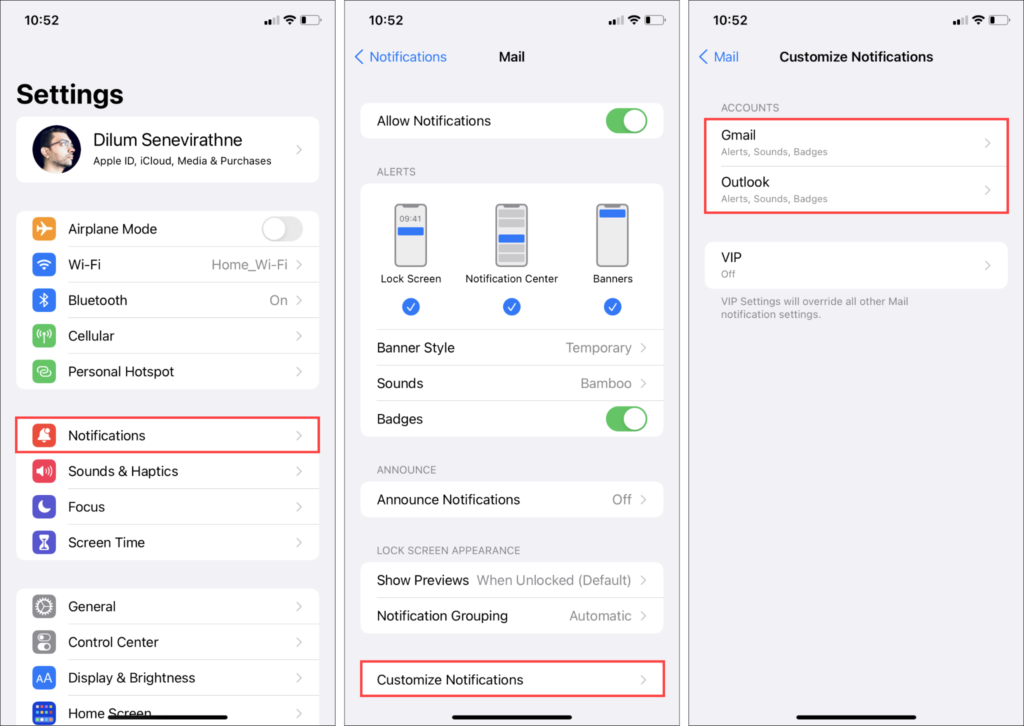
If the issue is related to the Mail app’s notifications, open the Settings app and select Notifications > Mail. Then, make sure that the notification settings (Alerts, Sounds, and Badges) are set up the way you want.
You must also check the notifications settings for individual accounts (tap Custom Notifications) and ensure that VIP Settings aren’t overriding them.
Check Cellular Data Settings
If the Mail app fails to update your email while on cellular data, you must ensure that it isn’t barred from using the iPhone’s mobile bandwidth.
To do that, open the Settings app and select Cellular. Then, scroll down the app and turn on the switch next to Mail.

Disable Low Data Mode (Cellular and Wi-Fi)
Apple introduced Low Data Mode in iOS 13 to help conserve bandwidth on Wi-Fi and cellular networks. However, the functionality can also limit internet-related activity in apps such as Mail. So check your Wi-Fi or Cellular settings and try switching it off.
Disable Low Data Mode – Wi-Fi
Go to Settings > Wi-Fi and tap the Info icon next to the active Wi-Fi connection. Follow that by turning off the switch next to Low Data Mode.
Disable Low Data Mode – Cellular
Go to Settings > Cellular > Cellular Data Options and turn off the switch next to Low Data Mode.

Disable Low Power Mode
Likewise, try disabling Low Power Mode. That’s another functionality that adversely impacts the Mail app by curtailing various background activities on your iPhone. To do that, go to Settings > Battery and turn off the switch next to Low Power Mode.

Toggle Airplane On & Off
Toggling Airplane Mode can also fix potential connectivity issues preventing the Mail app from updating. To do that, open the iPhone’s Settings app and turn on the switch next to Airplane Mode. Then, wait for up to 10 seconds and turn it off.
If you use Wi-Fi, you can also try renewing the IP lease or soft-resetting the router.

Change Domain Name Servers
On Wi-Fi connections, changing the DNS (Domain Name Servers) to a popular service such as Google DNS can end up fixing additional connectivity-related issues.
To do that, start by heading over to Settings > Wi-Fi. Then, tap the Info icon next to the active Wi-Fi connection and select Configure DNS > Manual. Follow that by entering and saving the following DNS addresses:
8.8.8.8
8.8.4.4

On cellular connections, you can only change DNS servers by using a third-party app such as DNS Override.
Restart iPhone
Turning off your iPhone and rebooting it is another viable fix that can help resolve app-specific issues.
To do that, go to Settings > General > Shut Down and drag the Power icon to the right. After your iPhone shuts down completely, followed by holding down the Side button to reboot it.

Check Mail Settings
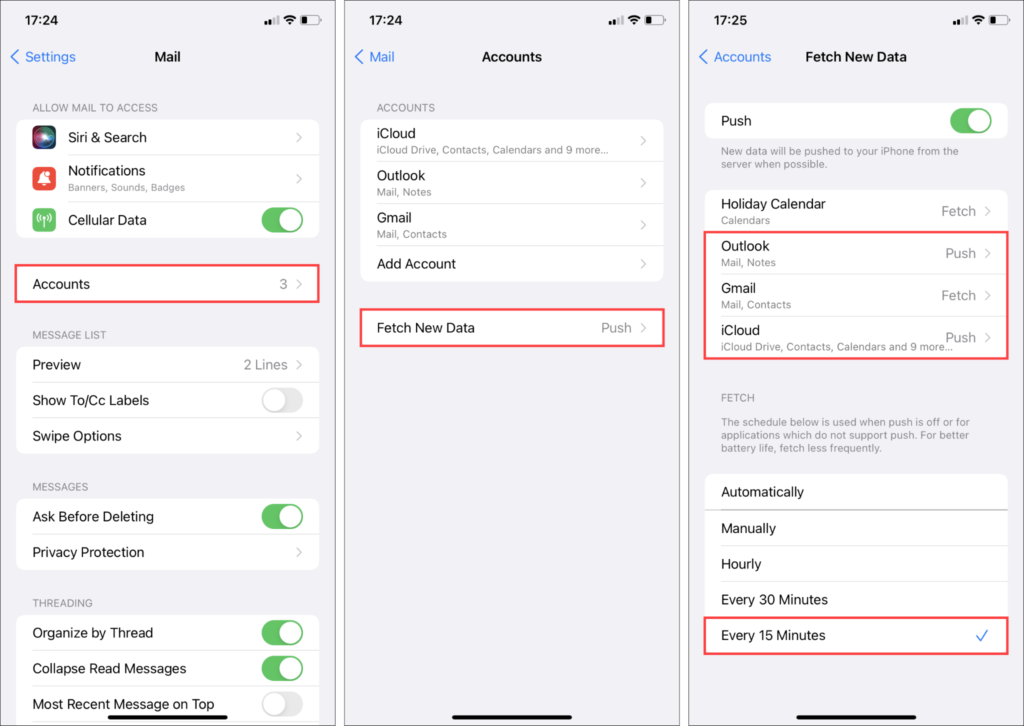
Email providers can use Push or Fetch to update your email. However, if given the option, you must set an account to Push since that prompts the email servers to ‘push’ your email instead of your iPhone trying to ‘fetch’ them. So it’s worth taking the time to double-check your email update settings.
To do that, start by heading over to Settings > Mail > Accounts > Fetch New Data. Then, tap on your email service provider and select Push. Or, if you have trouble with a specific mailbox only, you can set it as a pushed mailbox by tapping on it.
If Push is not supported (as is the case with Gmail), set it to Fetch. You must then select the update frequency to the fastest possible setting—Every 15 Minutes. If you want to update your email even quicker, you must manually refresh the Mail app.
Remove and Re-add Account
You can also try removing and re-adding any problematic accounts that refuse to update. That should help resolve issues with an incorrect or corrupt configuration.
To do that, go to Settings > Mail > Accounts and tap the account you want to remove.
Follow that by tapping Delete Account.

Then, select the Add Account option and go through the setup process from scratch. Make sure to choose the correct protocols (IMAP or POP) if you’re attempting to set up an email service provider using the Other setting.
Update iPhone
Bugs and glitches with the iPhone’s system software can also prevent the Mail app from updating your email. Hence, it’s best to update iOS immediately by heading to Settings > General > Software Update.

Reset Network Settings
Resetting the network settings can help patch out any underlying connectivity issues with the Mail app.
To do that, open the Settings app and tap General > Transfer or Reset iPhone > Reset. Then, select Reset Network Settings.
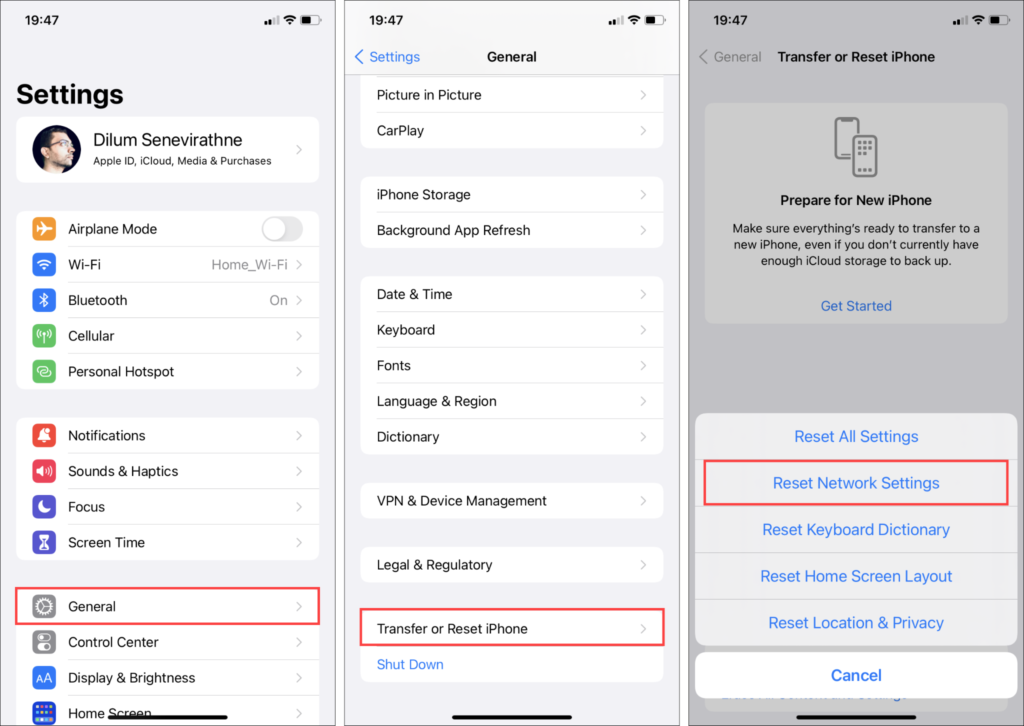
You must follow the network setting reset by manually reconnecting to any Wi-Fi networks. Then, force-quit and re-open the Mail app and check if the issue recurs.
Reinstall Mail App
Mail is part of the portfolio of stock apps on the iPhone, but you can still reinstall it just like any other app. That should provide you with a blank slate to set up your email accounts from scratch and avoid persistent issues with the current installation.
To delete the Mail app, go to Settings > General > iPhone Storage > Mail and tap Delete App.
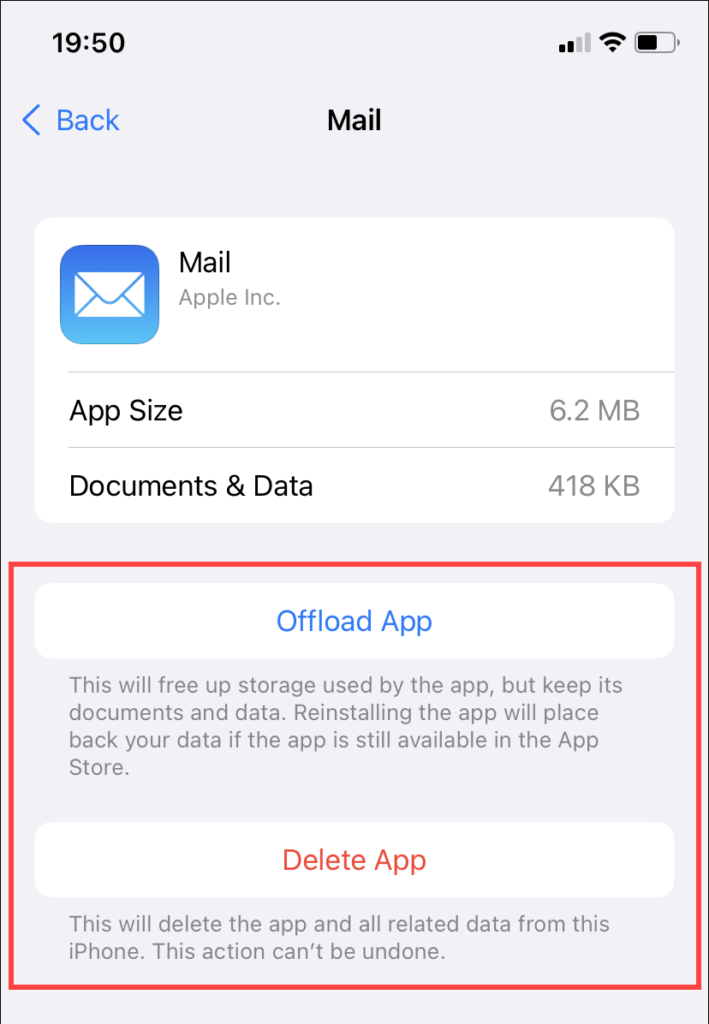
Follow that by redownloading the Mail app off the App Store. Then, launch it and sign in to your email account. Of course, you can always set up additional accounts by going to Settings > Mail > Accounts.
Mail App Still Not Updating Email?
If the Mail app continues to fail to update your mailboxes, you might want to contact your email service provider for help since it’s likely due to an issue beyond your control.
Alternatively, you can consider switching to an email client related to the email service provider itself—such as Gmail or Outlook—and check if that yields any positive results.
[related_posts_by_tax posts_per_page="5"]