Screen recording is a handy feature. In the past, we had to rely on external cameras to capture the screen on an iPad, iPhone, or PC. But now, many apps allow us to do this directly from our devices. iPhone and iPad are amazing for screen recording significant events, such as important Zoom calls, WhatsApp video, or online lessons. They’ll also help you share your screen with the audience if you are streaming on YouTube or Twitch.
But you might wonder if there’s a time limit for screen recording on the iPhone or iPad. This article will address this but also explain how to start recording your screen and suggest how to optimize your screen recording sessions.
How Long Can You Screen Record on Your Apple Device?
The iOS software allows users to benefit from up to three hours of recording per session. This may be plenty for most users out there. If you need to cram more than three hours into one project, you may need to look into other options, such as breaking it into smaller projects. That said, your iPhone screen recording might get interrupted earlier for these two reasons:
- Not enough available storage space on your device.
- Limited battery life if your device is not plugged into a charger.
Screen recordings are video files, and they are pretty big. The longer you record, the bigger the file will be. Apple devices have limited storage capacity. But if you have enough storage and battery life, you can record hours’ worth of video content and gameplay. Just keep in mind that if you record too long and create a file larger than your storage, your recording won’t get saved to your iPhone or iPad. Similarly, if your device’s battery dies during the recording session, the file won’t be saved to your phone or tablet.
That’s why it’s always important to check how much storage and battery life your iPhone or iPad has before you start recording. If you’re concerned about your device’s battery life, make sure it’s plugged into a charger and actively charging before and during your iPhone screen recording.
How to Check How Much Free Storage You Have on Your iPhone or Ipad
If you plan to perform a more extended screen recording, you must prepare and free up some storage space on your iPhone. Before you do that, check how much space you have left, so you can decide which files to delete in order to free up some storage.
Here’s how you can check how much free storage you have on your iPhone or iPad:
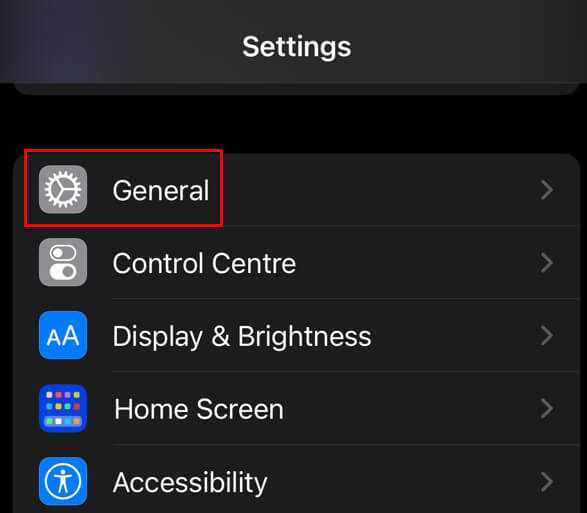
- Open up the Settings app.
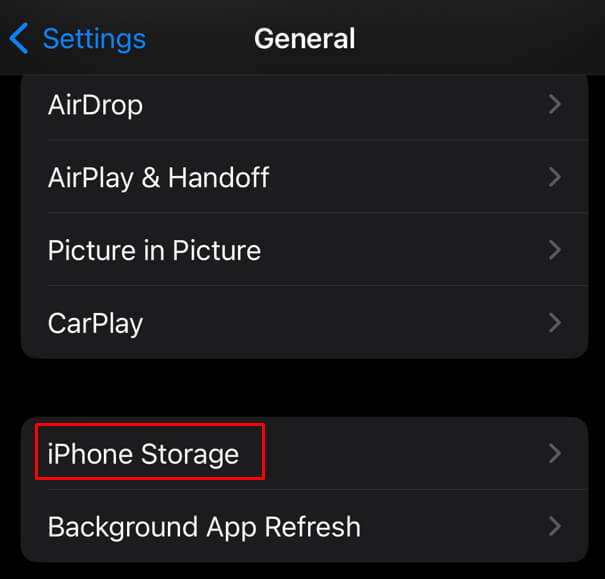
- Select General.
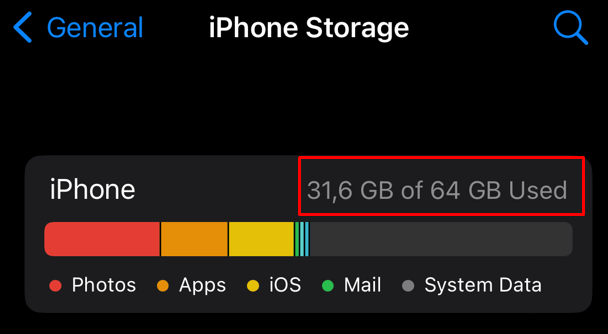
- Tap iPhone (or iPad) Storage.
- The next screen should display how much storage your iPhone is currently using. You can deduce how much storage is left.
If there’s insufficient storage and you start recording, you might see an error message on your screen. The most common message is “Screen recording stopped due to insufficient storage for recording”. If this happens, you can free up some space and start recording again. You can also divide your screen recording project into multiple smaller files. Then you can transfer them to your PC or upload them directly into the cloud storage or your YouTube channel. Smaller files are also easier to edit and faster to upload and share.
How to Enable Screen Recording on Your iPhone
If you have never screen recorded from your iPhone or iPad, here’s a step-by-step guide on how to do it:
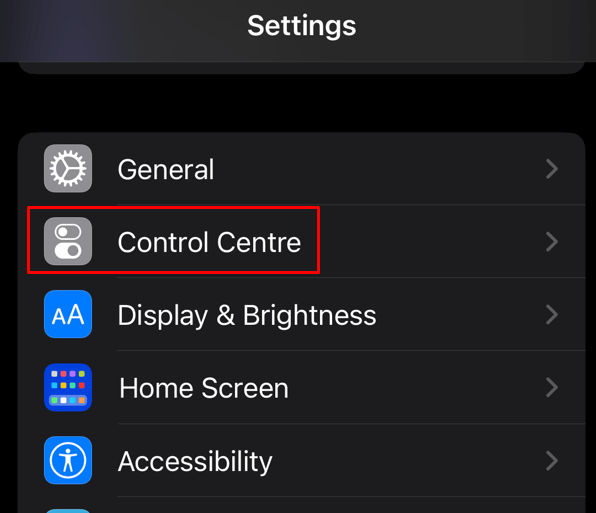
- Go to Settings.
- Select Control Centre.
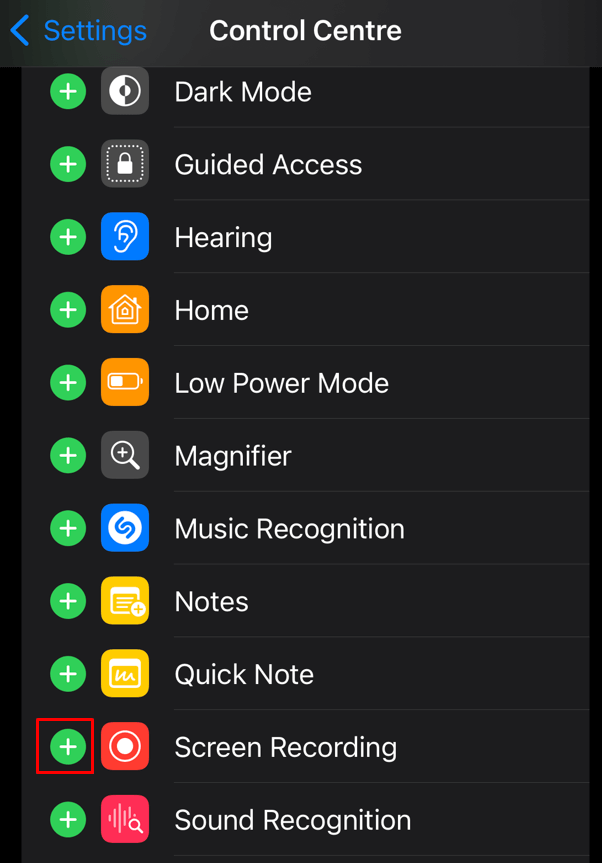
- Find the Screen Recording option and tap the green plus button.
You just added the Screen Recording feature to the Control Center. Read on to learn how to start using it.
How to Start Recording Your iPhone Screen
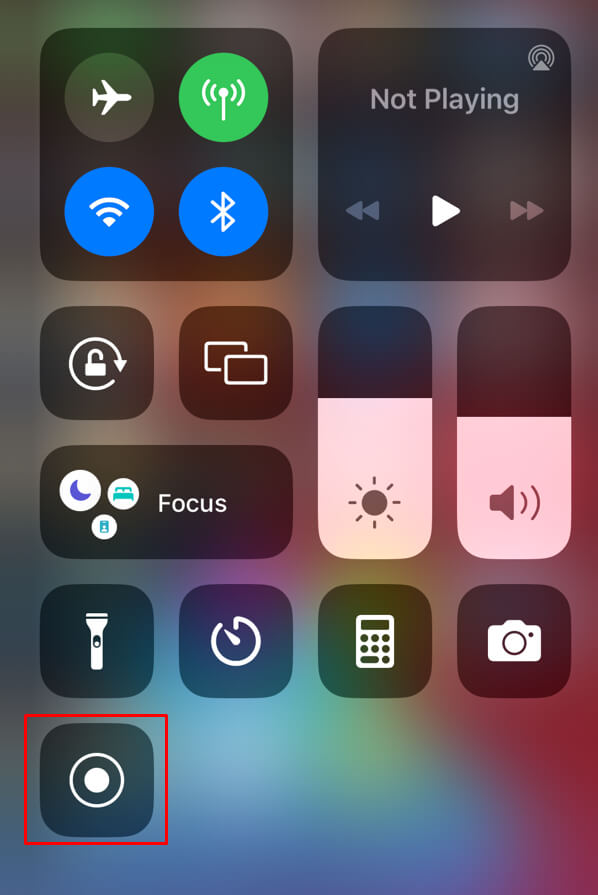
- Open Control Centre. iPhone X and later model users swipe down, from the top-right corner of the screen. Older model iPhone users swipe up from the bottom of the screen to open Control Center.
- Tap the Record button. It’s a full dot in a circle screen recording icon.
- A countdown starts. This ensures you have enough time to leave Control Center and prepare your device for recording. You have only three seconds to do this, but that should be enough time.
- After three seconds, the recording starts automatically.
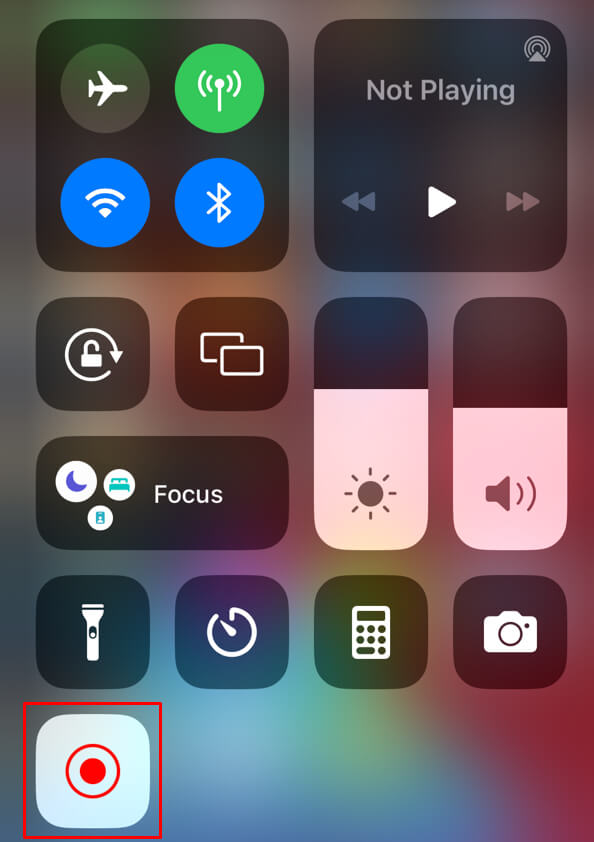
- To end screen recording, go back to the Control Centre and tap the red recording button. Alternatively, tap the red bar at the top of the screen and the recording will stop.
That’s all there. You successfully recorded whatever was going on your iPhone or iPad screen. The recording will be automatically saved in the Photos app. You can edit it, upload or share it.
How Much Space Does iPhone Screen Recording Take?
Note that you can quickly fill your device’s storage since screen recording files are videos. You can control the size of the files by manipulating the quality of the video. Here’s how:
- Go to Settings.
- Scroll down to Camera and tap it.
- Select Record Video.
- Select the video resolution quality from the offered list. The lower the resolution the smaller the recorded file size will be.
Here’s a quick breakdown of how much space will each resolution option take on your device, for a minute of a recorded video:
- A minute of a video recorded in 720p HD at 30 fps will take 40MB.
- A minute of a video recorded in 1080 HD at 30 fps will take 60MB.
- A minute of a video recorded in 10800p HD at 60 fps will take 90MB.
- A minute of a video recorded in 4K at 24 fps will take 135MB.
- A minute of a video recorded in 4K at 30 fps will take 170MB.
- A minute of a video recorded in 4K at 60 fps will take 400MB.
It’s important to know that all iPhone models have preset storage capacity that can’t be expanded. That’s why you’ll need to take care of how much you’re recording and what you’re doing with the saved files. Delete them often, and you’ll have more screen recording storage free. If you want to keep them, transfer these files to your Mac or Windows PC or store them on any external storage device. You can also opt to use iCloud for storing your screen recording videos.
Screen recording on your iPhone or iPad comes in handy. There are plenty of different uses, whether it’s for streaming, saving highlights from a game, or teaching someone how to do something on their device. Knowing how long you can screen record is a critical factor when deciding how to use the feature. So hit that record button! Who knows what epic moments you’ll capture.
[related_posts_by_tax posts_per_page="5"]