While most websites you come across are usually informative and help you with the tasks you’re stuck on, other websites mainly distract you from the work you’re doing. These websites often work as magnets and they keep you stuck to them for long periods.
If you find yourself wandering around these sites for long hours, you may want to get these sites blocked on your machine. This way you’re indirectly enforcing restrictions on yourself and making these websites inaccessible.

The feature also helps you block websites that you don’t want your kids to see. These may be adult sites or other sites you don’t think are appropriate for your kids.
Regardless of the reasoning, blocking sites on Safari on a Mac is a pretty easy process and can be done using three different methods. Feel free to check out our video also that we made for our sister-site YouTube channel that goes through the steps and requires no reading on your part!
Use Parental Controls To Block Websites In Safari On Mac
If you’ve taken a look inside the System Preferences panel on your Mac, you’ve likely seen this menu called Parental Controls. It allows you to restrict certain content from being viewed on your Mac, and it lets you block your chosen websites as well.
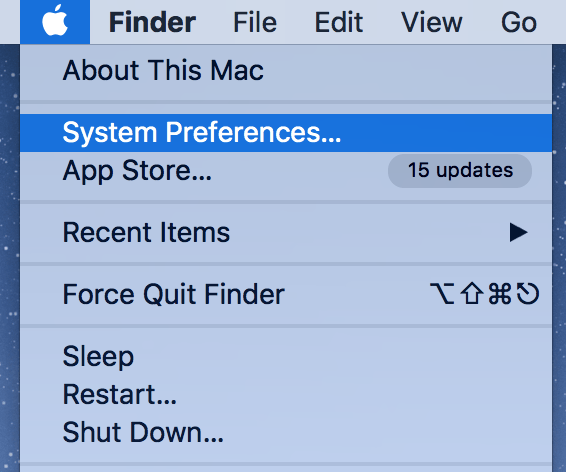
Click on the Apple logo at the top-left corner of your screen and select System Preferences.
When the panel opens, find and click on the option that reads Parental Controls.
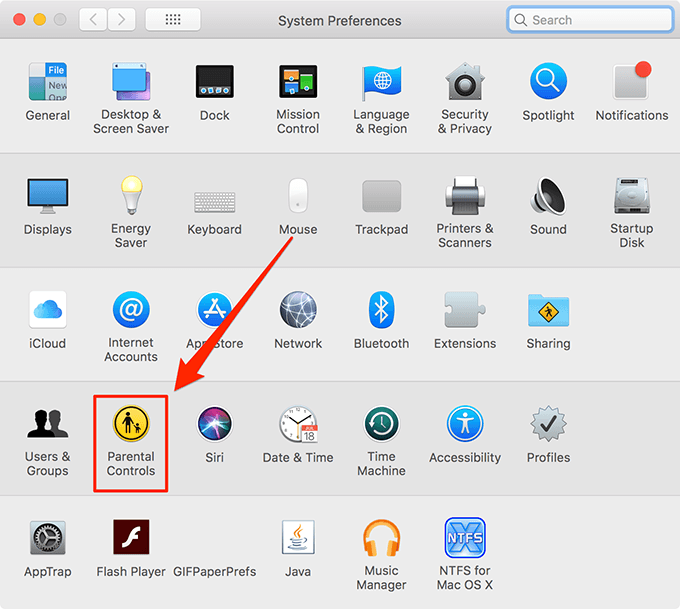
Select the user account you’d like to enable restrictions on from the left sidebar.
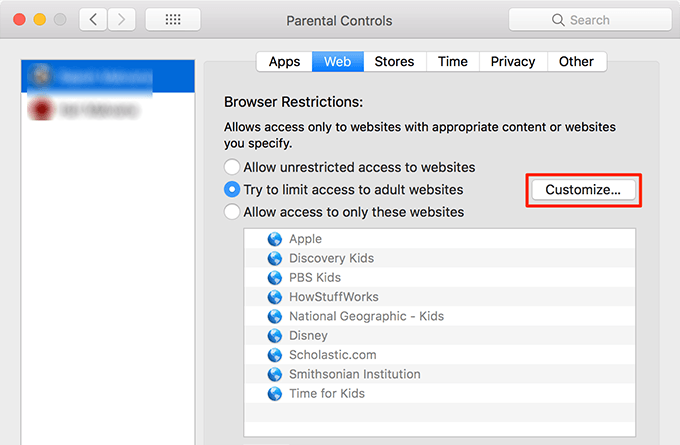
When a menu appears in the right pane, click on the tab that says Web.
Enable the second option that says Try to limit access to adult websites and then click on the Customize button next to it.
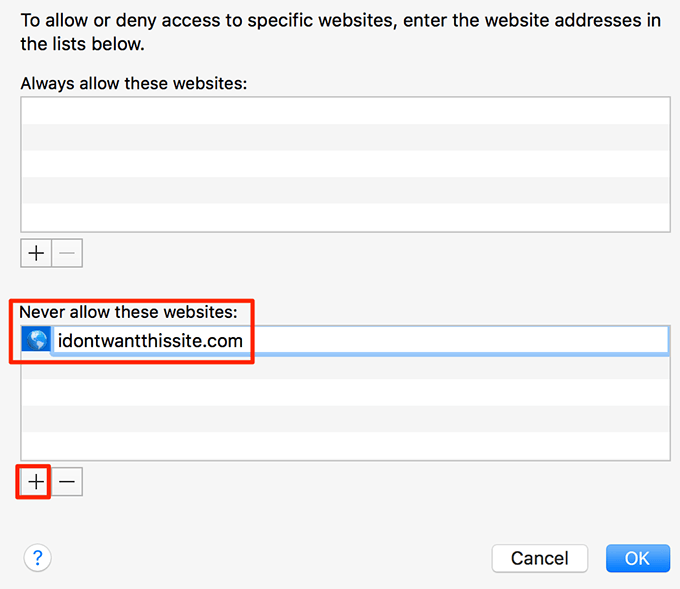
On the following screen, click on the + (plus) button beneath the Never allow these websites section to add a new website to the block list.
Type in the URL of the website you want to block and hit Enter. Feel free to add as many websites as you want to the list. Click on OK when you’re done.
The user won’t be able to access the websites you specified in the block list.
The list is customizable and you can add and remove websites at any point in time. There’s even a section that lets you specify the websites that are always allowed. It could contain your kids’ educational websites and things like that.
Tweak The Hosts File To Restrict Access To Websites In Safari On Mac
If you’ve ever tried to block websites on a Windows PC, you’re already familiar with the hosts file. This file can be used to restrict access to certain websites on your machine and it’s available on the Mac platform as well.
You’ll be using the Terminal app to open and edit the file.
Launch the Terminal app on your Mac, type the following command into it, and hit Enter.
sudo nano /etc/hosts

Since it’s a sudo command, you’ll be asked to enter your admin password. Enter the password and press Enter.

When the file opens, press Enter after the line that says 127.0.0.1 localhost. This will let you add a new line to the file.
Here comes the part where you block a site. Type in 127.0.0.1, press Spacebar, and then enter the web address of the site you want to block.
For example, if you want to block bing.com, you’ll use the following line:
127.0.0.1 bing.com
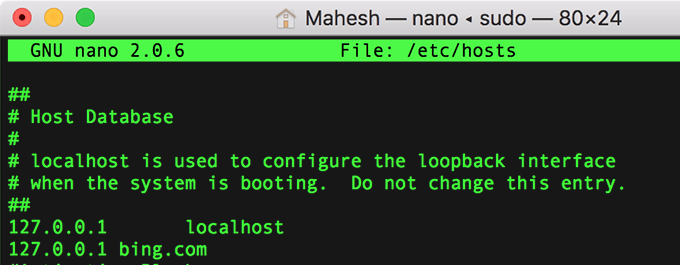
You can add as many websites to the block list as you want. Just make sure to put each website in a new line and don’t change the prefix that is the local IP address of your Mac.
Once you’ve entered the URLs for all the websites you want to block, press the Control + O keys on your keyboard to save the file.
Exit the file editing mode by pressing the Control + X keys.
Once you’re back to the normal Terminal window, type in the following command to flush your DNS cache:
sudo dscacheutil -flushcache

It’ll remove the DNS cache files so these files don’t interfere with the functions of the hosts file.
Your specified websites will remain blocked for as long as they are in your hosts file.
Use An App To Block Websites In Safari On Mac
Both of the ways shown above use the built-in tools available on your Mac to do the task. If you don’t find them convenient and you’d prefer a simpler option, you can use a third-party app to block sites on your Mac.
Enter SelfControl, a free app for Mac machines that lets you get your focus back by blocking unproductive sites on your computer. With this app, you can even define the duration for which you want your specified sites to remain blocked. Once that time period has passed, your specified sites will become accessible again.
Download the app, move it to the Applications folder, and launch the app.
On the main interface, click on the Edit Blacklist button to specify your websites.

Click on the + (plus) sign on the following screen to add websites to the block list. Optionally, you can even import the websites to be blocked from the Internet.
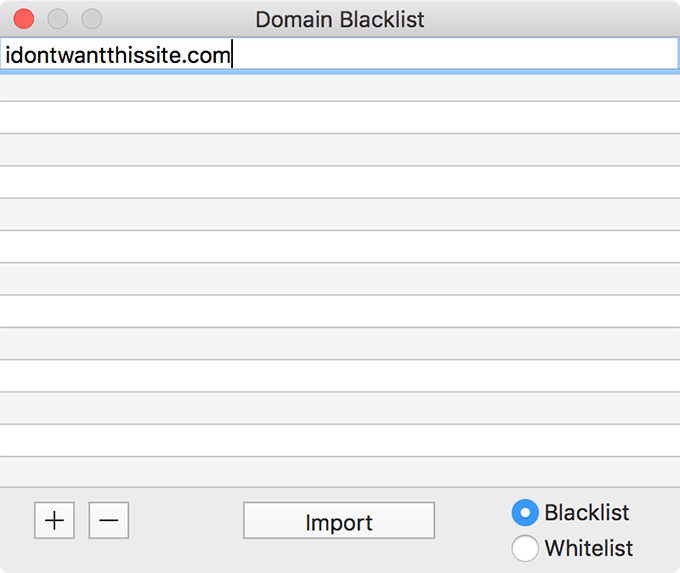
Drag the slider on the main interface to adjust the block duration. Then click on the Start button to start the blocking period.
Your selected sites will remain inaccessible for the time period you’ve chosen in the app.
An additional feature that this app provides is a list called a whitelist. What this list does is it lets you specify the sites that you want accessible keeping all other sites on the Internet blocked. Be cautious while using this feature and only use it in certain circumstances where only a few chosen websites are to be allowed on the machine.