Before going to the Apple Store
If you’re a MacBook Pro or Air user, you’ve encountered a flickering screen at some point. This problem can make it challenging to use your computer for an extended period and could even be a recipe for a headache!
But don’t fret! There are several solutions you can try before heading to the repair shop or purchasing a new laptop. Here are ten potential fixes that help resolve screen flickering on your MacBook.
1. Restart Your MacBook
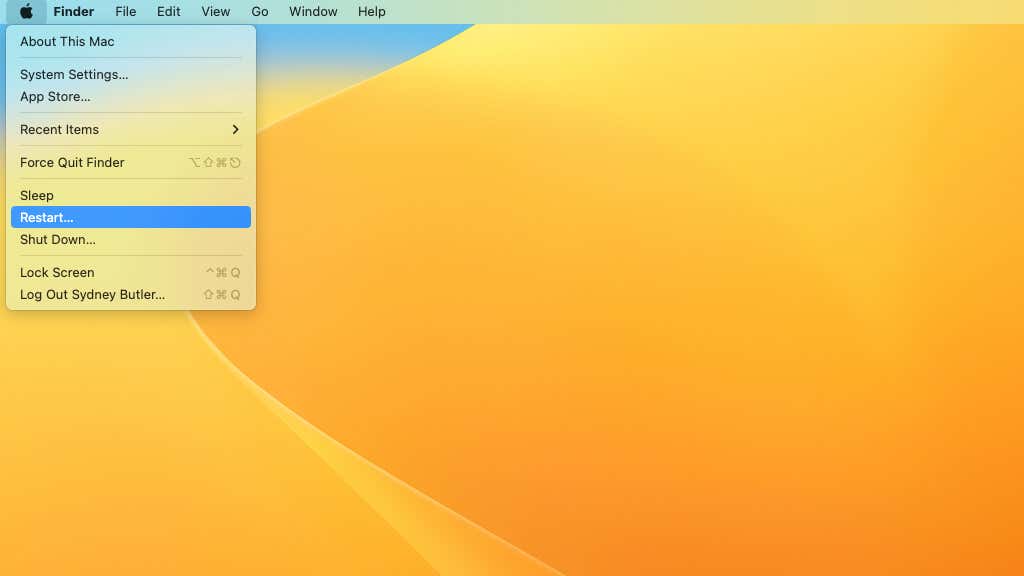
Restarting your MacBook may seem like a no-brainer solution, but it often works! By doing so, you can clear out any temporary bugs or glitches that may have been causing the screen flickering issue.
When you restart your MacBook, all running applications, processes, and services are shut down and then started up again, which can refresh your system and eliminate any transient glitches causing the issue.
Now, restarting your MacBook is not necessarily a once-and-done fix. If you experience screen flickering again and you have to restart your system repeatedly, it points to a more systemic issue.
2. Check for macOS Updates
Updating your operating system to the latest version can fix bugs and glitches that could be behind the screen flickering problem. Apple regularly releases software updates addressing known issues, including screen flickering, so keeping your system up-to-date is smart.
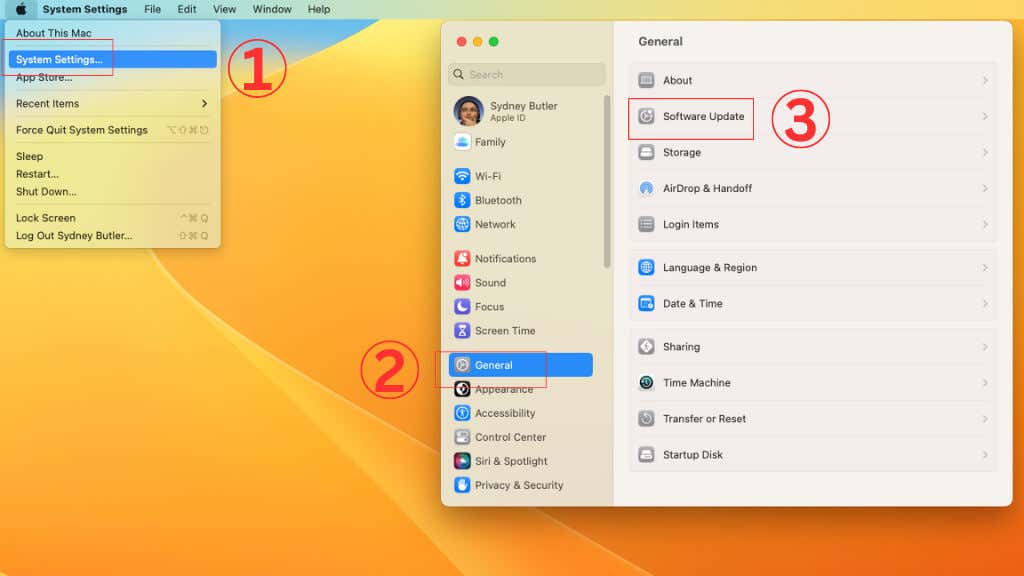
Go to the Apple menu > System Preferences or System Settings on newer macOS versions to check for macOS updates.
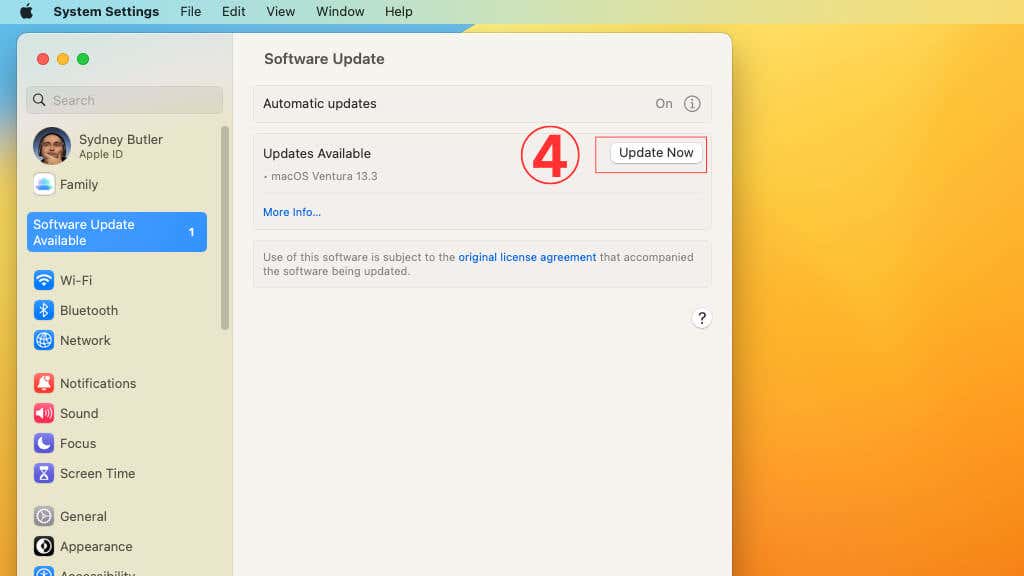
From there, select General and then Software Update. This will bring up a list of available updates for your system. If any updates are available, select the Update Now button to download and install them.
Sometimes, screen flickering can be caused by a compatibility issue between the operating system and other applications or hardware. So, updating your operating system might not fix the issue. However, you can use Safe Mode to determine if a third-party app is causing the problem, and we’ll explain how to do that under tip number seven below.
3. Disable True Tone
True Tone automatically adjusts the color temperature of your MacBook’s screen based on ambient lighting. While this can help reduce eye strain, it can also cause perceived screen flickering for some people.
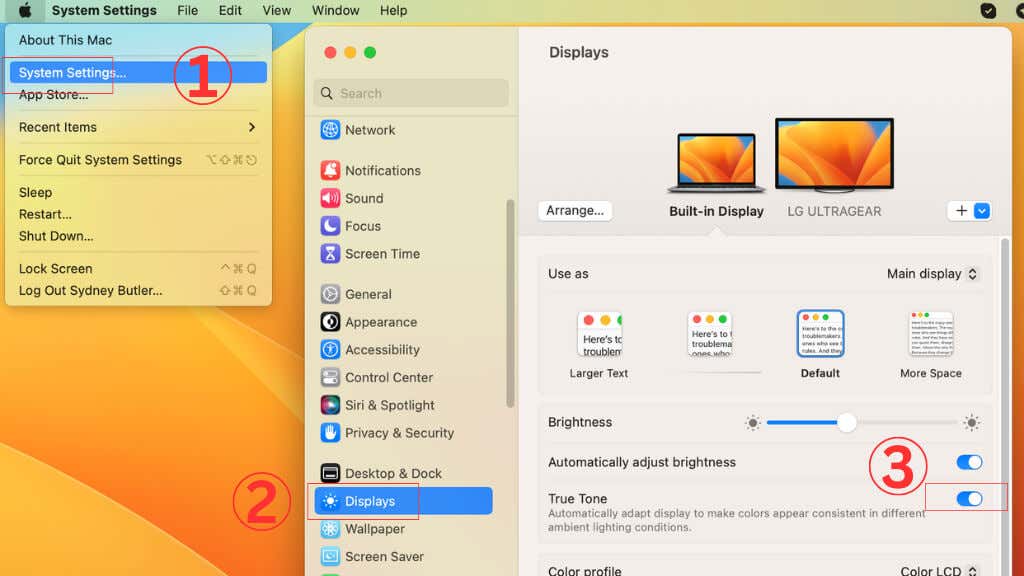
To disable True Tone, go to the Apple menu > System Preferences or System Settings on newer macOS versions.
Then choose Displays. In the Displays preferences pane, you will see the option for True Tone. Toggle the switch next to True Tone to turn off the feature.
True Tone is only available on newer MacBooks with a built-in light sensor. If your MacBook is older, you won’t have the True Tone option in your display preferences.
4. Disable Variable Refresh Rates for External Monitors
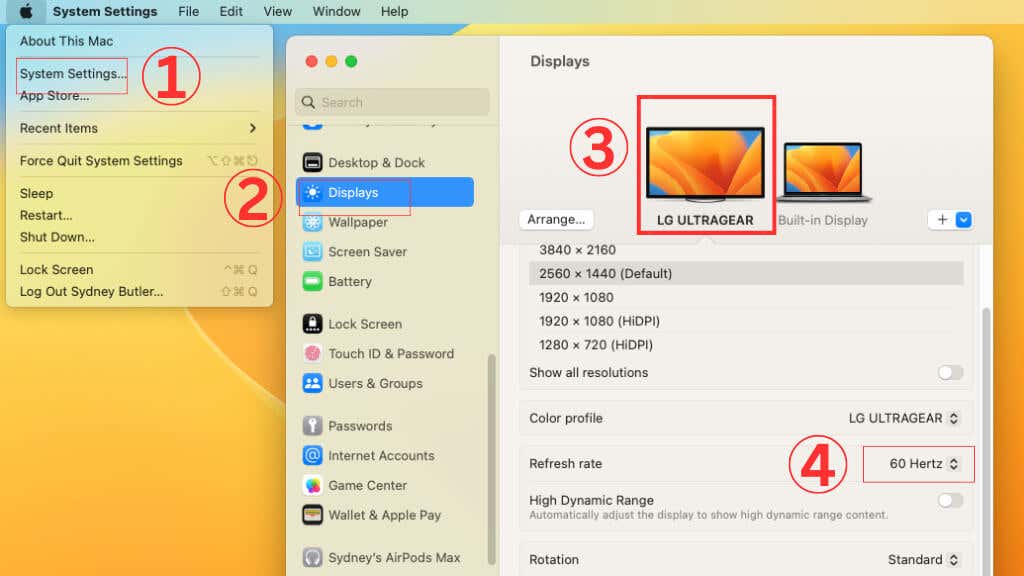
If you’re using an external monitor with your MacBook, the variable refresh rate feature may be causing the screen to flicker. To disable this feature, go to the Apple menu, then choose System Preferences/Settings > Displays.
Make sure your external display is selected from the diagram at the top of the window, then next to Refresh Rate, ensure that Variable Refresh Rate isn’t selected.
Instead, choose any stable number, such as 60Hz. In some cases, if you choose a high refresh rate (such as 120Hz), you may experience intermittent flickering if the HDMI adapter isn’t up to the job. Switching to one certified for that resolution and refresh rate is the best fix.
We’ve only seen the variable refresh rate feature appear when using DisplayPort output from our MacBook, and with every reboot, it defaults to a variable refresh rate. Until Apple addresses this, you must turn off the variable refresh rate after every reboot or switch to HDMI.
5. Disable Graphics Switching
Some MacBook models come with dual graphics GPUs and can switch between them automatically, depending on the task you are performing. While this can enhance your MacBook’s battery life, it can also cause screen flickering issues in some cases. If you’re experiencing screen flickering, try disabling this feature.
To disable graphics switching, go to the Apple menu and select System Preferences. Then, select Battery and select the Battery Tab. Deselect the automatic graphics switching checkbox. If you’re on macOS Catalina or earlier, the setting is under the Energy Saver preference tab instead.
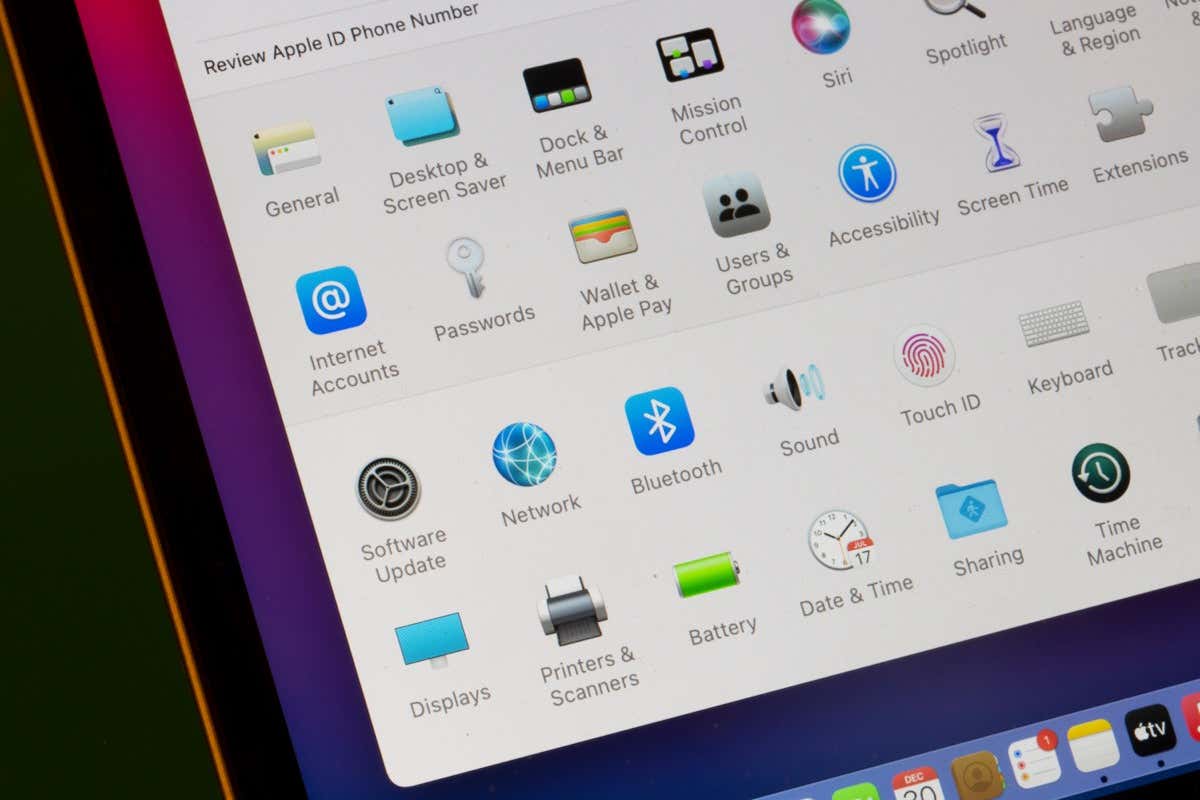
Remember that disabling graphics switching may impact your MacBook’s battery life and performance, especially when running graphics-intensive applications. So only disable graphics switching temporarily when you’re experiencing screen flickering issues.
Some MacBook models may not have the option to disable graphics switching. For example, suppose you can’t find the Automatic graphics switching option in your MacBook’s Energy Saver preferences. In that case, it’s likely that your MacBook doesn’t have dual graphics cards, and the issue causing the screen flickering may be something else. At the time of writing, no Apple Silicon MacBooks have this feature because they all use integrated Apple Silicon GPUs.
6. Reset NVRAM/PRAM and SMC
NVRAM (Non-Volatile Random Access Memory) and PRAM (Parameter RAM) are small pieces of memory that store settings related to your MacBook’s hardware, including screen resolution, startup disk selection, and speaker volume. Resetting them can help to fix screen flickering issues, as well as other hardware and software problems.
For more information on how to perform this reset, please read How To Reset PRAM & SMC On Your Mac
7. Restart In Safe Mode
If the screen flickering persists after trying the previous fixes, restarting your MacBook in Safe Mode can be a useful troubleshooting step. Safe Mode is a special boot mode that loads only the essential components and drivers needed to run your MacBook. This can help to isolate and identify any software issues that may be causing the screen flickering.
For more information on how to boot your Mac into Safe Mode, please refer to How to Boot Up and Use a Mac in Safe Mode.
If the screen flickering problem is resolved while in Safe Mode, it’s likely that a third-party application or software driver is causing the issue. You can try uninstalling or updating recently installed software programs to fix the issue.
8. Run Apple Diagnostics
Apple Diagnostics is a built-in tool that performs a series of tests to check your MacBook’s hardware, including the screen, graphics card, memory, and hard drive.
Once Apple Diagnostics starts, follow the on-screen instructions to run the diagnostic tests. The tests may take some time to complete, but they will provide a report on any issues. If any hardware problems are detected, the report will provide information on the issue and how to resolve it.
You can run Apple diagnostics from the startup options window. To access the startup options window on your Apple Silicon Mac, simply power it on and keep pressing the power button until the window appears. You’ll know you’ve reached it when you see a gear icon labeled Options. Once there, press the Command + D keys on your keyboard to proceed.
For those with an Intel processor, the process is different. Immediately after powering on your Mac, hold down the D key on your keyboard until you see a progress bar or are prompted to select a language. This will take you where you need to go.
9. Run Maintenance Scripts
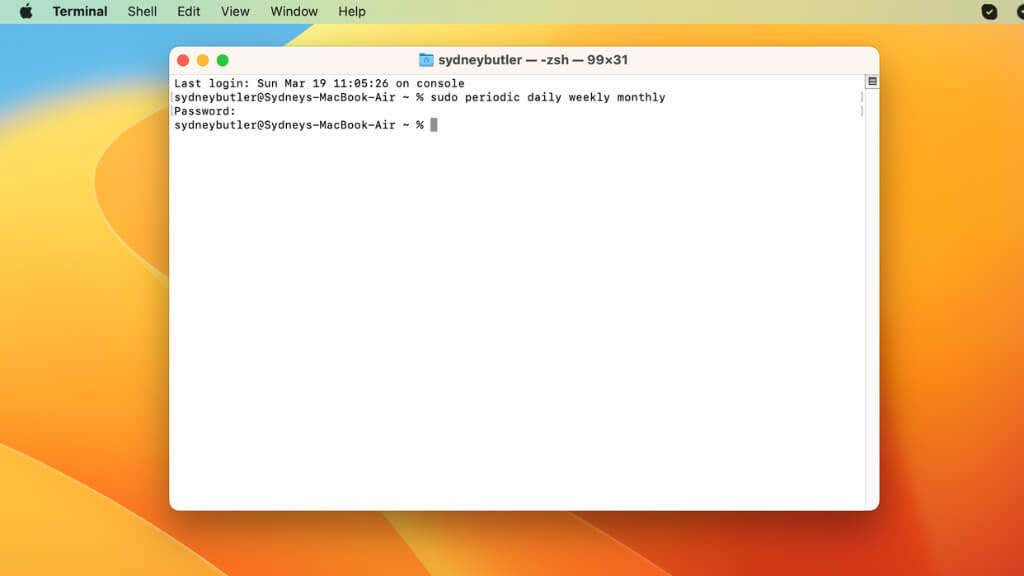
Over time, your MacBook can accumulate temporary files and other data that can cause issues with performance and stability. Running maintenance scripts can help clear out these files and improve your MacBook’s performance. To run maintenance scripts, open the Terminal app, type the following, and press Enter.
sudo periodic daily weekly monthly
While running maintenance scripts using the Terminal app is straightforward, it can be intimidating for users unfamiliar with command-line tools. Fortunately, third-party applications, such as CleanMyMac X, can simplify the process of running maintenance scripts.
Aside from CleanMyMacX, several other third-party applications are available that can help perform maintenance tasks on your MacBook. One such app is Onyx, a free donationware utility that provides a user-friendly interface for running maintenance scripts and performing other tasks, such as deleting cache files and repairing disk permissions.
10. Take the MacBook Back to Apple
If you’ve tried all the above fixes and are still experiencing screen flickering issues, a more serious hardware issue may require professional repair. In this case, take your MacBook back to Apple for repair or replacement.
If your MacBook is still under warranty, you may be eligible for a repair or replacement at no additional cost. Apple provides a one-year limited warranty on all new MacBooks, and you can also purchase AppleCare+ for extended warranty coverage within that first year. AppleCare+ provides up to three years of additional coverage and includes two incidents of accidental damage coverage.
In some cases, even if your MacBook is out of warranty, Apple may still cover known problems with Macs through a special program. These aren’t always widely published, but the Apple technician will let you know if you’re eligible for such a program. So it’s still worth bringing your laptop in for an assessment, even if you don’t intend to pay for a repair out of your pocket.

