Quick and easy ways to protect your privacy
You’re constantly at risk of exposing photos and videos on an Apple iPhone. It’s just too easy to stumble across something sensitive around other people or share it among contacts by accident. Your privacy is also at stake if someone else has access to your iOS device.
Thankfully, you can put a stop to that by hiding sensitive photos and videos on your iPhone. Use the Photos app or any alternative methods below to get the job done. The instructions in this tutorial also apply to the iPod touch and iPad.
1. Add Photos to Hidden Album
The fastest way to hide photos and videos on the iPhone is to move them to the “Hidden” album—which you can also hide—in the Photos app. However, it might not be a practical solution since you can’t lock the album with a password.
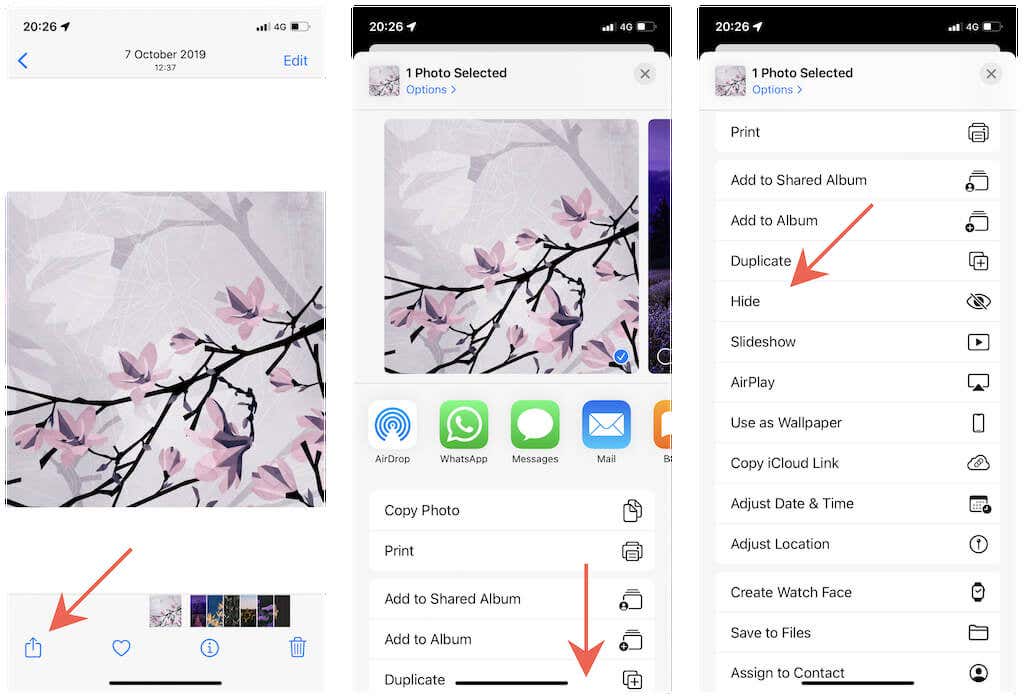
Hide a Photo on iPhone
To hide a photo in the Photos app:
1. Open the Photos app and tap the image you want to hide.
2. Tap Share (the box-shaped icon with an arrow coming out from the top) at the bottom left corner of the screen.
3. Scroll down the Share Sheet and tap Hide.
Hide Multiple Photos on iPhone
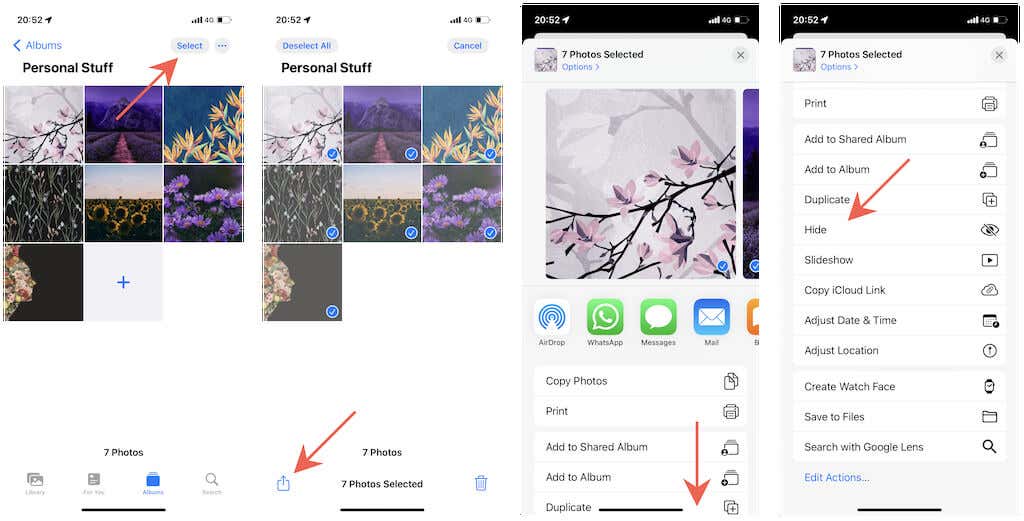
You can hide multiple photos faster by entering selection mode. To do that:
1. Tap the Select button at the top right corner of the Photos app while viewing the contents of any album, the camera roll, or your photo library.
2. Mark the photos you want to hide.
3. Tap the Share icon.
4. Scroll down and tap Hide.
Access the Hidden Photo Album
Hidden photos will no longer appear within your albums, camera roll, and photo library. If you want to view them, you must open the “Hidden” album on your iPhone. To get to it:
1. Switch to the Album tab in Photos.
2. Scroll down to the Utilities section.
3. Tap Hidden.

If you use iCloud Photos, the changes above will also sync across Apple devices. You can access the hidden photos on any other iPhone or iPad you own by repeating the above steps. On a Mac, select the Hidden folder on the Photos sidebar instead.
Hide the Hidden Album
It’s also possible to hide the “Hidden” album on your iPhone. To do that:
1. Open the Settings app on your iPhone.
2. Scroll down and tap Photos.
3. Turn off the switch next to Show Hidden Album.
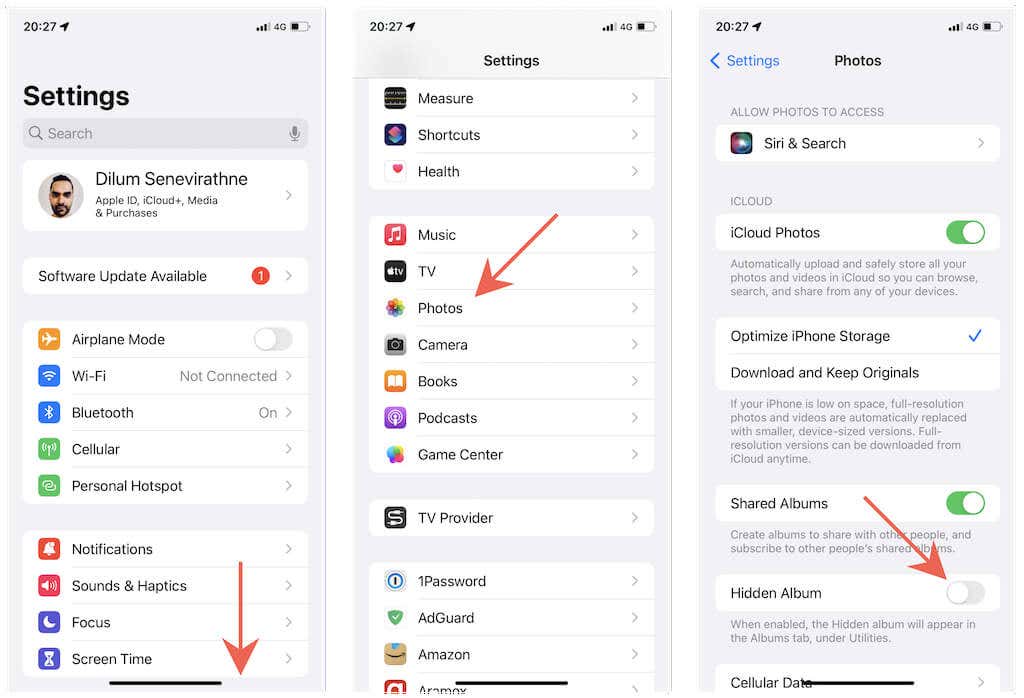
If you want to unhide the “Hidden” album, revisit the above screen and turn on the switch next to Show Hidden Album.
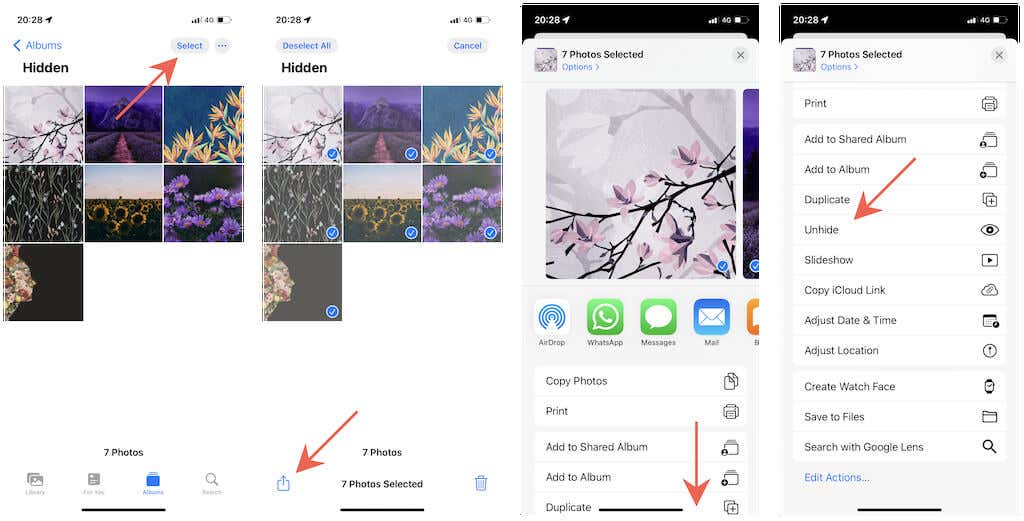
Unhide Photos on Hidden Album
If you want to unhide photos within the “Hidden” album:
1. Open the Hidden album.
2. Tap the Select button and mark the photo or photos you want to unhide.
3. Tap the Share button.
4. Scroll down and tap Unhide.
2. Hide Photos in Notes
The following method involves hiding photos within the Notes app on your iPhone. It’s not as convenient as the previous method but comparably safer since you can lock notes behind a password.
Export Photos to Notes App
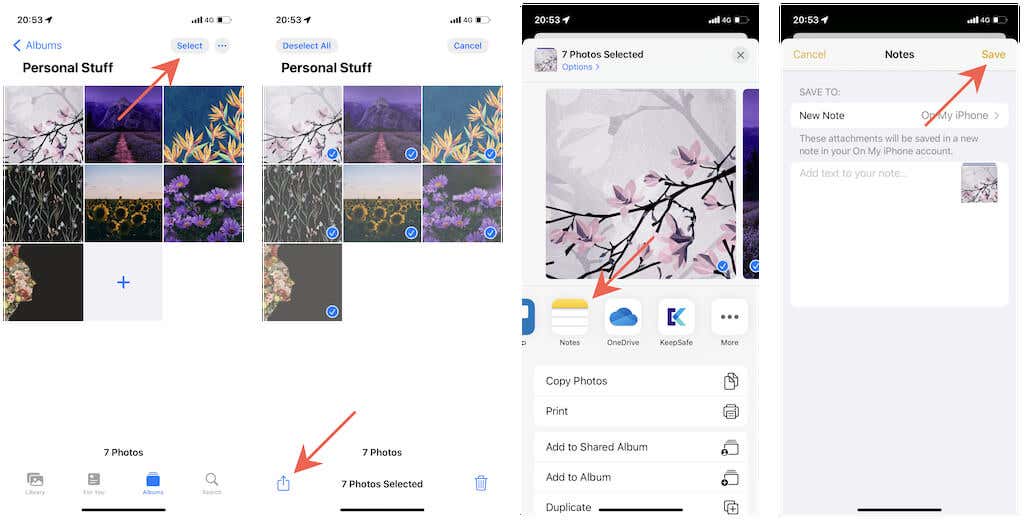
Start by exporting your private photos from the Photos app to Notes. To do that:
1. Open Photos and select the photo or photos you want to hide.
2. Tap Share.
3. Tap Notes.
4. Create a new note or select any of your existing notes within the iCloud or On My iPhone locations.
5. Tap Save.
Lock the Note in Notes
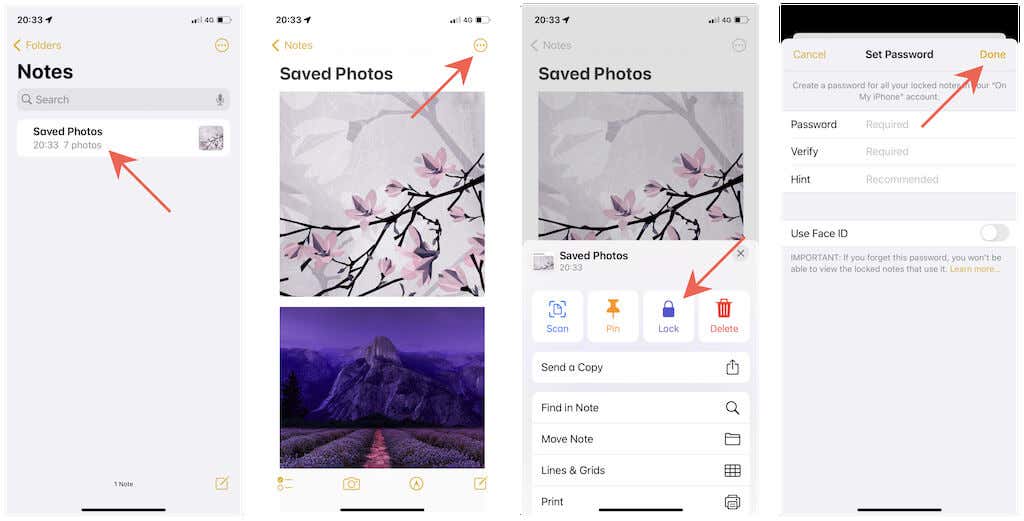
You must next lock the note. That involves creating a password for the iCloud or On My iPhone accounts the first time.
1. Open the Notes app.
2. Tap the note containing the photos.
3. Tap the Menu icon (three dots) at the top right of the screen.
4. Tap Lock.
5. Create a password, activate unlocking via Face ID or Touch ID (optional), and tap Done. You will not encounter this step in any subsequent notes you want to lock.
Remove Images From Photos
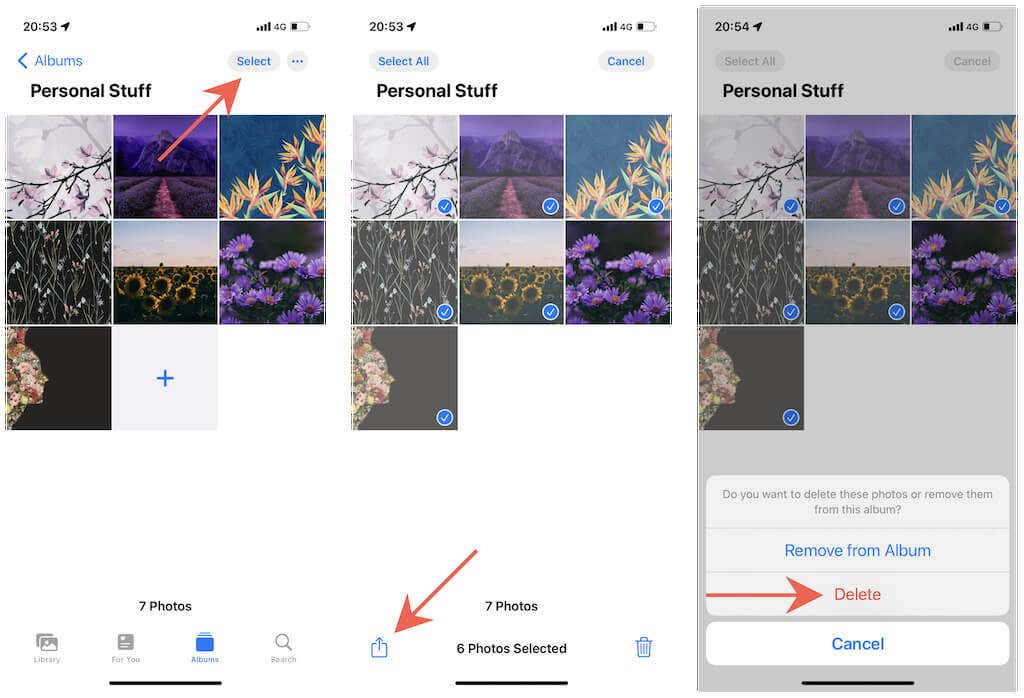
Don’t forget to remove the images from the Photos app. To do that:
1. Open Photos.
2. Select the image or images you want to remove.
3. Tap the Trash icon at the bottom right corner of the screen and select Delete.
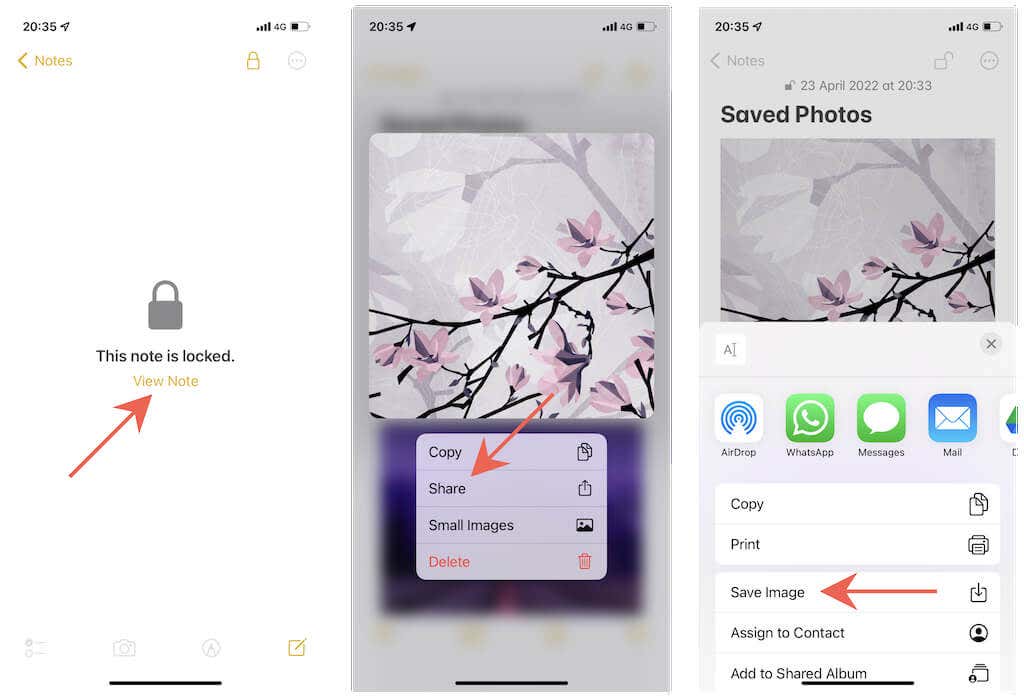
Save Notes to Photos
If you want to save the images from the Notes app to Photos later, you must:
1. Open the note containing the photos.
2. Long-press a photo in the note and tap Share.
3. Tap Save Image.
4. Repeat for any other images you want to save to Photos.
3. Hide Photos in Files App
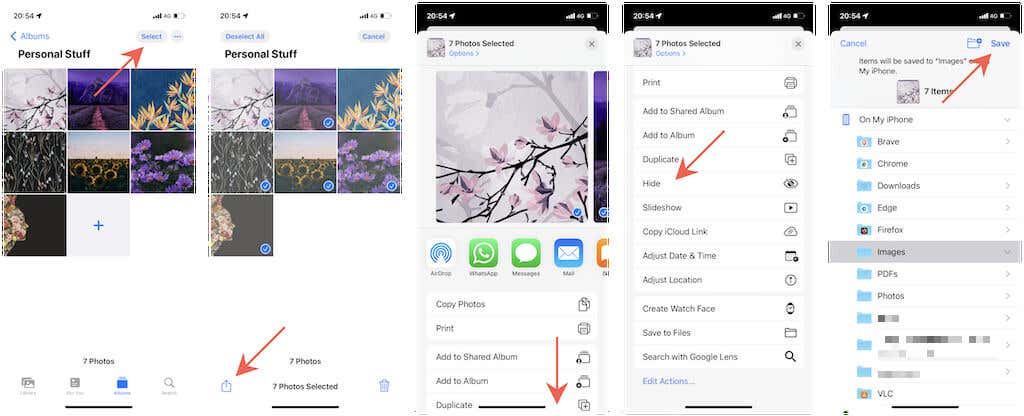
The Files app on your iPhone offers another way to hide pictures and videos by letting you conveniently stash them in obscure locations within the iCloud and On My iPhone directories. You can’t use password protection like in Notes, though.
Hide Photos in Files
1. Open Photos and select the photos you want to hide.
2. Tap Share.
3. Scroll down and tap Save to Files.
4. Select a location or create a new folder and tap Save.
5. Delete the photos from the Photos app.
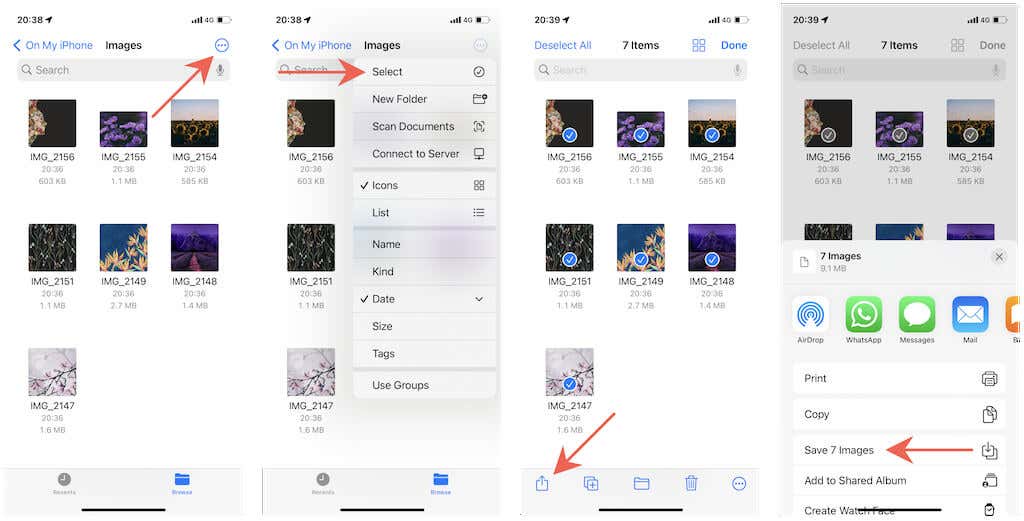
Save Images Back to Photos App
If you want to save your photos back to the camera roll on the Photos app:
1. Open the Files app and navigate to the location of the photos.
2. Select the photo or photos and tap Share.
3. Tap Save Image/Images.
4. Hide the Photos App
Removing the Photos app from the iPhone’s Home Screen can minimize the chances of someone viewing your photos without permission. You may also want to build on that by removing Photos widgets and preventing images from showing up in search results.
Remove Photos App From Home Screen
To remove the Photos app from the Home Screen:
1. Long-press the Photos app icon.
2. Tap Remove App.
3. Tap Remove from Home Screen.
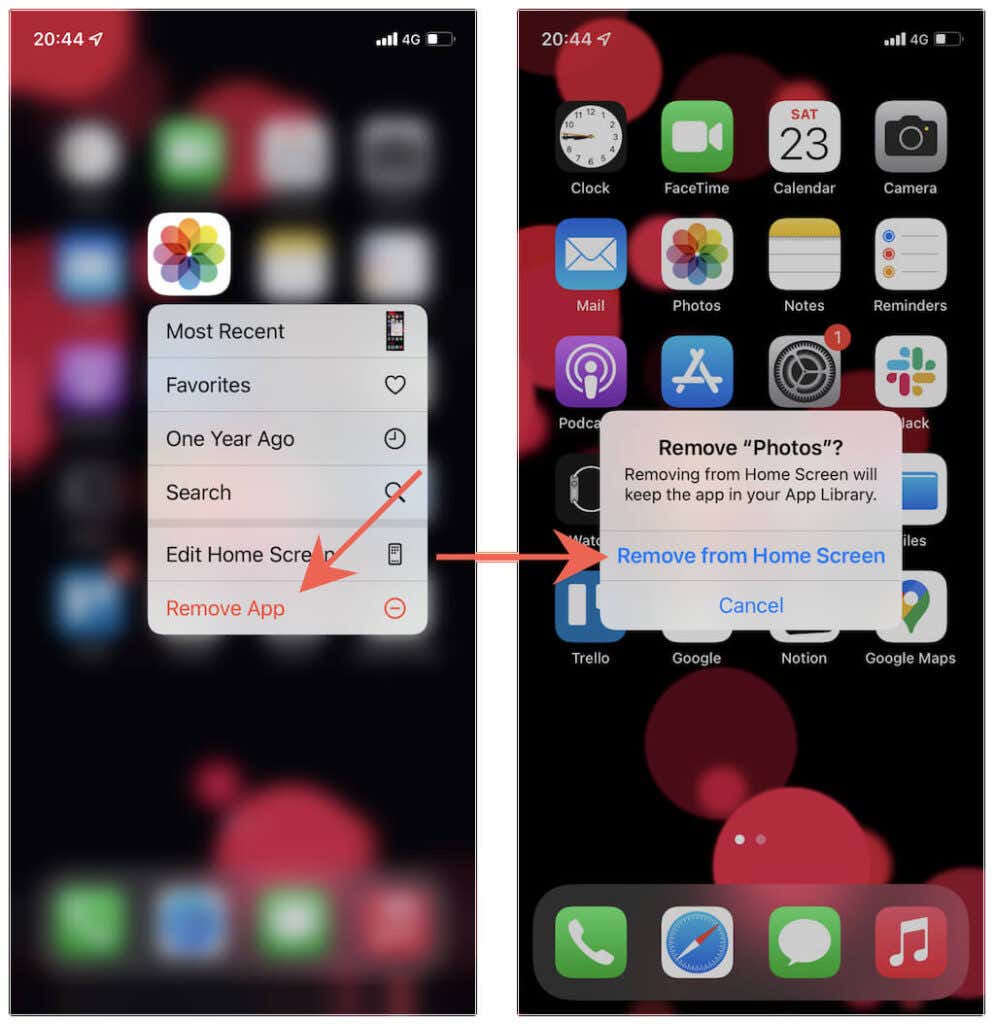
If you want to access the Photos app, open the App Library, expand the Photos & Video category, and tap Photos. To add Photos back to the Home Screen, long-press the Photos icon and tap Add to Home Screen.
Remove Photos App Widget
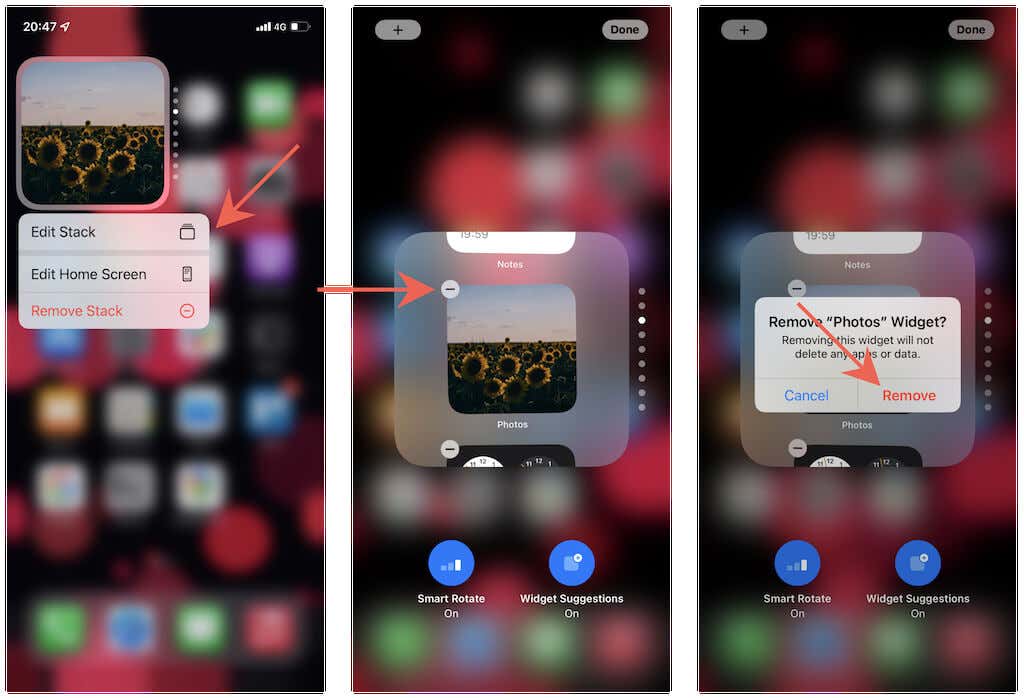
If you have a Photos app widget on your iPhone’s Home Screen, you can remove it by long-pressing and selecting Remove Widget. However, if it’s part of a widget stack:
1. Long-press the widget stack and tap Edit Widget.
2. Locate the Photos widget and tap the Delete icon.
3. Tap Remove.
Hide Photos in Search Results
To stop the Photos app and your images from showing up in search results:
1. Open Settings.
2. Scroll down and tap Photos.
3. Tap Siri & Search.
4. Disable the switch next to Show App in Search.
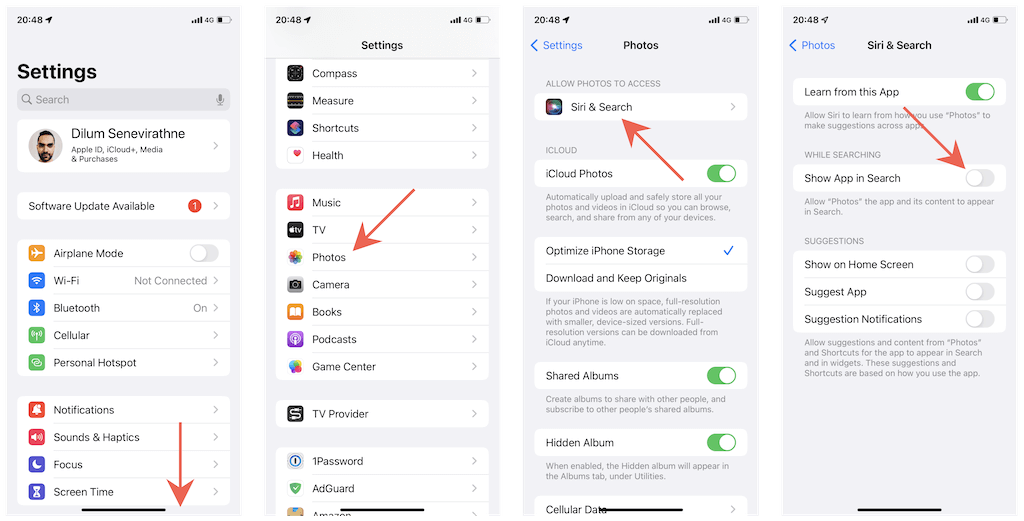
Optionally, you can turn off photo-based Siri recommendations by disabling the Show on Home Screen, Suggest App, and Suggestion Notifications switches.
5. Use a Third-Party Photo Locker
Third-party photo lockers offer the best way to hide photos on the iPhone with less hassle. Performing a cursory search on the App Store will reveal multiple apps offering photo locking capabilities, but here are a couple of top picks.
Warning: Always check the privacy labels on the App Store before providing third-party apps with permissions to your photo library.
Private Photo Vault – Pic Safe
Private Photo Vault starts by requiring you to set up a dedicated passcode so that only you can access it. You can then move images and videos from your photo library, request the app to delete the originals soon after, and organize the hidden items into separate albums.
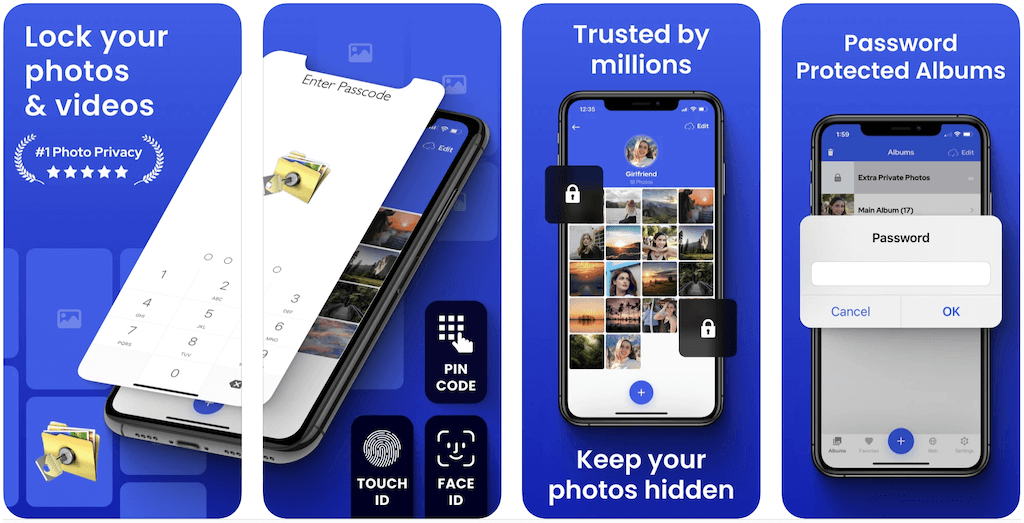
Private Photo Vault also provides a built-in camera that lets you shoot and save stuff directly to the app itself, helping you avoid the trouble of moving them. It even features a built-in browser that automatically hides any photos you download. If you’re willing to shell out $6.99/month or $39.99/year, you can sync your images across devices using the built-in Cloud Vault feature.
Secret Photo Vault – Keepsafe
Secret Photo Vault works similar to Private Photo Vault, allowing you to add, organize, and lock photos behind a secure passcode. It also has a built-in camera to shoot and hide stuff directly into the app, although it lacks a private web browser.
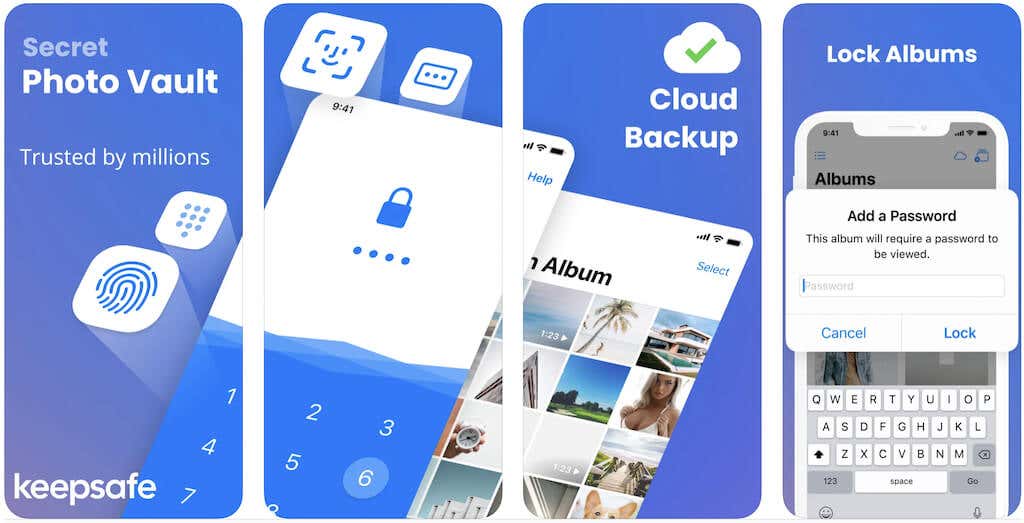
You can subscribe to Secret Photo Vault at $9.99/month or $23.99/year to remove advertisements and unlock additional features such as cloud-based backups and cross-device syncing.
Stay Private
Hiding photos directly within your iPhone’s Photos app is quick and easy. But if you feel it’s inadequate, you might want to dig into the other methods above or consider investing in a third-party photo locker to protect your privacy. Additionally, learn what you can do to stop people from accessing the contents in other apps on your iPhone.


